
Overview
This article explains how to use the Pay@Table Till Function Button on SmartPOS Mobile.
Prerequisites
Minimum Bepoz version of 4.7.3.3
Minimum .NET version of 4.8
The applicable Operator Privileges will need to be enabled:
Operator Maintenance 'General' Tab
System Setup: "Maintain Till Function Maps" flag
Venue Maintenance "Main" Tab (General Settings)
All “System Setup” Flags
Pay@Table on SmartPOS Mobile Transactions
After configuring the Till Function button for Pay@Table for SmartPOS Mobile transactions, the operator should be able to pay for the transactions via Pay@Table
When a retail transaction is created at SmartPOS Mobile by adding few sample products, the operator can finalize the payment via Pay@Table by following the below steps:
Click on Payment till function button on SmartPOS Mobile and this will change the panel which displays the Pay@Table till function button
Click on Pay@Table till function button to initiate the payment
When clicked on Pay@Table till function button, a new screen is displayed which displays the list of items, order total and two buttons as: Split and Confirm (the order total)
The operator can perform the following:
Select a single item and pay for it
When a single item is selected to pay, the item is highlighted and the pay amount is displayed for the selected item
The selection can be reverted by clicking on the item again and it then displays the order total on the Pay@Table screen
Select multiple items and pay for it
When multiple items are selected to pay, the selected items are highlighted and the amount to be paid is also updated on the Pay@Table screen
It displays the no.of items selected next to the pay amount
Pay the complete order
The order can be paid completely without selecting any particular item

The operator can split the payment by clicking on the split button on the Pay@Table screen which then displays two ways to split the payment as:
By Amount
When the operator selects to split the payment method by amount, a number pad is displayed to enter the amount to pay
A confirm message is displayed to pay for the entered amount
When click OK, it displays if the customer wants to add the tip. The customer/operator can select the precalculated tip % displayed on the screen or can select to enter the custom amount or can skip the step to add tip
A confirm message is displayed which displays the updated order total which includes the tip amount (if the tip is added)
When click OK, a warning message is displayed as 'You have not finalized this sale. Balance owing :'. When click OK, it goes back to the Pay@Table home screen which displays the balance amount to be paid. The paid value and the total values are updated accordingly
Once the transaction is completed, a message is displayed to return the terminal to the staff

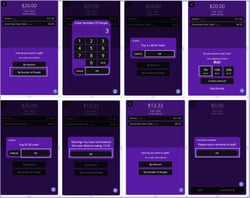
By No.of people
When the operator selects to split the payment method by no.of people, a number pad is displayed to enter the number of people
A confirm message is displayed which displays the no.of people entered and the amount to be paid
When click OK, it displays the updated payment total to be paid by first person and if the customer wants to add the tip. The customer/operator can select the precalculated tip % displayed on the screen or can select to enter the custom amount or can skip the step to add tip
A confirm message is displayed which displays the amount to be paid by first person which includes the tip amount (if the tip is added)
After the first person completes payment, the user is prompted back to back to complete payments by the amount of people entered until the balance is complete.
Once all transactions are completed, a message is displayed to return the terminal to the staff
The operator can click on confirm button to pay the order without splitting the payment
The customer/operator can select the precalculated tip % displayed on the screen or can select to enter the custom amount or can skip the step to add tip
A confirm message is displayed which displays the amount to be paid by first person which includes the tip amount (if the tip is added)
Once the transaction is completed, a message is displayed to return the terminal to the staff
SmartPOS Mobile App Setup Articles
To complete the full & correct setup of the SmartPOS Mobile App, the Operator must follow & execute these articles provided in the given chronological order:
SmartPOS Mobile Workstation Setup
SmartPOS Mobile Venue Maintenance Setup
SmartPOS Mobile Till Function Map Setup Guide
SmartAPI Host Usage
SmartPOS Mobile App Configuration Screen