- INTERNAL - Bepoz Help Guides
- SmartPOS | Mobile App
- SmartPOS Mobile BackOffice Setup
-
End-User | Products & SmartPOS
-
End-User | Stock Control
-
End-User | Table Service and Kitchen Operations
-
End-User | Pricing, Marketing, Promotions & Accounts
- Prize Promotions
- Points, Points Profiles and Loyalty
- Product Promotions
- Repricing & Discounts in SmartPOS
- Vouchers
- Account Till Functions
- Pricing, Price Numbers and Price Modes
- Raffles & Draws
- Marketing Reports
- Accounts and Account Profiles
- Rewards
- SmartPOS Account Functions
- Troubleshooting
- Product Labels
- Packing Slips
-
End-User | System Setup & Admin
-
End-User | Reporting, Data Analysis & Security
-
End-User | Membership & Scheduled Billing
-
End-User | Operators, Operator Permissions & Clocking
-
Interfaces | Data Send Interfaces
-
Interfaces | EFTPOS & Payments
- NZ EFTPOS Interfaces
- Linkly (Formerly PC-EFTPOS)
- Adyen
- Tyro
- ANZ BladePay
- Stripe
- Windcave (Formerly Payment Express)
- Albert EFTPOS
- Westpac Presto (Formerly Assembly Payments)
- Unicard
- Manager Cards External Payment
- Pocket Voucher
- OneTab
- Clipp
- eConnect-eConduit
- Verifone
- AXEPT
- DPS
- Liven
- Singapore eWallet
- Mercury Payments TRANSENTRY
- Ingenico
- Quest
- Oolio - wPay
-
Interfaces | SMS & Messaging
-
Interfaces | Product, Pricing, Marketing & Promotions
- Metcash Loyalty
- Range Servant
- ILG Pricebook & Promotions
- Oolio Order Manager Integration
- Ubiquiti
- Product Level Blocking
- BidFood Integration
- LMG
- Metcash/IBA E-Commerce Marketplace
- McWilliams
- Thirsty Camel Hump Club
- LMG Loyalty (Zen Global)
- Doshii Integration
- Impact Data
- Marsello
- IBA Data Import
- Materials Control
- Last Yard
- Bepoz Standard Transaction Import
-
Interfaces | Printing & KDS
-
Interfaces | Reservation & Bookings
-
Interfaces | Database, Reporting, ERP & BI
-
Interfaces | CALink, Accounts & Gaming
- EBET Interface
- Clubs Online Interface
- Konami Interface
- WIN Gaming Interface
- Aristocrat Interface
- Bally Interface
- WorldSmart's SmartRetail Loyalty
- Flexinet & Flexinet SP Interfaces
- Aura Interface
- MiClub Interface
- Max Gaming Interface
- Utopia Gaming Interface
- Compass Interface
- IGT & IGT Casino Interface
- MGT Gaming Interface
- System Express
- Aristocrat nConnect Interface
- GCS Interface
- Maxetag Interface
- Dacom 5000E Interface
- InnTouch Interface
- Generic & Misc. CALink
-
Interfaces | Miscellaneous Interfaces/Integrations
-
Interfaces | Property & Room Management
-
Interfaces | Online Ordering & Delivery
-
Interfaces | Purchasing, Accounting & Supplier Comms
-
SmartPOS | Mobile App
-
SmartPDE | SmartPDE 32
-
SmartPDE | Denso PDE
-
SmartPDE | SmartPDE Mobile App
-
MyPlace
-
MyPlace | myPLACE Lite
-
MyPlace | Backpanel User Guides
- Bepoz Price Promotions
- What's on, Events and tickets
- Staff
- System Settings | Operational Settings
- Vouchers & Gift Certificates
- Member Onboarding
- Members and memberships
- System Settings | System Setup
- Reports and Reporting
- Actions
- Offers | Promotions
- Messaging & Notifications
- System Settings | App Config
- Surveys
- Games
- User Feedback
- Stamp Cards
-
MyPlace | Integrations
-
MyPlace | FAQ's & How-2's
-
MyPlace | Release Notes
-
YourOrder
-
YourOrders | Backpanel User Guides
-
YourOrders | YourOrder Kiosk User Guide
-
YourOrders | Merchant App User Guide
-
WebAddons
-
Installation / System Setup Guides
- SmartPOS Mobile App | Setup
- SmartPOS Mobile App | SmartAPI Host Setup
- SmartPOS Mobile App | BackOffice Setup
- SmartPOS Mobile App | Pay@Table setup
- SmartKDS Setup 4.7.2.7 +
- SmartKDS Setup 4.6.x
- SQL Installations
- Server / BackOffice Installation
- New Database Creation
- Multivenue Setup & Config.
- SmartPOS
- SmartPDE
- Player Elite Interface | Rest API
- Interface Setups
- Import
- KDSLink
- Snapshots
- Custom Interface Setups
-
HOW-2
- Product Maintenance
- Sales and Transaction Reporting
- SmartPOS General
- Printing and Printing Profiles
- SQL
- Repricing & Discounts
- Stock Control
- Membership
- Accounts and Account Profiles
- Miscellaneous
- Scheduled Jobs Setups
- Backoffice General
- Purchasing and Receiving
- Database.exe
- EFTPOS
- System Setup
- Custom Support Tools
-
Troubleshooting
-
Hardware
2 | SmartPOS Mobile Workstation Setup
The creation of a SmartPOS Mobile Workstation within BackOffice is the first step required to configure and start using SmartPOS Mobile. It provides connectivity between the SmartPOS Mobile app and the configured workstation in Backoffice.
The creation of a SmartPOS Mobile Workstation within BackOffice is the first step required to configure and start using SmartPOS Mobile.
It provides connectivity between the SmartPOS Mobile app and the configured workstation in Backoffice.
Prerequisites
- Minimum Bepoz version of 4.7.3.x
- Minimum .NET version of 4.8
- The applicable Operator Privileges will need to be enabled:
-
Operator Maintenance 'General' Tab - General Settings: "Use BackOffice" Flag
- System Setup: "Access Venue, Stores & Tills" Flag
- System Setup: "Maintain Venue, Stores & Tills" Flag
Adding a SmartPOS Workstation
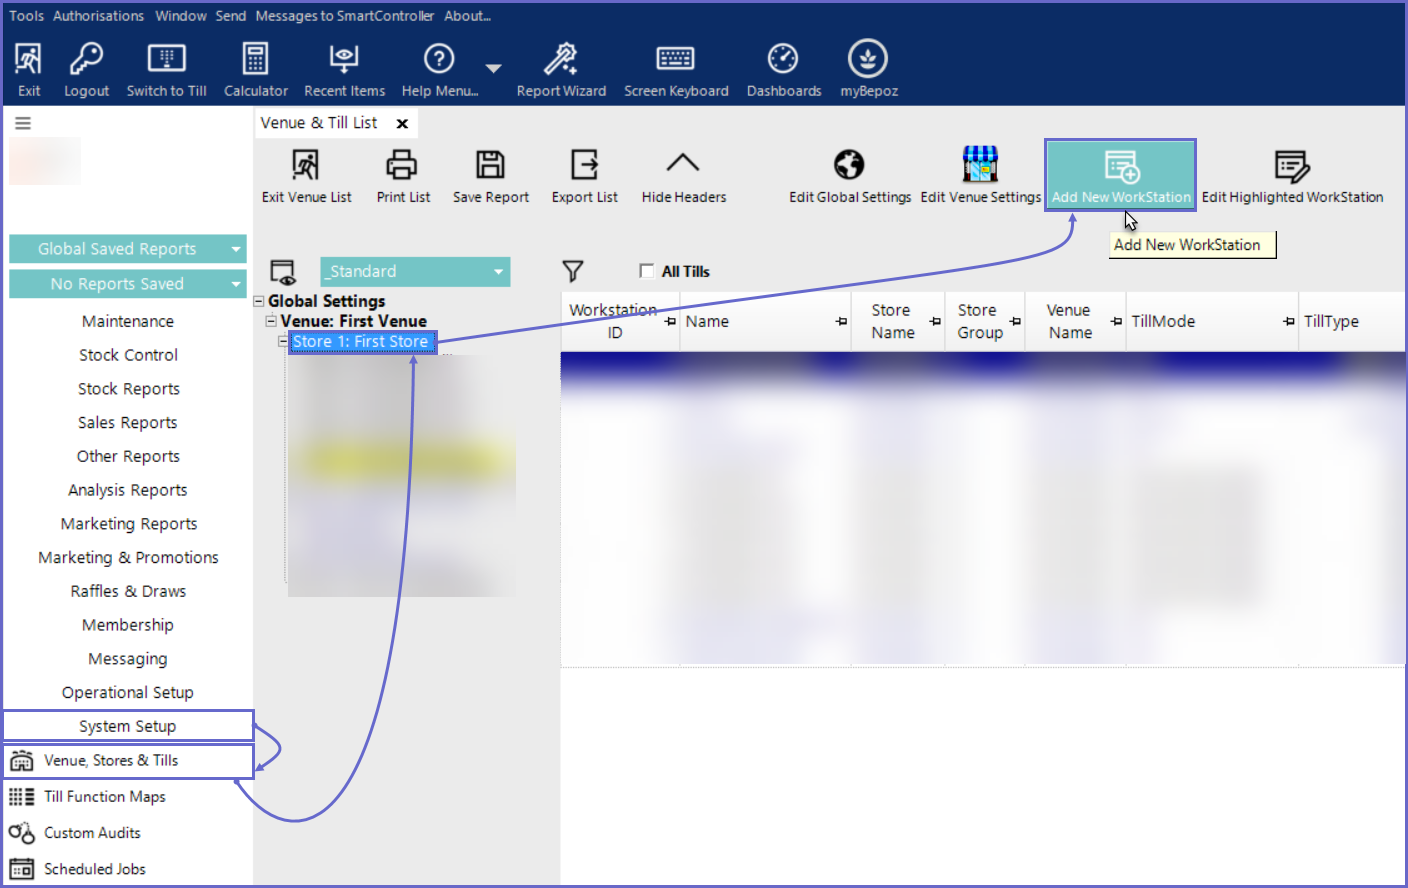
- First, navigate to System Setup component in the sidebar menu and select Venue, Stores & Tills to open the desired Store under which you want to create a New Workstation for SmartPOS Mobile
- Click on 'Add New Workstation' button at the top of the tab

- When prompted select 'Blank Workstation' and enter a Name for your New Workstation and the Workstation Maintenance window will open
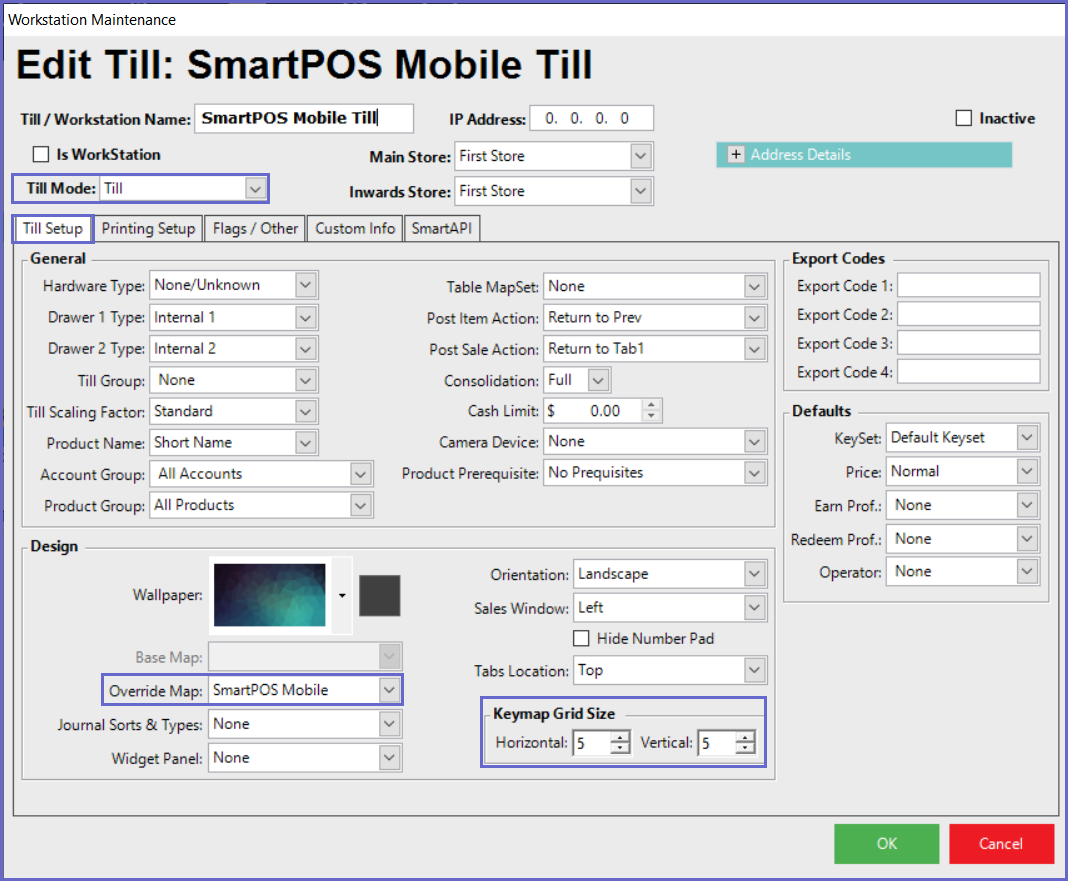
- There are several credentials that need to be configured, including the following:
- Till Mode: Till
- Till / Workstation Name: Enter a relevant name
- Within the Till Setup tab, the following details must be updated:
- KeyMap Grid Size: 5x5
- Note: This is the recommended keymap size for the Oolio / Adyen EFTPOS device
- Override Map: The configured Till Function Map specifically for SmartPOS Mobile
- KeySet: The configured KeySet used for SmartPOS Mobile

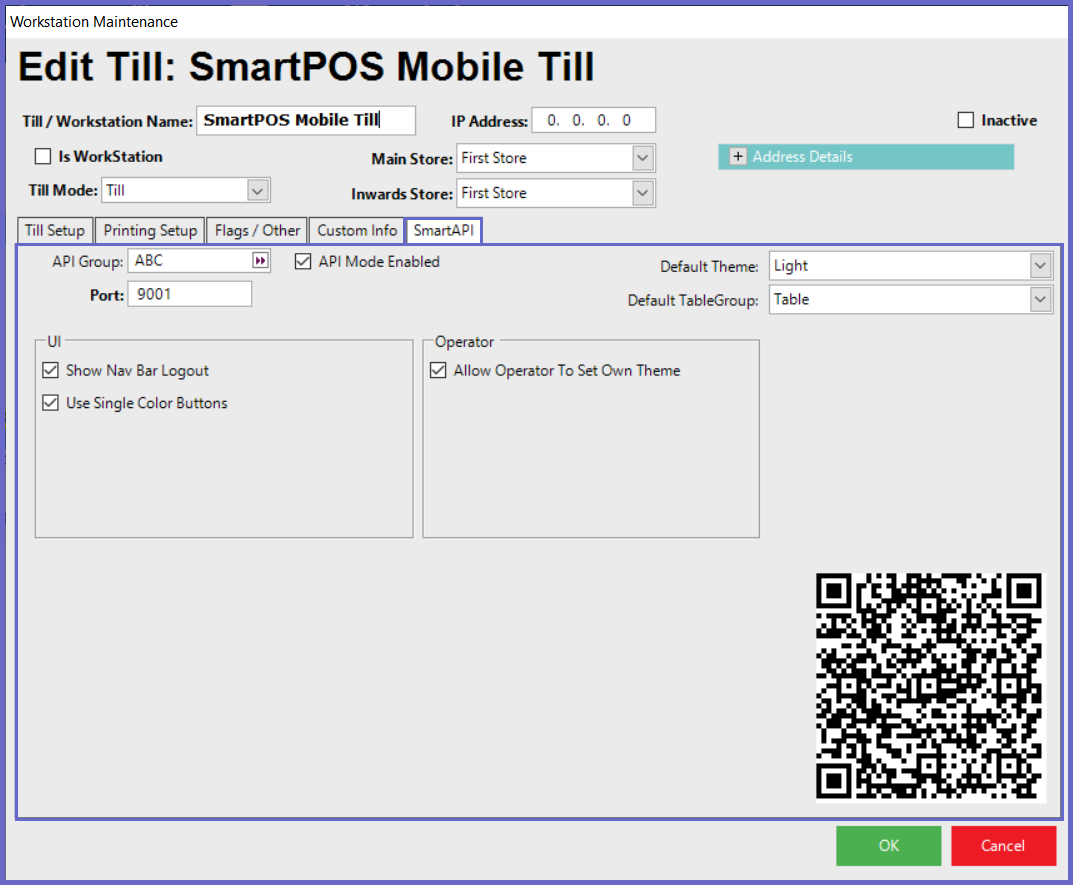
- Within the SmartAPI tab, the following details must be updated:
- API Group: If utilised, this will group each workstation in an API group, which allows the user to start multiple instances of SmartAPI Host at the same time
- API Mode Enabled: If enabled, this flag allows communication between SmartController & SmartAPI devices
- Port Number: The Port number used must be an open port and not in use by any other process
- A QR code is auto generated on the screen based on the port number entered
- The QR code is used to configure the SmartPOS Mobile app
- Note: Each port number used for a workstation must have the relevant firewall rules configured to ensure a successful connection to SmartPOS mobile
- Default Theme: Sets the default theme for SmartPOS Mobile
- Default TableGroup: Sets the default tablegroup for SmartPOS Mobile
- Show Nav Bar Logout: If enabled, the logout button will be visible in SmartPOS mobile which allows the Operator to Logout of the POS
- Use Single Color Buttons: If enabled, the keymap colours are overridden and will be specific to the chosen SmartPOS Mobile theme
- Allow Operator To Set Own Theme: If enabled, the operator can set their own theme within SmartPOS Mobile

- Repeat these steps for all required SmartPOS Mobile Workstations
SmartPOS Mobile App Setup Articles
- To complete the full & correct setup of the SmartPOS Mobile App, the Operator must follow & execute these articles provided in the given chronological order:
-
SmartPOS Mobile Workstation Setup -
SmartPOS Mobile Venue Maintenance Setup
-
SmartPOS Mobile Till Function Map Setup Guide -
SmartAPI Host Usage -
SmartPOS Mobile App Configuration Screen
