- INTERNAL - Bepoz Help Guides
- End-User | System Setup & Admin
- SmartPOS Till Modes & Extensions
-
End-User | Products & SmartPOS
-
End-User | Stock Control
-
End-User | Table Service and Kitchen Operations
-
End-User | Pricing, Marketing, Promotions & Accounts
- Prize Promotions
- Points, Points Profiles and Loyalty
- Product Promotions
- Repricing & Discounts in SmartPOS
- Vouchers
- Account Till Functions
- Pricing, Price Numbers and Price Modes
- Raffles & Draws
- Marketing Reports
- Accounts and Account Profiles
- Rewards
- SmartPOS Account Functions
- Troubleshooting
- Product Labels
- Packing Slips
-
End-User | System Setup & Admin
-
End-User | Reporting, Data Analysis & Security
-
End-User | Membership & Scheduled Billing
-
End-User | Operators, Operator Permissions & Clocking
-
Interfaces | Data Send Interfaces
-
Interfaces | EFTPOS & Payments
- NZ EFTPOS Interfaces
- Linkly (Formerly PC-EFTPOS)
- Adyen
- Tyro
- ANZ BladePay
- Stripe
- Windcave (Formerly Payment Express)
- Albert EFTPOS
- Westpac Presto (Formerly Assembly Payments)
- Unicard
- Manager Cards External Payment
- Pocket Voucher
- OneTab
- Clipp
- eConnect-eConduit
- Verifone
- AXEPT
- DPS
- Liven
- Singapore eWallet
- Mercury Payments TRANSENTRY
- Ingenico
- Quest
- Oolio - wPay
-
Interfaces | SMS & Messaging
-
Interfaces | Product, Pricing, Marketing & Promotions
- Metcash Loyalty
- Range Servant
- ILG Pricebook & Promotions
- Oolio Order Manager Integration
- Ubiquiti
- Product Level Blocking
- BidFood Integration
- LMG
- Metcash/IBA E-Commerce Marketplace
- McWilliams
- Thirsty Camel Hump Club
- LMG Loyalty (Zen Global)
- Doshii Integration
- Impact Data
- Marsello
- IBA Data Import
- Materials Control
- Last Yard
- Bepoz Standard Transaction Import
-
Interfaces | Printing & KDS
-
Interfaces | Reservation & Bookings
-
Interfaces | Database, Reporting, ERP & BI
-
Interfaces | CALink, Accounts & Gaming
- EBET Interface
- Clubs Online Interface
- Konami Interface
- WIN Gaming Interface
- Aristocrat Interface
- Bally Interface
- WorldSmart's SmartRetail Loyalty
- Flexinet & Flexinet SP Interfaces
- Aura Interface
- MiClub Interface
- Max Gaming Interface
- Utopia Gaming Interface
- Compass Interface
- IGT & IGT Casino Interface
- MGT Gaming Interface
- System Express
- Aristocrat nConnect Interface
- GCS Interface
- Maxetag Interface
- Dacom 5000E Interface
- InnTouch Interface
- Generic & Misc. CALink
-
Interfaces | Miscellaneous Interfaces/Integrations
-
Interfaces | Property & Room Management
-
Interfaces | Online Ordering & Delivery
-
Interfaces | Purchasing, Accounting & Supplier Comms
-
SmartPOS | Mobile App
-
SmartPDE | SmartPDE 32
-
SmartPDE | Denso PDE
-
SmartPDE | SmartPDE Mobile App
-
MyPlace
-
MyPlace | myPLACE Lite
-
MyPlace | Backpanel User Guides
- Bepoz Price Promotions
- What's on, Events and tickets
- Staff
- System Settings | Operational Settings
- Vouchers & Gift Certificates
- Member Onboarding
- Members and memberships
- System Settings | System Setup
- Reports and Reporting
- Actions
- Offers | Promotions
- Messaging & Notifications
- System Settings | App Config
- Surveys
- Games
- User Feedback
- Stamp Cards
-
MyPlace | Integrations
-
MyPlace | FAQ's & How-2's
-
MyPlace | Release Notes
-
YourOrder
-
YourOrders | Backpanel User Guides
-
YourOrders | YourOrder Kiosk User Guide
-
YourOrders | Merchant App User Guide
-
WebAddons
-
Installation / System Setup Guides
- SmartPOS Mobile App | Setup
- SmartPOS Mobile App | SmartAPI Host Setup
- SmartPOS Mobile App | BackOffice Setup
- SmartPOS Mobile App | Pay@Table setup
- SmartKDS Setup 4.7.2.7 +
- SmartKDS Setup 4.6.x
- SQL Installations
- Server / BackOffice Installation
- New Database Creation
- Multivenue Setup & Config.
- SmartPOS
- SmartPDE
- Player Elite Interface | Rest API
- Interface Setups
- Import
- KDSLink
- Snapshots
- Custom Interface Setups
-
HOW-2
- Product Maintenance
- Sales and Transaction Reporting
- SmartPOS General
- Printing and Printing Profiles
- SQL
- Repricing & Discounts
- Stock Control
- Membership
- Accounts and Account Profiles
- Miscellaneous
- Scheduled Jobs Setups
- Backoffice General
- Purchasing and Receiving
- Database.exe
- EFTPOS
- System Setup
- Custom Support Tools
-
Troubleshooting
-
Hardware
6 | Stock Donation Mode
Learn how to covers Stock Donation Mode and the Till Extension required to setup Stock Donations.
This article covers Stock Donation Mode and the Till Extension required to setup Stock Donations.
Stock Donation Mode is a simple one-touch way to add inventory to the system from donations and print out a label. This will be done from dedicated terminals for the process of processing donations which means that the operators can adjust the till however they want and don’t have to worry about how it will interfere with sales. This mode is useful for the venues that receive Donated Stock.
Till Extension Step-by-step Guide
- A device needs to be added to the till in BackOffice that will accept donation stock
- From the bepoz menu tree select System Setup> Venue, Stores & Tills to access the workstations and tills
- On the left of the Venue, Stores & Till window, Select the till from the Venue, Stores & Till tree which is to be added to the till extension donations
- On top of the Venue, Stores & Till window; Select Add New Device
- An option window prompt will allow the operators to select a device to copy from; select blank device
- A new device window will prompt
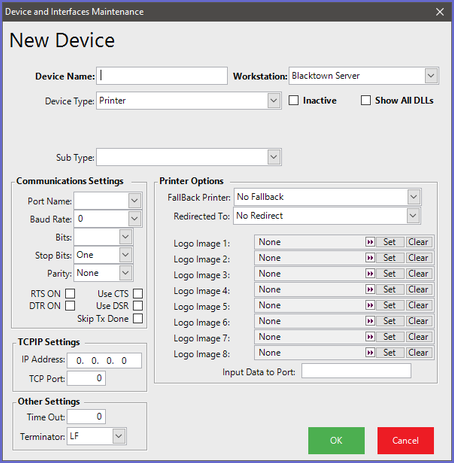
- In the Device Name enter the name you wish to call the device. (e.g.Donations Till 1)
- Set the Device Type too 'Till Extension'
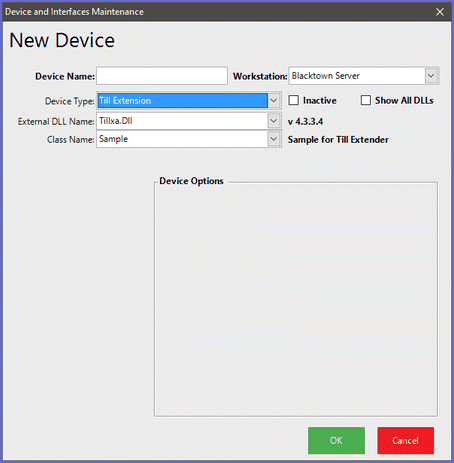
- Set the 'External Dll Name' to 'Tillx_donations.DLL'
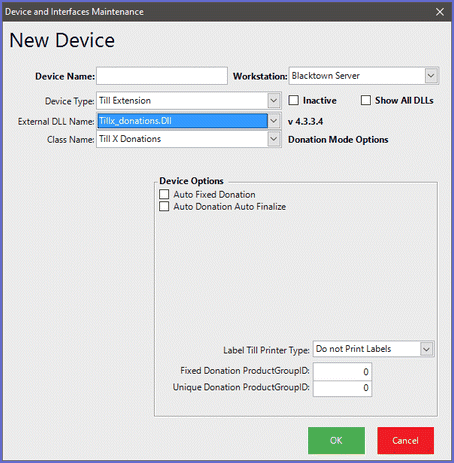
- The Class name should be set too 'Till X Donations' once the External Dll Name has been selected as 'Tillx_donattions.dll'
- When setting the Device Options, depending on what options have been flagged is how the till will perform
Auto Donation Mode
- When the Flag is turned on, the device will allow for the till to be a donations till; Operators can not perform a normal sale when the device is in this mode
- At the start of each transaction, each item selected from the till will be treated as a Stock Donation transaction type
- The stock system will display as a manual adjustment when a donation has performed at the till
- Turn the flag On for the till to perform donations
Auto Donation Auto Finalise
- When the flag is turned On for the device, the transaction will be finalised after selecting one product from the till
- Turn the flag On to prompt the till to finalise the donation on one button press
Label Till Printer type
- Select a label till printer type from the drop-down selection
- When the type has been selected, Operators will then need to assign the Label printer to the printer type in the Till settings
Fixed Donation Product GroupID
- Set the product group ID of the base product group that the donation products are under
- When a product group number is assigned in the settings, the operator will only be able to access the donation products within the product group
Unique Donation Product GroupID
- Set the product group ID of the base product group that the Unique donation products are under
- Operators will need to set the Product Group settings for Unique donations to copy from
- When the operators assign a product group number in the settings, they will only be able to access the Unique donation products within the product group
- The Fixed Donations field and the Unique Donations field must be set with a product group ID, if both fields a set to zero the 'Auto Fixed Donations' and the 'Auto Donations Auto Finalise
Printer Formats
- With EPL label printers, before the operators can assign the label Printer to the till they will need to create a Printer format for the label printer
- In Backoffice from the tree menu, Operators will need to select Operational setup > Printer Formats
- From the Printer format window Select the button called 'Add Printer Format' which will open a prompt window
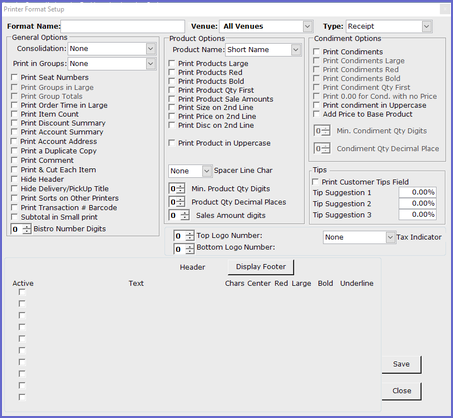
- Set the 'Type' as EPL Printer which will change the screen as shown below
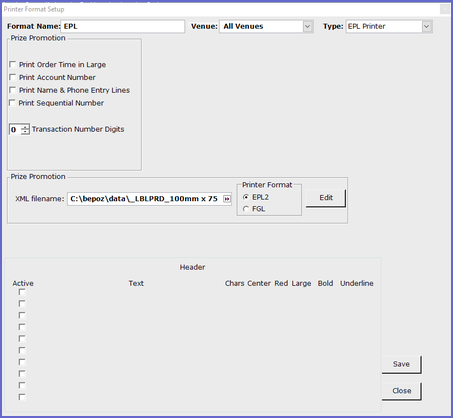
- Set the LBLPRD_*.Xml file Path Name. e.g.C:\bepoz\data\_LBLPRD_100mm x 75mm.XML
- Select save to save the Printer Format
Assigning the label printer to the Till
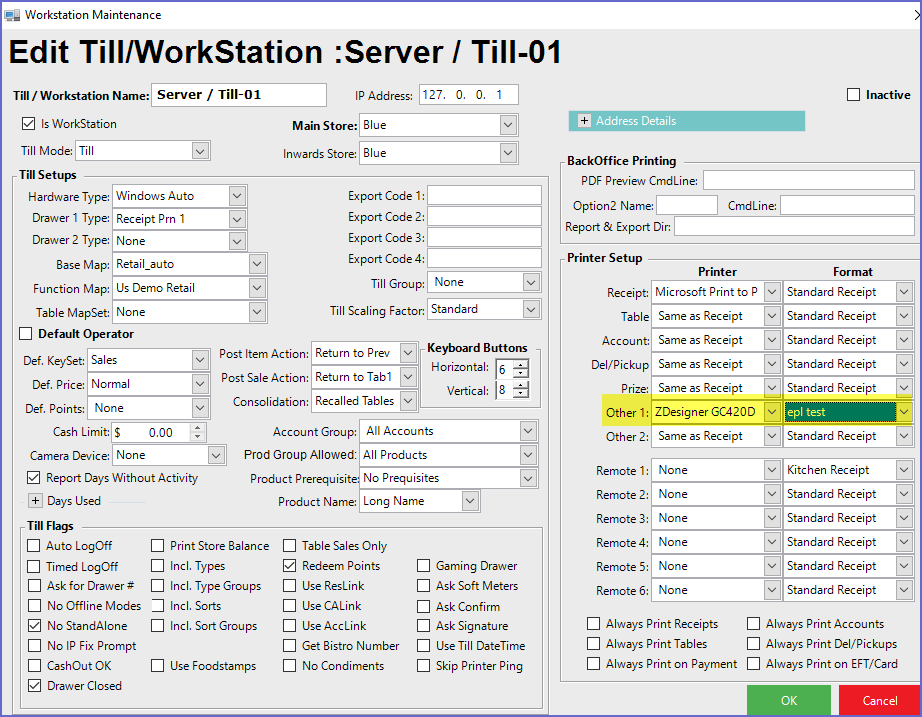
- Each SmartPOS must have a Printer Type setup for the Label printer; any of the types can be used i.e. Receipt, Table, Account, Other, Remote, etc..
- With the selected Type, set the Printer to an EPL printer device and set the format to a valid EPL printer format
- Below is an example of the label printer assigned at the till
- When adding the till extension donations to a till and you have the 'Auto Donations Auto Finalized' turned On, each sale performed at the till will be treated as a donation transaction
Till Functions Step-by-step Guide
- There are two buttons under 'Stock Functions' on the function map that can be setup to be used with donations
- Donation Transaction
- Donate Unique Product
- These two functions buttons use a till, which allows donations to be added at the till without the till extension device added to the till
Unique Donations Product
- To set up the Function Buttons, Operators will need to edit the existing till function map
- Within Backoffice, Operators will need to select from the tree menu System setup> Function Maps
- Select the till function map from the function list
- On top of the window, a button can be seen called 'Edit Highlighted Function Map'; click on the button to Edit function map
- The Function Map will appear
- Select a blank button and select the function 'Stock & Product'
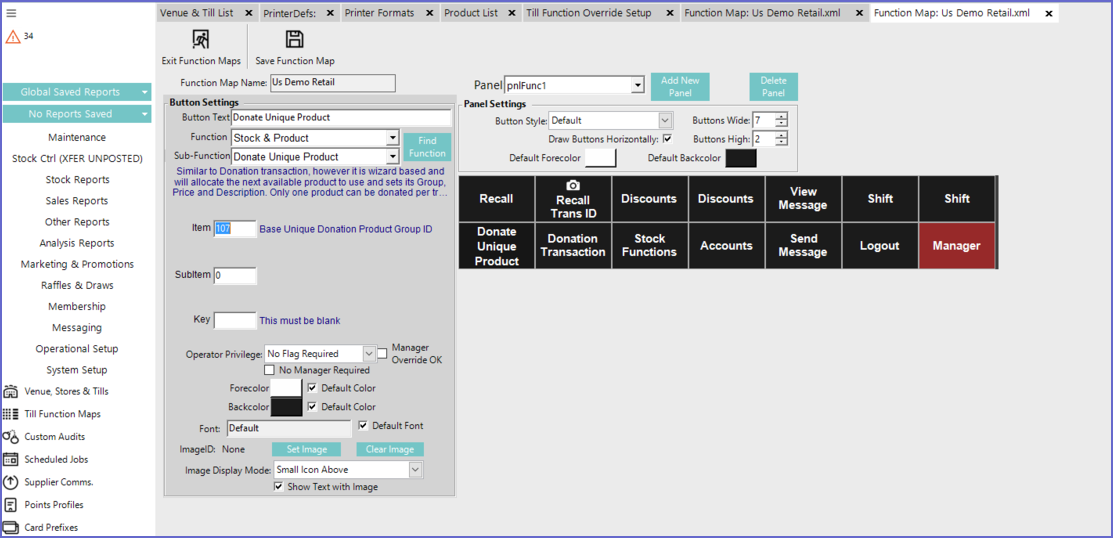
- Set the sub-function to 'Donate Unique Product'
- Set the Product Group ID with the Group for the Unique donations. this is the Product Group that the donation will be added too.
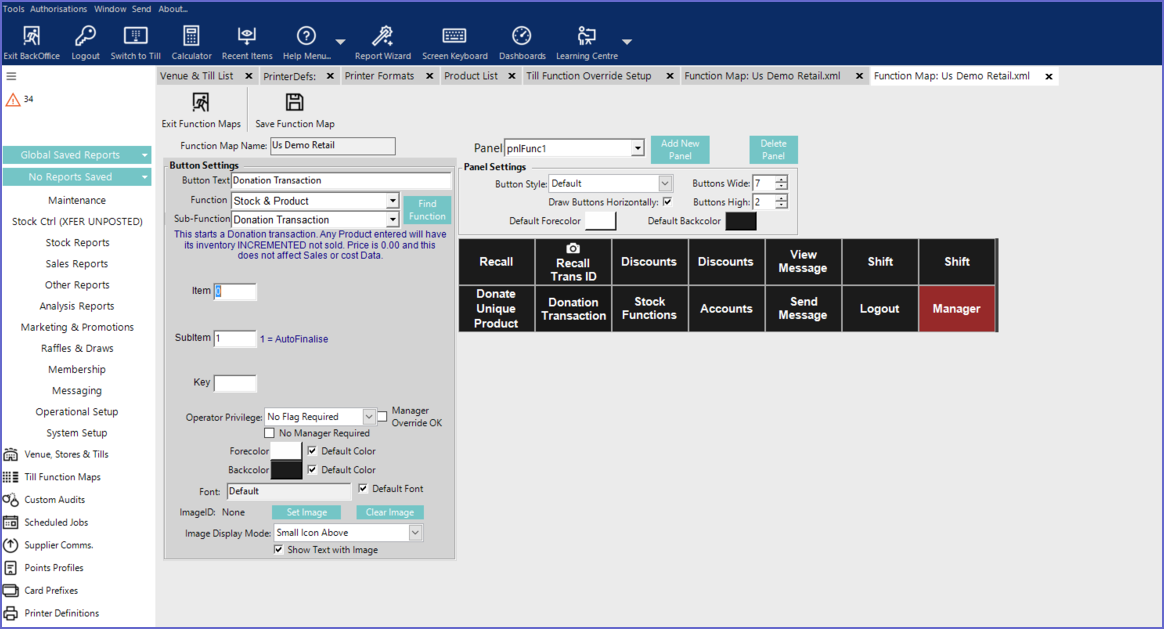
- Below is an example of the Unique Donation Product button
Donations Transaction
To set up the Function Buttons, Operators will need to edit the existing till function map
- Within Backoffice you will need to select from the tree menu System setup> Function Maps
- Select the till function map from the function list
- On top of the window, you will see a button called 'Edit Highlighted Function Map' click on the button to Edit function map
- The Function Map will appear
- Select a blank button and select the function 'Stock & Product'
- Set the Sub Function to 'Donations Transaction'
- The 'Item' is how you want the transaction to behave. 1= Auto Finalize 0= Manual finalize, you will need to select the cash button to finalise the donation
- Below is an example of the Donation Transaction button
