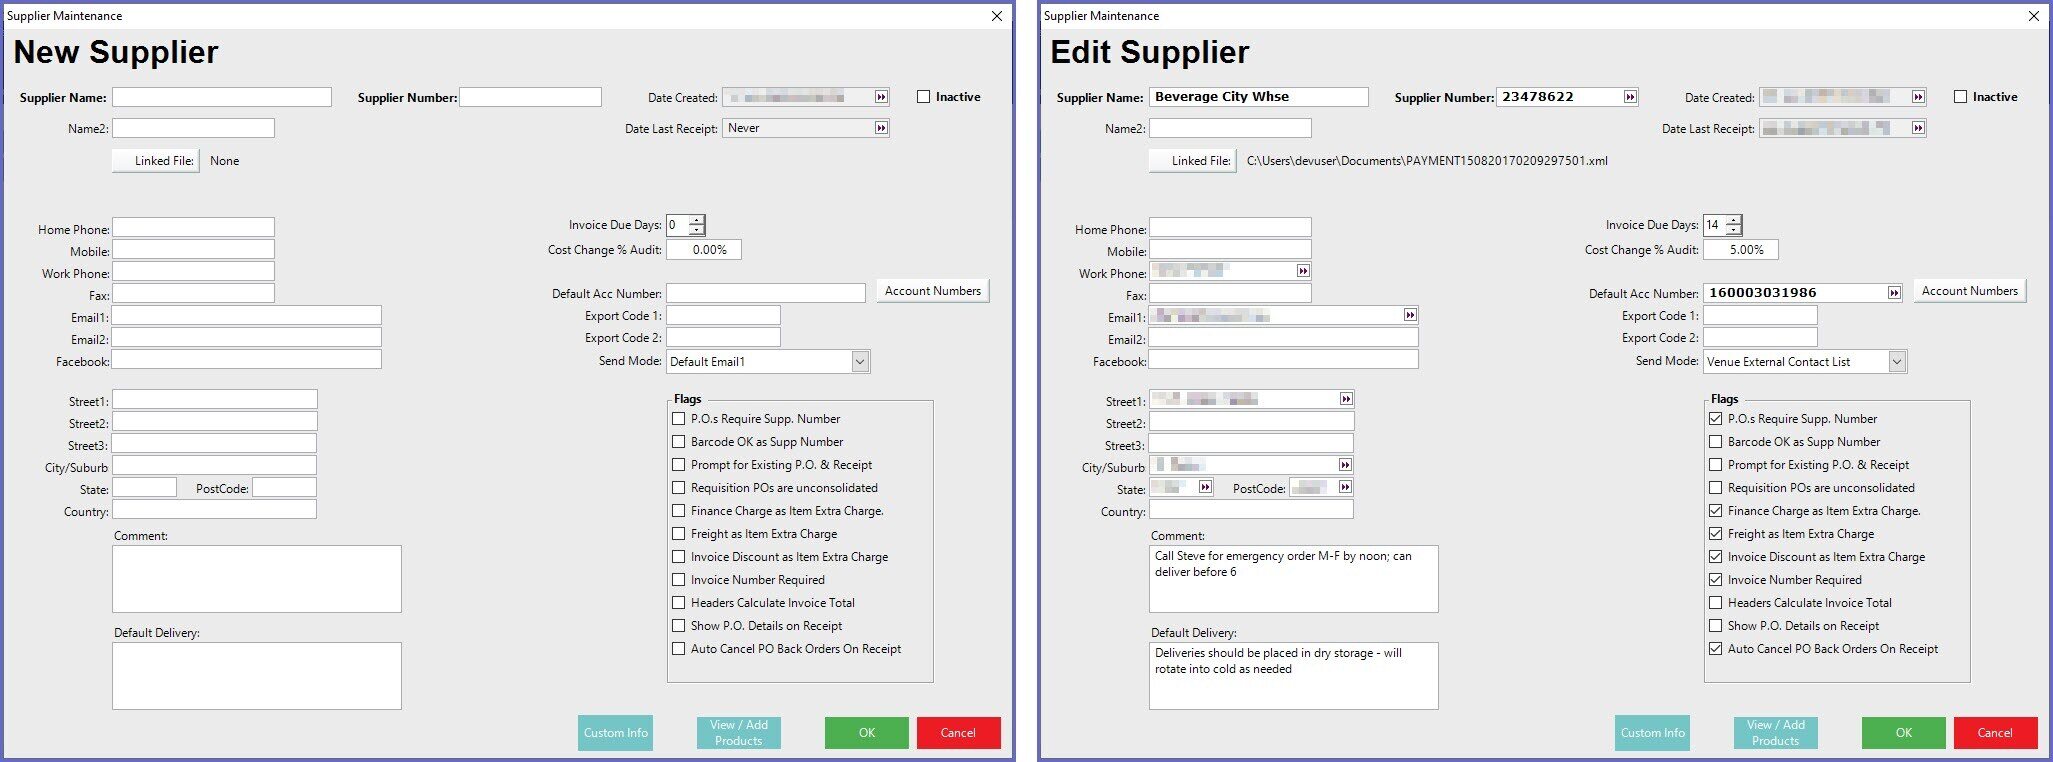
Configuration Option
|
Description & Information
|
| Supplier Name |
- The is the name of the Supplier
|
| Supplier Number |
- This is an optional field; a number entered here will be used to reference the Supplier
- This is only mandatory when Exporting to an External Accounting System
|
| Date Created |
- This is the date the Supplier was created
|
| Date Last Receipt |
- This is the date and time of the last Receipt Posted for this Supplier
|
| Inactive |
- As with Products and many other BackOffice components, Suppliers cannot be deleted from Bepoz
- Marking as Inactive will deem the Supplier dormant and hide it from view unless the Inactive flag is checked in the Supplier List
|
| Linked File |
- This is optional, but can be used to attach a file to the Supplier; it is a way of keeping information together and accessible
|
| Contact Info & Address Details |
- These include street address, phone numbers, fax, and email addresses
- Email1 & Email2 are used for Supplier Communications via Bepoz Messaging
|
| Comment |
- This is an optional text field allowing for any Comment to be stored for internal reference
|
| Default Delivery |
- This is an additional optional text field which is meant to be used to note any standard delivery information
|
| Invoice Due Days |
- Enter the number of days from Receiving an invoice to when Payment is due to the Supplier
- Filling this in will enable the due date to be automatically generated on Receipts
|
| Cost Change % Audit |
- If the Cost Price of a Product changes by the nominated percentage entered here, an Audit will automatically be generated
|
| Default Acc Number |
- This is the Account Number that is given by this Supplier and will be printed on Purchase Orders
- The Account Numbers button to the right allows for adding multiple Account Numbers - often used in a Multi-Venue Organization where each Venue may need a separate, unique Account Number
|
| Export Codes |
- These are used when Exporting to an External Accounting System
|
| Send Mode |
- This drop-down allows for a default option to be selected which will determine the Email Address/es that will be used when sending Supplier Communications from Bepoz
- This enables an Organisation to send Supplier Communications to multiple email addresses at the same time which is often necessary to send POs to multiple Supplier Reps or contacts
- More on Supplier Send Mode
|
| P.O.s Require Supp. Number |
- If enabled then all items added to a Purchase Order for this Supplier require a Supplier Number
- If one is not already assigned then the Operator will be prompted to add one
|
| Barcode OK as Supp Number |
- If this flag is enabled then the System will use the Barcode as the Supplier Number if one is not assigned
|
| Prompt for Existing P.O. & Receipt |
- If the same items are typically ordered from this Supplier often rather then ordering based on items sold, enabling this flag will allow for selecting a previous P.O. or Receipt to base a new P.O. or Receipt (Like a Template)
- This will replace MIN/Max in the first P.O. creation window
|
| Requisition POs are Unconsolidated |
- If this flag is enabled then POs created by the Requisition process will not be consolidated; i.e., a PO will be generated for each Store with an Order from this supplier
|
| Finance Charge as Item Extra Charge |
- When this flag is enabled for a Supplier, then when 'Item Extra Charges' are applied to a Receipt, the total amount applied and pro-rated to all Products will also include any Finance Charges
- The Finance Charge field will be grouped with the Item Extra Charge and moved just above that field
- After entering the Charge Amounts and selecting to Apply the Charges, a prompt will appear notifying the Operator of the Total Amount which will be added to the Receipt
- The Total Amount of any Finance Charges plus (+) Item Extra Charges will then be pro-rated amongst the Products in the Receipt
|
| Freight as Item Extra Charge |
- When this flag is enabled for a Supplier, then when 'Item Extra Charges' are applied to a Receipt, the total amount applied and pro-rated to all Products will also include any Freight Charges
- The Freight Total field will be grouped with the Item Extra Charge and moved just above that field
- After entering the Charge Amounts and selecting to Apply the Charges, a prompt will appear notifying the Operator of the Total Amount which will be added to the Receipt
- The Total Amount of any Freight Charges plus (+) Item Extra Charges will then be pro-rated amongst the Products in the Receipt
|
| Invoice Discount as Item Extra Charge |
- When this flag is enabled for a Supplier, then when 'Item Extra Charges' are applied to a Receipt, the total amount applied and pro-rated to all Products will also decrement any Invoice Discount
- The Invoice Discount field will be grouped with the Item Extra Charge
- After entering the Invoice Discount Amount and Item Extra Charge and selecting to Apply the Charges, a prompt will appear notifying the Operator of the Total Amount which will be added to or removed from the Receipt
- The Total Amount of any Item Extra Charges minus (-) Invoice Discount will then be pro-rated amongst the Products in the Receipt
|
| Invoice Number Required |
- If this flag is enabled for a Supplier, an Invoice Number will be required to be entered prior to Posting a Receipt
|
| Headers Calculate Invoice Total |
- This flag works similar to the Venue Maintenance flag called "Auto Update INV Receipt Total" which will update the Invoice Total and Total Ex Tax fields on Receipts
- The Headers Calculate Invoice Total flag - here at the Supplier Maintenance level - will work independently to the aforementioned Venue Maintenance flag but follows a similar concept
- If this flag is enabled for a Supplier, then the Invoice Total will be calculated and updated automatically with the following calculation:
- Tax (GST) + Total Ex Tax + Finance Charge + Freight Total + Invoice Discount
- However, if Finance Charge, Freight Charge or Invoice Discount are used as Item Extra Charge, they will be excluded from the calculation
- If both the Venue-level and the Supplier -level flags are enabled, the System will disregard the Venue setting's logic and use the Supplier logic
|
| Show P.O. Details on Receipt |
- With this flag enabled, when an Operator is entering a Manual Receipt or Receiving a Purchase Order for this supplier, the P.O. Details section will be displayed by default, without the Operator having to press the flag "Show P.O. Details" (this can still be used as a toggle to hide the P.O. Details)
|
| Auto Cancel PO BackOrders On Receipt |
- When this flag is enabled, POs will not be Partially Received if items are shorted; instead, the shorted amounts will simply be Canceled automatically
|