Global, Venue, Store, Till & Device Setups

16 | Venue Maintenance "External Links" Tab

This article focuses specifically on the "External Links" Tab of Venue Maintenance and the relevant configurations that are made within BackOffice.

This article focuses specifically on the "External Links" Tab of Venue Maintenance and the relevant configurations that are made within BackOffice.
Prerequisites 
  • To access Venue Settings, the applicable Operator Privileges   will need to be enabled 
    • Operator Maintenance 'General' Tab
      • System Setup: "Access Venue, Stores & Tills" Flag 
      • System Setup: "Maintain Venue, Stores & Tills" Flag 

CALink Settings


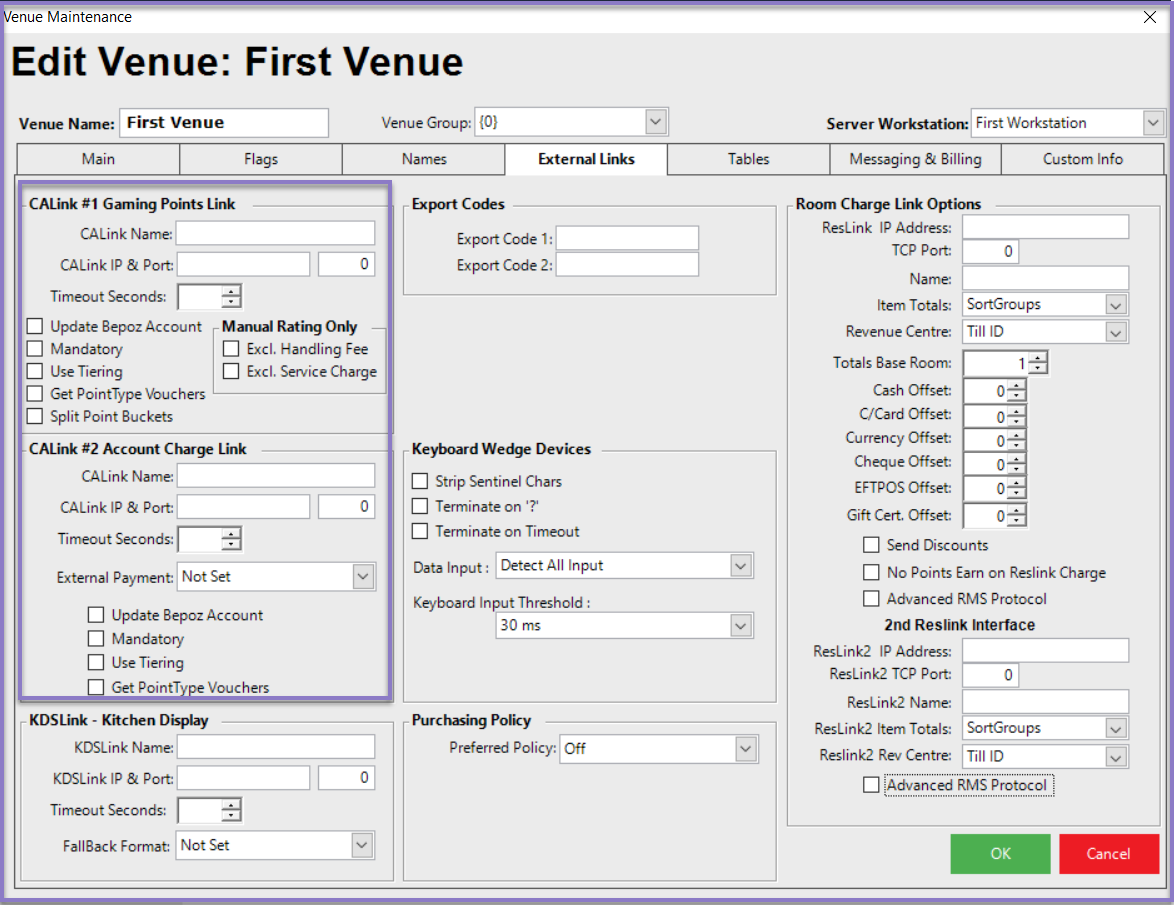
  • This allows for connecting to an external membership system so that Member information can be returned to Bepoz; e.g., name, number, and pricing privilege (in some instances)
  • There are 2 possible links from 2 different Bepoz application programs
    • The first is the Gaming Points Link; this is Client Account Link and is the link used with most Gaming Systems to obtain the Customer/Member information from the Membership/Gaming System
    • The second is the Account Charge Link which is used for MultiVenue Systems to link the local Venues to one Membership database at HeadOffice
      • This will allow all Account Balances and Points to be processed and returned in real time
  • For each of these links, the TCP/IP address and the port must be entered
    • This is the address of the computer that is running those Bepoz applications and may not be the Bepoz server
    • In the specific application, the TCP/IP address of the computer that the link connects to will also need to be set
 

Configuration Option

Description

CALink Name
  • Use these fields to enter the Name of the CALink
CALink IP & Port
  • These are the IP address and Port of the respective CALinks
Timeout Seconds
  • Use this to set the timeout in seconds for the reply from the TCPIP links
"Update Bepoz Account" flag
  • If this flag is enabled, Accounts in Bepoz will be created and/or updated when accounts information is retrieved via the CALink
"Mandatory" flag
  • This flag should be enabled along with the "Update Bepoz Account" flag and the "Use Tiering" flag when certain CALinks are being used so that the tier Accounts and tier Groups will be created in Bepoz
"Use Tiering" flag
  • This flag should be enabled along with the "Update Bepoz Account" flag and the "Mandatory" flag when certain CALinks are being used so that the tier Accounts and tier Groups will be created in Bepoz
  • The tier Groups will be created from the Card Levels that are retrieved via the CALink; e.g., if the Card Level is called "Gold", an Account Group called "Tier Gold" will be created in Bepoz and the Account Number will be "CALINKGOLD"
Manual Rating Only (these flags are available from v4.7.2.6 and above)  
Excl. Handling Fee
  • When this flag is enabled, it excludes the handling fee from the manual rating calculation
  • When this flag is disabled, it does not exclude the handling fee from the manual rating calculation
Excl. Service Charge
  • When this flag is enabled, it excludes the service charge from the manual rating calculation
  • When this flag is disabled, it does not exclude the service charge from the manual rating calculation

KDSLink - Kitchen Display

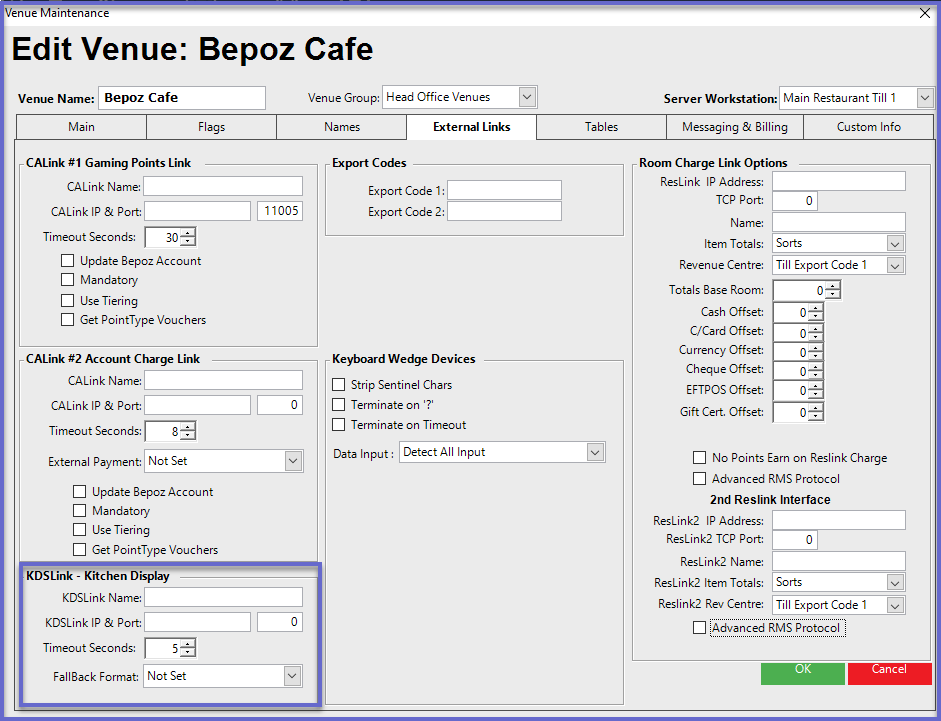
  • After KDSLink is active, a section of configuration options will appear on the "External Links" tab of Venue Maintenance labeled "KDSLink - Kitchen Display"
  • Most of these settings will be copied from the KDSLink Settings


  • KDSLink Name - enter the name of the KDS; this should match the Server Type from KDSLink
  • KDSLink IP & Port - enter the Primary Server IP Address and the Primary Server Port Number from KDSLink into the respective fields
  • Timeout Seconds - this should be the same as the Reply Timeout from KDSLink
  • FallBack Format - use the drop-down to select one of the System's Printer Formats; when redirected to a Receipt Printer, this is the Print Format that will be used

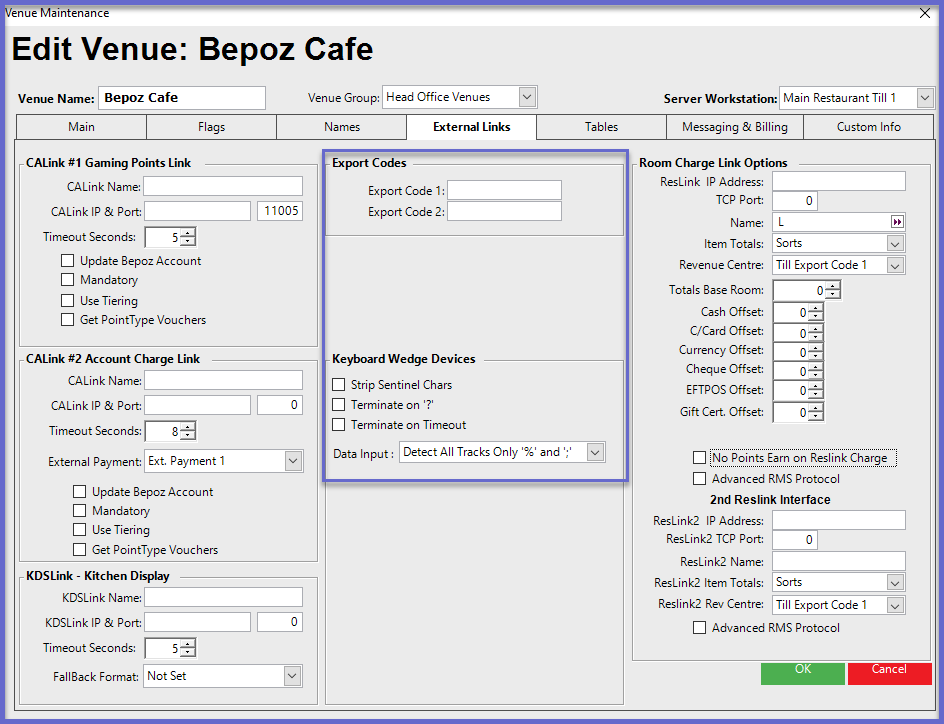
Export Codes & Keyboard Wedge Devices

Configuration Option

Description

Export Codes
  • These are user-defined fields that can be used when exporting Reports or Data
"Strip Sentinel Chars" flag
  • If this flag is enabled, the following characters will be stripped from the data when a card is swiped since they are the start and end codes:
    • %
    • ;
    • ?
"Terminate on '?'" flag
  • The default terminator is CR (ascii 13); if this is not sent by the device, another terminator must be used
  • Enabling this flag will terminate waiting for more input and process the received string after receiving a '?' character (a common magnetic card track terminator)
"Terminate on Timeout" flag
  • The default terminator is CR (ascii 13), if this is not sent by your device another terminator must be used
  • Enabling this flag will automatically terminate waiting for more input and process the received string after not receiving additional input for 500ms

"Card Tracks" drop-down

  • If using multiple keyboard devices or using a physical computer keyboard with a keyboard wedge device, the till must determine how keyboard input will be processed
  • Magnetic Card (Magcard) data can be determined using its start Sentinels (% ;)
  • If using a Magcard reader and laser scanner, simply the first option should work fine (Detect All Tracks '%' and ';')
  • If using a physical computer keyboard with a laser scanner, it would be best to program the scanner to send a prefix of '%' or ';' to help the till differentiate it from keyboard keys being pressed
  • Always use Detect All Tracks, unless there are multiple tracks on the cards and only one should be processed
  • If using a keyboard and no other device, the All Input is Keyboard Input option will be best
  • If no keyboard is being used and it is desired for everything to be processed as a keyboard wedge device, set to All Input is Scan Data
 

  • The Keyboard Wedge Device area allows for defining and configuring the Magnetic Card Reader of the Venue's Tills if required
  • For example, if running a Micros WS4, both the "Strip Sentinel Chars"  and the "Terminate on '?'" flags will need to be enabled
  • Terminate allows for the system to terminate the read of the MCR if the time exceeds the allowed amount and no terminator characters have been sent
  • The Track Number allows you to set the MCR tracks that are read
    • Tracks 1 and 2 are the ISO standard with 1 being an alpha-numeric track and 2 being a numeric only track
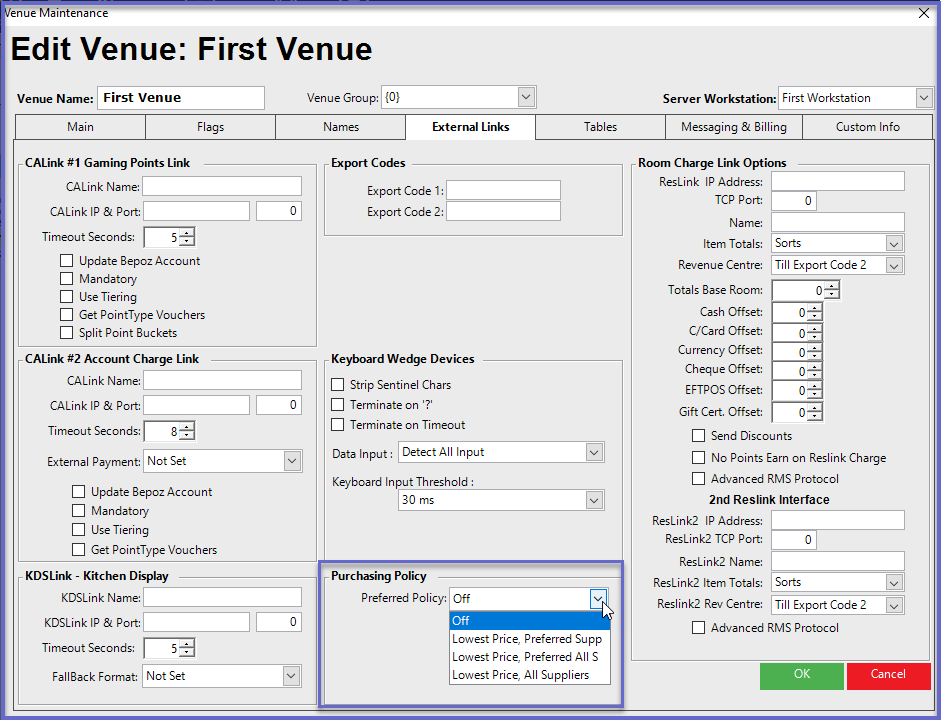
Purchasing Policy


Purchasing Policy

Description

Lowest Price, Preferred Suppliers Only
  • If this is selected, it will force the Store(s) to use:
    1. The Preferred Supplier code with the lowest available cost price, otherwise
    2. Use the Global Products preferred Supplier code with lowest available cost price, otherwise
    3. Use the Product code from the preferred supplier with the lowest available cost price
  • If there is no preferred supplier set, the product cannot be ordered and a 'No Preferred Supplier exists' message is displayed for that product when selected.
  • If an attempt is made to order a product from a non-preferred supplier, the product cannot be ordered and a 'Not Preferred Supplier' error message is shown for the product when selected
Lowest Price, Preferred Suppliers
  • If this is selected, it will force the Store(s) to use:
    1. The preferred supplier product code with the lowest available cost price, otherwise
    2. Use the global products preferred supplier code with the lowest available cost price, otherwise
    3. Use the product code from the preferred supplier with the lowest available cost price (If no preferred supplier, forces the product code from the supplier with the lowest available cost price)
  • If an attempt is made to order a product from a non-preferred supplier, the product can be ordered and a warning message 'Not Preferred Supplier, Are you sure you want to proceed? (Yes/No)' message is displayed for that product when selected
    • If yes, it will add the product
    • If no, it will not add the product to the Purchase Order
Lowest Price, All Suppliers  If this is selected, it will force the product code from the Supplier with the lowest available cost price, if not then purchase order functionality works as it does currently
Off This is the default, and if it selected, purchase order functionality work as it does currently


Room Charge Link Options


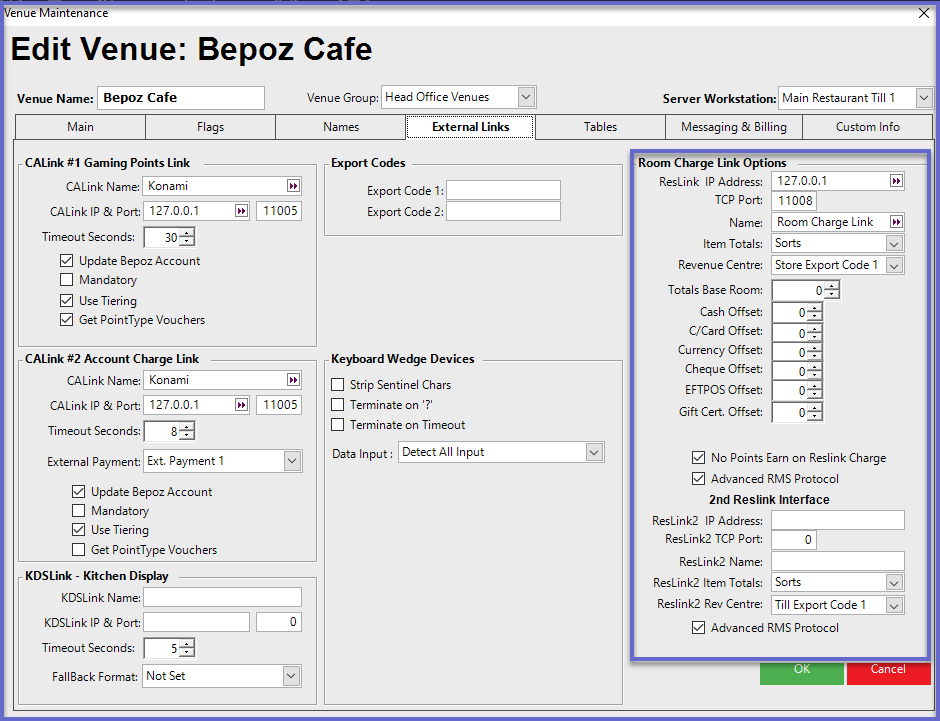
  • Bepoz allows for 2 different links to Property Management Systems (PMS) for the purpose of Room Inquiry and the posting of transactions from the till directly to the PMS
  • The 2nd Reslink Interface is a simplified duplication of the primary PMS interface that allows posting to the PMS with the definitions as shown but without the ability to send the Media Totals to the 2nd system
 

Configuration Option

Description

ResLink IP Address
  • Enter the IP address of the computer that Bepoz will connect to in order to process the Room Charge
TCP Port
  • Enter the Port of the computer that Bepoz will connect to in order to process the Room Charge
Name
  • Into this field, enter the Name that the actual Room Charge is called
"Item Totals" drop-down
  • This drop-down allows for defining which of the groups will be used to define the charge to the PMS
  • Select from:
    • Sorts
    • Types
    • SortGroups
    • TypeGroups
  • Typically, SortGroups are used, but this is not "set"
  • The majority of PMS do not support a large number of definitions for the makeup of the room charge; e.g., they often support a maximum of 8 definitions - or groups - and sometimes fewer
  • E.g., the SortGroups could be Food, Beverage, Merchandise, and Services
"Revenue Centre" drop-down
  • This drop-down is used to set either the Till ID or the desired Export Code so the PMS can determine which Revenue Centre the sale is coming from
Totals Base Room & Offsets
  • The totals for the Media Types that are sent to the PMS are usually posted to pseudo or dummy rooms in the PMS
  • This setting allows for the Base Offset for the Room Numbers to be set, then the corresponding offsets for Cash, Credit Card, etc. are entered below
"No Points Earn on Reslink Charge" flag
  • Enabling this flag prevents the system from earning Points to an attached Account when using the Room Charge payment option
"Advanced RMS Protocol" flag
  • Not applicable to all PMS
  • To enable support for A0-A9 and GA / GD fields, this flag must be clicked on