11 | Venue Maintenance "Main" Tab (Additional Settings)
.
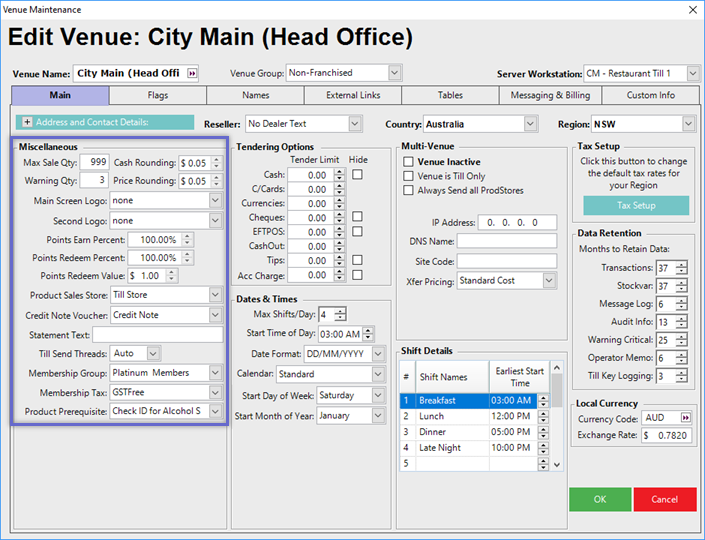
This article focuses specifically on the second part of "Main" Tab of Venue Maintenance which includes multiple Settings such as Miscellaneous, Tending Options, Dates & Times, Multi- Venue Settings etc. These are the overall settings which will be applied to all stores in the selected venue(s).
Prerequisites
- To access Venue Settings, the applicable Operator Privileges will need to be enabled
- Operator Maintenance 'General' Tab
- System Setup: "Access Venue, Stores & Tills" Flag
- System Setup: "Maintain Venue, Stores & Tills" Flag
Miscellaneous Settings
Configuration Option
|
Description
|
| Max Sale Quantity |
- This allows for the prevention of possible errors by Operators when accidentally entering the Product Price or the Product Code as the Quantity Sold
- This is the Venue-wide maximum Quantity that can be entered for any individual Product Sales line
- There is also a Max Sale Qty at a Product Level and if it's set for a Product it will override this
|
| Warning Quantity |
- When a Product has the 'No OverSell' flag enabled, this is the Quantity On Hand at which a Warning Prompt will be triggered to appear at SmartPOS Workstations notifying that the QOH is getting low
|
| Cash Rounding |
- This sets the Local Currency amount for rounding purposes
- E.g., if set to $0.05 a Transaction total of $11.97 will be rounded to $12.00
|
| Price Rounding |
- This applies to the individual items within a Transaction and will force all calculated Prices of individual Products to be rounded
- E.g., if set to $0.05 and three (3) of Product X are sold at an each Price of $1.97, the Price will be rounded to $2.00 and then multiplied by 3
- This affects % Discounts and % Surcharges
|
| Main Screen Logo |
- This is the logo displayed on the left side of the till and in BackOffice
- This is typically the Venue's logo
|
| Second Logo |
- This is the logo displayed on the right side of the till and in BackOffice
|
| Points Earn Percent |
- This is for the integrated Customer Rewards System whereby customers are rewarded with Points when they purchase and can use Points to pay for purchases when they have accrued sufficiently
- The advantage of this system is that the customer returns to the Venue to build up sufficient points to make the “free” purchase
- Points are regarded as a long-term discount that builds
- A discount applied to a sale will walk out the door with the customer having more money to spend at a competitor, whereas Points Rewards bring the customer back
- The value of the “point” is set by the relationship between the Earn and Redeem percentages
- If the Earn is set to 5% and the Redeem is set to 100% that means that the shopper earns 5% in points each time they buy
- It also means that the price of the item in points is the same as it is in money; if it is 100.00 in cash, it is 100.00 in points
- This method is simple to understand and it is easy for the customer to know how many points they need for a purchase
- Some outlets like to reward a high number of points for a purchase and then the price in points must be correspondingly high
- If the Earned Points is 100% and the same relationship as explained above is to be maintained, that is the long-term discount is 5% then the Redeem percentage must be 20 times the earned points, so 20 x 100 = 2000%
- The starting point is “what is the percentage the Venue is prepared to reward their loyal customers” and “how do they want it to operate, like the first or second options”?
|
| Points Redeem Value |
- This is the monetary value assigned if Points are allowed to be redeemed for cash
|
| Product Sales Store |
- This refers to the way Product Summaries reports
- The options are:
- Till Store - The Sales Reports of BackOffice will reflect the sales made in the store the till is in within the Venue, Stores, &Till setup
- Pricing Store - Sales Reports will be based on the actual Pricing Store the till is set to be in, or directed to, for the Price Number
- Stocking store - This makes the Sales Reports based on the stocking store of the inventory which could be different from either of the above
|
| Credit Note Voucher |
- This allows Refunds of the system to issue a Credit Note rather than a “Cash” refund
- A Voucher setup needs to be created before setting a credit note
|
| Statement Text |
- This is a Multiline text box that will print at the bottom of all statements
- There is an Account option for specific text on that account’s statement
|
| Till Send Threads |
- The recommended setting is Auto as then the system will determine the optimum number of concurrent threads it can use to communicate with the tills
- It is possible to override this and manually set the threads here
|
| Membership Group |
- This sets the “top” Membership Group under which all the Membership Groups appear for customers using the Membership option
- If Membership is not used then this should not be set
|
| Membership Tax |
- Select the retail tax for this product for this Store
|
| Product Prerequisites |
- Set a prerequisite that must be met prior to selling any Products at the tills
|
Tendering Options
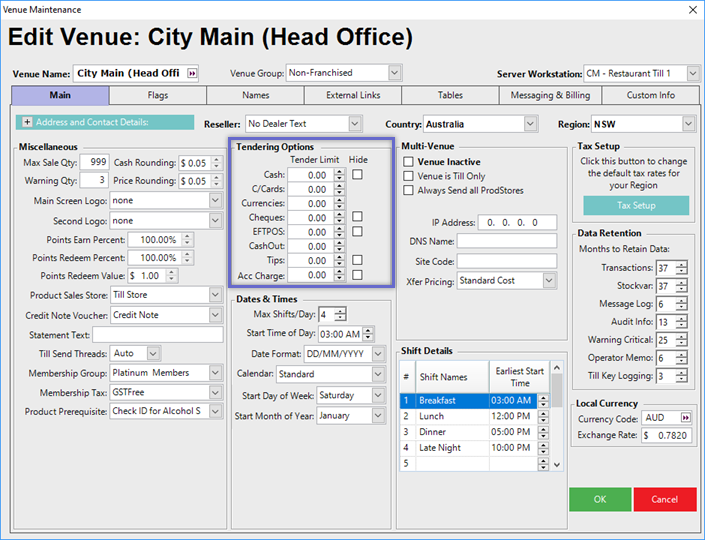
- This table allows for a maximum Tender Limit to be set for each of the Tendering types
- An amount entered into a Tender type's field will be the maximum amount of that Tender type that an Operator can process without needing a Manager authorization
- The Hide checkboxes control whether or not a Tender type will show up on the Venue's SmartPOS Workstations
- If a Hide checkbox is enabled for a particular Tender type, it will not be displayed as a Payment option via the Standard Payment screen
- If a Tender type is hidden on the Standard Payment screen, a separate Payment Function button for it can still be added to a Function Panel
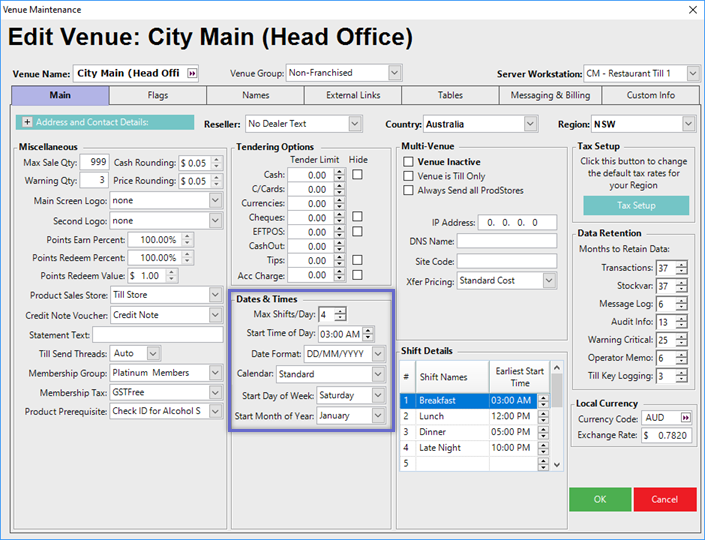
Dates & Times
Configuration Option
|
Description
|
| Max Shifts/Day |
- A shift is a balancing period; it could also be described as the time an Operator spends at the till and for which there needs to be a cash balance
- The concept of a cash register’s X and Z read is eliminated with Bepoz shifts
- If permitted by Operator Privilege, the current shift can be read as many times as required and reading the balance can prompt for a shift change or not, according to the
Override Map setting
- If shifts are available then it will allow for the till to move to a new shift, that is the next available shift. If more shifts are not available, the system will not allow the till to move from the shift it is currently on
- There can also be a separate button to change shifts
- It is important to know how many shifts are needed and to set the Max Shifts/Day accordingly
|
| Start Time of Day |
- The Start Time of Day time setting relates to shifts as before this time the till will move to the next shift for the current day; if after midnight with the Start Time of Day set to 3:01 AM the system will still move to shifts of the current day and not to the first shift of the next day
- So this setting indicates the latest time the Venue will trade to and then this time should be set to a little bit later
- At Start Time of Day the system moves all tills to the new/next day and to shift 1 of that new day
- There are also many housekeeping tasks that the system automatically performs at this time so it should be set to the quietest time possible or a time when there is no activity
- The system will perform well even if the site is a 24-hour operation and the Start Time is set to say, 6:00 AM. The point that should be noted is that all sales for a day stop for the day at the Start Time of Day
- Then the new/next day commences with sales and cash reporting to it
|
| Date Format |
- This is set to reflect the manner in which the date is displayed in the country
|
| Calendar |
- This allows for configuring how Months are defined in the System for the Venue by determining the Start and End of each Month for reporting purposes based on the Organization's needs or preferences
- Select from the following options:
- Standard - The months are the same as the calendar
- Previous Week - means that when the month ends on a day that is not the end of the week the extra days after the normal day which is the last day of the week go back to the previous week to fall into the previous month
- Next Week - As for the example immediately above except that the extra days go forward to the next month
- 13 Periods Previous Week - This allows for 13 “periods” in the year each with 4 weeks but there will be several times when there is an extra day or two; in this setting, the extra days go to the previous month
- 13 Periods Next Week - As for the setting immediately above with the extra days going forward to the Next month
- Business - This selection will dynamically populate alternate fields below this which allow for selecting an all-time Start Date and a Weeks per Month format for each Quarter
|
| Start Day of Week |
- This can be set to any day of the week for the Bepoz “calendar” to show a week in accordance with the customer’s calendar
- The first day of the week can be set to any day.
- This setting plus the ones that immediately follow allow for the BEpoz System to automatically present reports in the calendar format used by the customer
|
| Start Month of Year |
- To set the first month of the customers reporting year. Typically this would be the financial year
|
Multi-Venue

Configuration Option
|
Description
|
| Venue Inactive |
- Enabling this flag will make the Venue Inactive
- This flag is only available when Multi-Venue is on
|
| Venue is Till Only |
- This option will allow the Venue to run without a Remote Smart Controller
- You can only have one till in this Venue if this tick box is ticked
|
| Always Send all ProdStores |
- If the Global settings flag 'Send All ProdStores' is disabled (not sending all ProdStores), enabling this flag will override for this Venue and send all ProdStores
|
| IP Address |
- This is the IP Address of the Venue's Smart Controller as accessed from the Head Office or another Venue
- If you have a VPN and it is the same as the Workstations IP Address, it can be left blank
- If you do not have a VPN, then it is typically the Venue's Internet Address
|
| DNS Code |
- As an alternative to using an IP Address to connect to this Venue, a DNS Name lookup can be used instead
- Using an IP Address is recommended method; the System will try an IP Address first and then a DNS Name
|
| Site Code |
- This is a secondary number used when exporting data out for the Venue
|
| Transfer Pricing |
- This allows for the “cost” to be set for stock transfers from H/O to remote sites and for the cost to be a specific Price Name within the system
- As an example, in a Multi-Venue Organization where the remote sites are owned by the Head Office then this would stay at the 'Standard Cost' setting; but, in a situation where the remote sites are Franchise operations and not owned by the Head Office then a specific Sell Name, e.g. Sell 10 can be set as the Transfer Cost and the Cost used by the Franchise operators
|
Shift Details
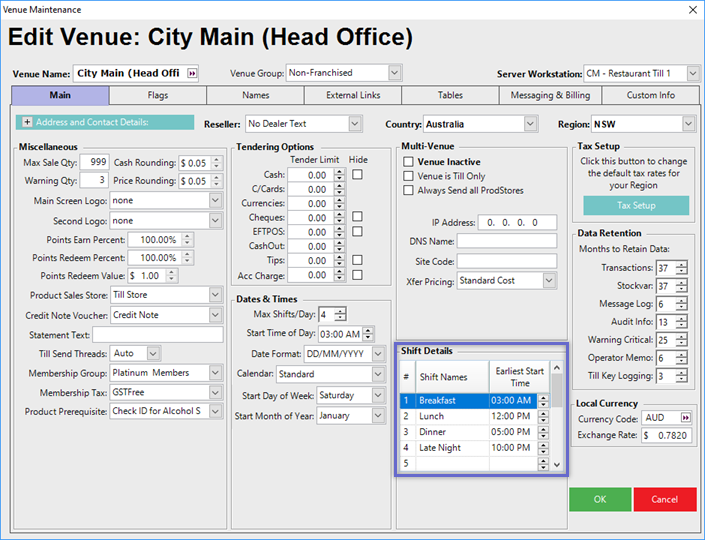
- Based on the Max Shifts/Day set in the Dates & Times section, use this section to define the Shift Names and Earliest Start Times for each Shift
- The Earliest Start Time for Shift #1 will match the Start Time of Day set in the Dates & Times section
- Additional Shifts' Earliest Start Times can be configured as required for the Venue's business needs or preferences
- If Shift Names aren't entered, they will assume the Names of Shift 1, Shift 2, etc.
Tax Setup
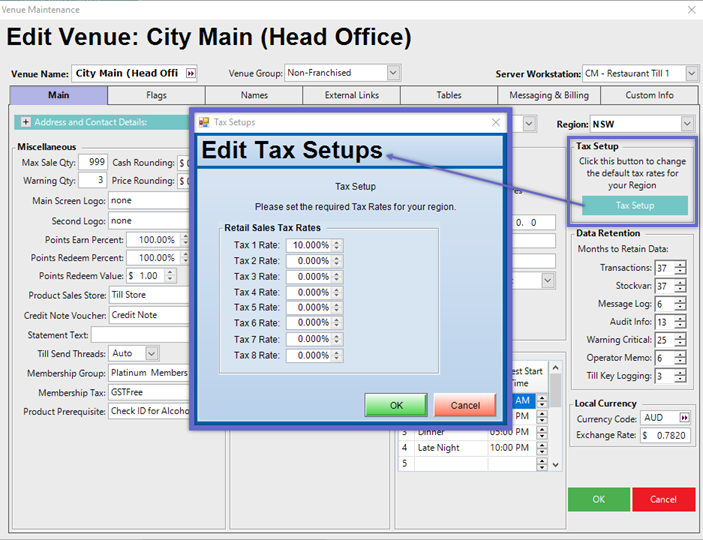
- The Tax Setup section is used for configuring up to eight (8) different Retail Sales Tax Rates for the Venue
- To begin, click on the Tax Setup button which will open a small window where the Tax Setups can be edited as required
Data Retention

- The Data Retention section is to be used to configure how many Months each type of Data will be kept in the System for before being automatically deleted
- If zero (0) is entered into a Data Type's field, that type of data will never be deleted
Local Currency

- The Local Currency section only needs to be used when the Organization is Multi-Currency ; i.e., the Venue uses a different Local Currency than the Organization uses as the Base Currency
- For example, if the Organization is based in the US and uses USD, however, the Venue is located in Australia and uses AUD then the Local Currency settings would need to be configured accordingly
- The Currency Code of the Local Currency will need to be entered into the provided field and should be the Standard Currency Code used for Exchange Rate Conversion; e.g., USD, AUD, NZD, GBP, EUR
- An Exchange Rate field is also provided for entering the Venue's Local Currency Exchange Rate to the Organization's Base Currency; i.e., 1 NZD = .9053 AUD
- This can be entered manually or by using the Get Currency Rate Scheduled Job (recommended)
