18 | Venue Maintenance "Messaging & Billing" Tab
This article focuses specifically on the "Messaging Billing" Tab of Venue Maintenance. The Messages Memos option within Bepoz which is configured per Venue via this tab allows for Messages to be sent to employees and to Members/Accounts by Email and SMS.
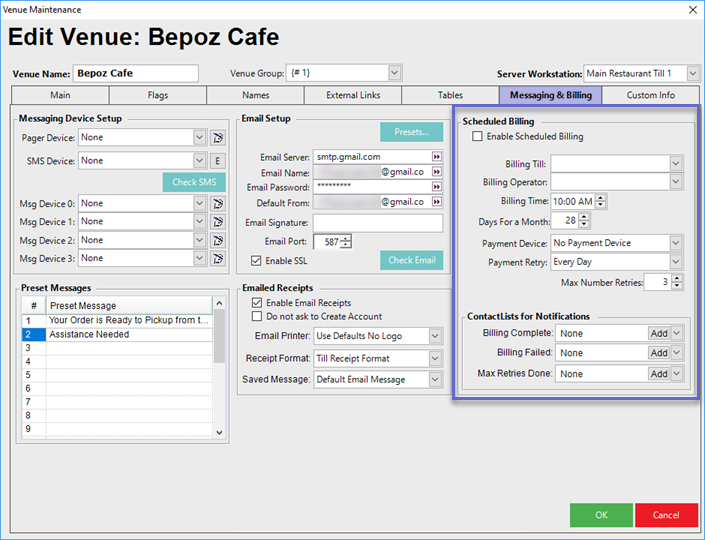
This article focuses specifically on the "Messaging & Billing" Tab of Venue Maintenance.
The Messages & Memos option within Bepoz which is configured per Venue via this tab allows for Messages to be sent to employees and to Members/Accounts by Email and SMS.
Bepoz allows connection to both alphanumeric “people” pagers as well as table pagers. SMS messages can also be sent by subscribing to a provider that accepts SMS messages by an internet connection and send those messages to the mobile phone network. There are devices that allow the connection directly to the computer for the sending of SMS messages.
Prerequisites
- To access Venue Settings, the applicable Operator Privileges will need to be enabled
- Operator Maintenance 'General' Tab
- System Setup: "Access Venue, Stores & Tills" Flag
- System Setup: "Maintain Venue, Stores & Tills" Flag
Messaging Device Setup & Preset Messages
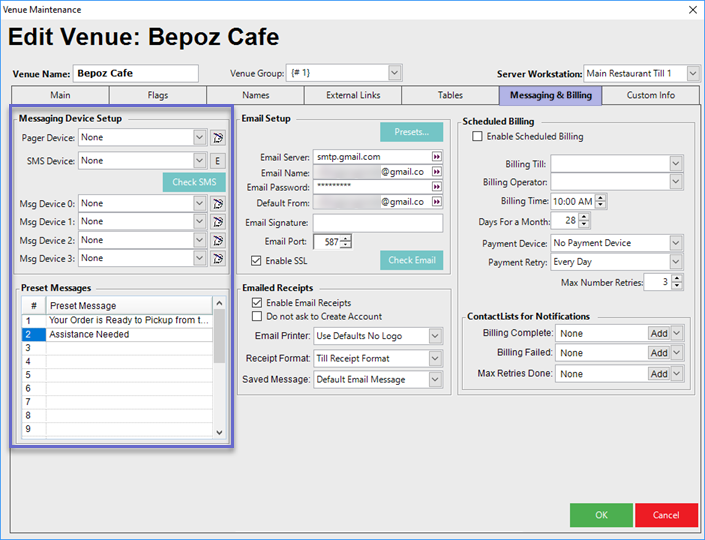
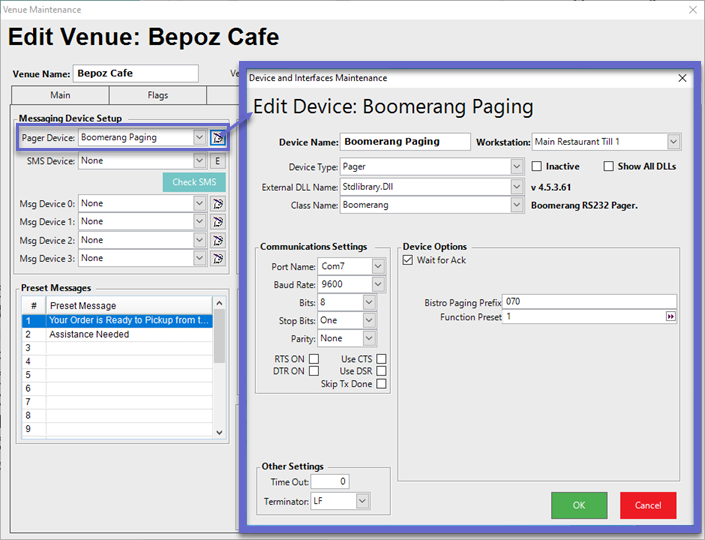
- The Pager Device configuration is used when a Linked Pager System is being utilized, in which case a Pager Device must be created and attached to the SmartController Workstation to be set up specifically for the Paging System
- The Device will then be available for selection via this drop-down and will need to be selected
- After selecting the Pager Device, the Device can be edited from this window by clicking on the small icon to the right of the drop-down
- Similar to using a Pager System, the SMS Device configuration is used when a Linked SMS System is being utilized; likewise, an SMS Device must be created and attached to the SmartController Workstation to be set up specifically for the SMS interface
- The Device will then be available for selection via this drop-down and will need to be selected
- After selecting the SMS Device, the Device can be edited from this window by clicking on the small icon to the right of the drop-down
- The Check SMS button can be used to check that the SMS interface has been set up properly
- If the SMS carrier supports it, this will request and display the credit currently available with the SMS carrier

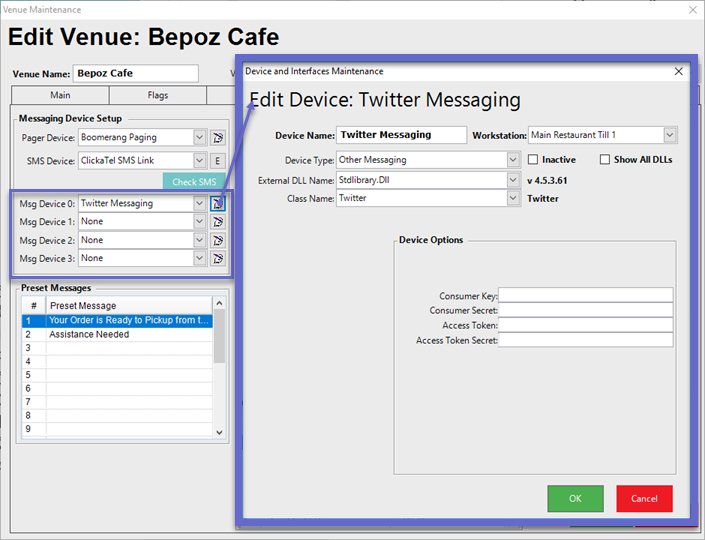
- Similar to the above cases, if another Linked Message System interface is being utilized, a suitable Device must be created and attached the SmartController Workstation to be set up specifically for the Message System
- The Device will then be available for selection via the Msg Device 0-3 drop-downs and will need to be selected
- After selecting the SMS Device, the Device can be edited from this window by clicking on the small icon to the right of the drop-down
- The Preset Messages section provides the ability to maintain a list of up to sixteen (16) pre-defined Messages that can then be accessed and sent from SmartPOS Workstations using the Messaging Till Functions after correct configuration
Email Setup & Emailed Receipts
Configuration Option
|
Description
|
Visual/s (if applicable)
|
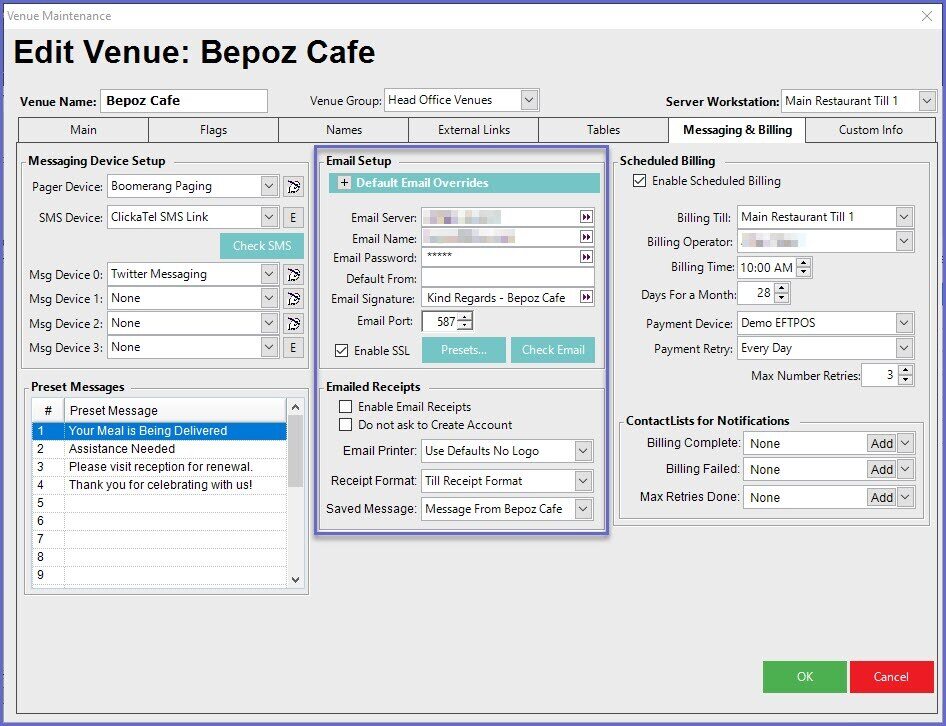
| Default Email Overrides |
- As opposed to the general default Email settings which are maintained in this form, the Defult Email Overrides allows for configuring alternate default email addresses to be used when sending out communications for a variety of purposes, e.g. sending POs to Suppliers, sending Messages to Accounts, sending Reports, etc.
- For more on these, see Default Email Override Setup
|
|
| Presets |
- This button can be used to open a small window displaying a few preset Email Servers
- After selecting an Email Server, successive prompts will appear allowing for entering the Email Address & Password
|

|
| Email Server |
- An accessible Email Server must be entered into this field to enable sending emails
|
|
| Email Name |
- Enter the Email From Name into this field
- Some Email Servers require a specific Email Name in order to allow Email messaging to flow; e.g., "username@server.com"
|
|
| Email Password |
- This may not be needed, however, in cases where a specific Email Name is required, the Password for that Email Name will need to be entered here
|
|
| Default From |
- Typically when an Operator sends an Email via Bepoz, their Email 1 or Email 2 as configured in their Operator Maintenance record will be used as the From and Reply address; however, for cases when an Operator does not have an Email Address configured, the Email Address entered here will be used
|
|
| Email Signature |
- Enter the desired Email Signature to print at the bottom of all Emails sent via Bepoz using this multi-line text field
|
|
| Email Port |
- Enter the appropriate Email Port to be used
|
|
| "Enable SSL" flag |
- This flag must be enabled if the Email Server being used requires SSL
|
|
| Check Email |
- Use this button to test that the Email Setup configurations are properly set up
- A small window will open allowing for entering an Email Address to send a test Email to
|

|
| |
|
|
| "Enable Email Receipts" flag |
- If this flag is enabled, Transaction Receipts can be Emailed via SmartPOS when selecting the "Print" Till Function
- The Receipt will be in the form of a PDF file attached to the Email sent
|

|
| "Do not ask to Create Account" flag |
- This flag is applicable when the above flag "Enable Email Receipts" has been enabled
- If this flag is enabled, then when no Account is associated with a Transaction the Operator will not be prompted to create or attach one when Emailing a Receipt via SmartPOS
- If this flag is not enabled, the Operator will be prompted to create or select an existing Account when Emailing a Receipt via SmartPOS (see image)
|

|
| "Email Printer" drop-down |
- Use this drop-down to select the Printer Device that has been created to be used to get the Printerdefs and any logos to be attached to the receipt
|
|
| "Receipt Format" drop-down |
- Use this drop-down to select the Receipt Format to be used for Emailed Receipts
|
|
| "Saved Message" drop-down |
- As the Receipt will be an attached PDF, the body of the Email should contain a Message include as well
- Use this drop-down to select the contents of the Email body from the System's Saved Messages that are available
|

|
Scheduled Billing
Configuration Option
|
Description
|
| "Enable Scheduled Billing" flag |
- This flag must be enabled for Scheduled Billing to work
|
| "Billing Till" drop-down |
- This is the Till which all Scheduled Transactions and Payments will associate to
- Select the Workstation where all Scheduled Billing Transactions will be associated with
|
| "Billing Operator" drop-down |
- This is the Operator which all scheduled Transactions and Payments will associate to
- Select the Billing Operator which was created for this purpose
|
| Billing Time |
- This is the time of day that all Scheduled Billings will attempt to process payments
|
| Days For a Month |
- This is the number of days that constitute a full month for Billing purposes
- When Billing by the month, if the number of days to pro-rata is more than this, the system will Bill a full month
|
| "Payment Device" drop-down |
|
| "Payment Retry" drop-down |
- If a Scheduled Bill payment is unsuccessful, Payment Processing will be re-tried at the interval selected here; e.g., Every Day, Every 3 Days, etc.
|
| Max Number Retries |
- This is the number of retries before the Scheduled Bill will stop trying to Process Payment
|
| "Contact Lists for Notifications" drop-downs |
- Notifications can be sent to a contact list for the instances listed:
- Billing Complete
- Billing Failed
- Max Retries Done
- Use the drop-downs to select an available Contact List to be notified of each respective occurrence
- Optionally, use the Add buttons to add a New Contact List
|
