
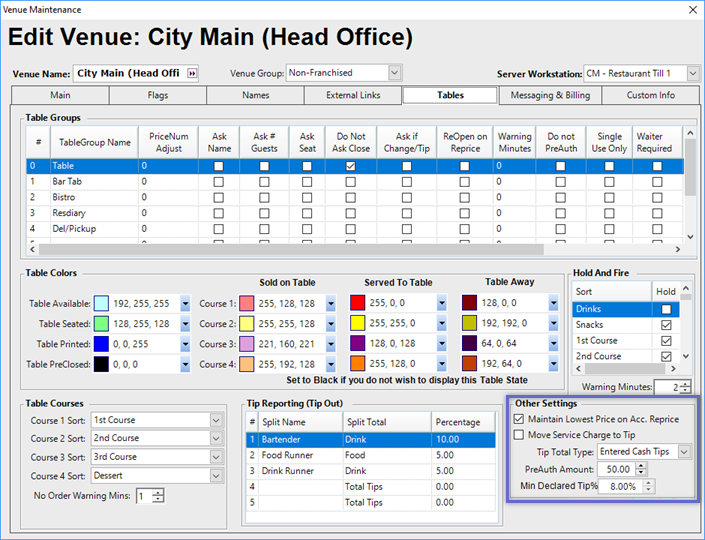
This article will focus specifically on the "Tables" Tab of Venue Maintenance which provides configuration options relating to Table Groups, Courses, and other important Table Settings.
This article will focus specifically on the "Tables" Tab of Venue Maintenance which provides configuration options relating to Table Groups, Courses, and other important Table Settings. Prerequisites- To access Venue Settings, the applicable Operator Privileges will need to be enabled
- Operator Maintenance 'General' Tab
- System Setup: "Access Venue, Stores & Tills" Flag
- System Setup: "Maintain Venue, Stores & Tills" Flag
Table Groups
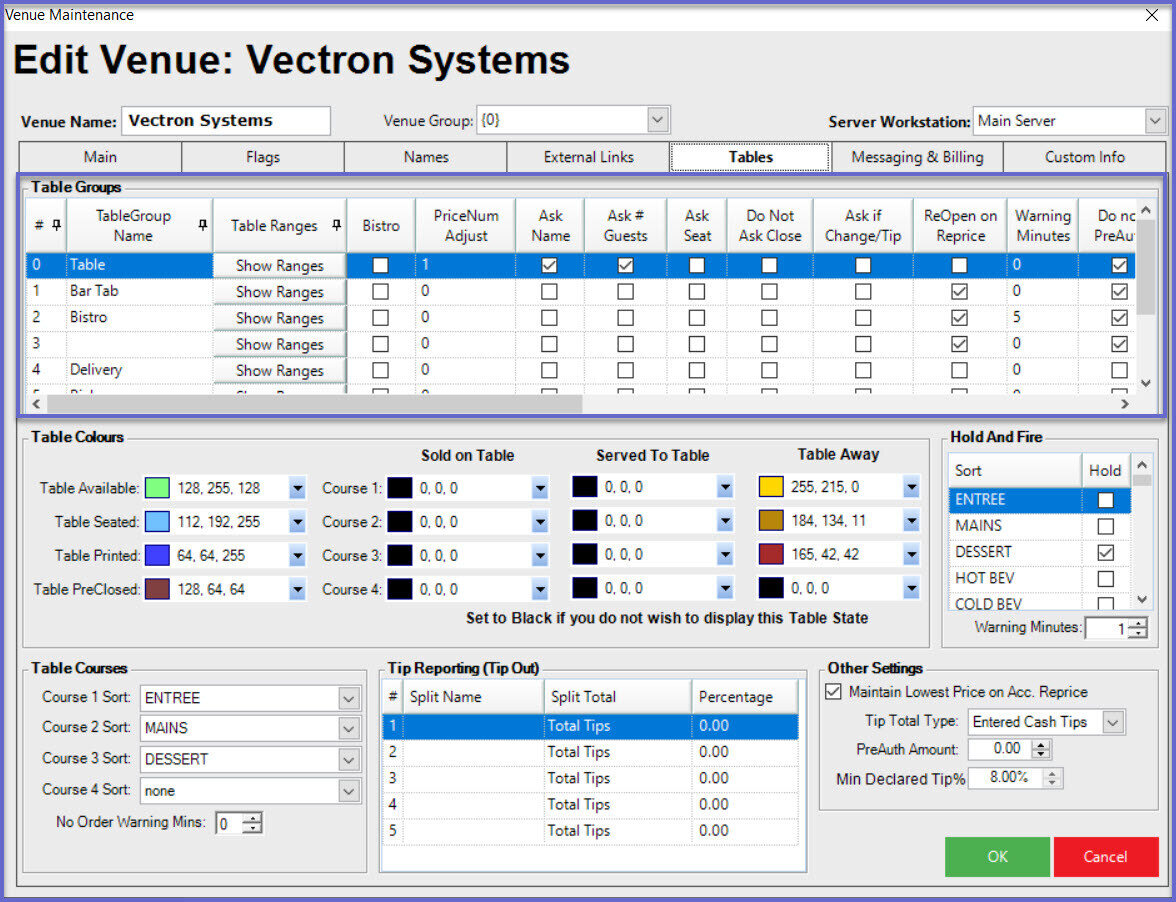
- The Table Groups section allows for configuring up to eight (8) Table Groups as required by the Venue's needs
- The concept of Table Groups offers the ability to differentiate between certain areas of the Venue or necessary Table Accounts that will require varying Table Settings,
- E.g., Restaurant Tables, Bar Tabs, Bistro Tables, Delivery/Pickup, etc.
- This is also useful for Reporting Purposes via the Table Report and also with the ability to add a Table Group column to other Reports
- Pro-Tip: Use the Pin function which is available for both the "#" column and the "TableGroup Name" column
- These Pin Functions can be toggled on and off
- On: Keeps the column on the grid so that the column will always be displayed when scrolling to other fields
- Off: Columns will be displayed in order when scrolling to other fields
Column Name |
Description |
Visual/s (if applicable) |
| # |
|
|
| TableGroup Name |
|
|
| Table Ranges |
Note: This Table Ranges option is currently available only for Doshii Integration |
|
| Bistro |
|
 |


| PriceNum Adjust |
|
|
| Ask Name |
|
|
| Ask # Guest |
|
|
| Ask Seat |
|
|
| Do Not Ask Close |
|
|
| Ask if Change/Tip |
|
|
| ReOpen on Reprice |
|
|
| Warning Minutes |
|
|
| Do not PreAuth |
|
|
| Single Use Only |
|
|
| Single Use Only Enforced |
|
|
| Waiter Required |
|
|
| PreAuth on Open |
|
|
| Pre-Close Tables |
|
|
| No Offset |
|
|
|
Ask Splits as Guests
|
|
|
| PLB Helper |
|
|
| Allow Zero Covers |
|


Table Colours
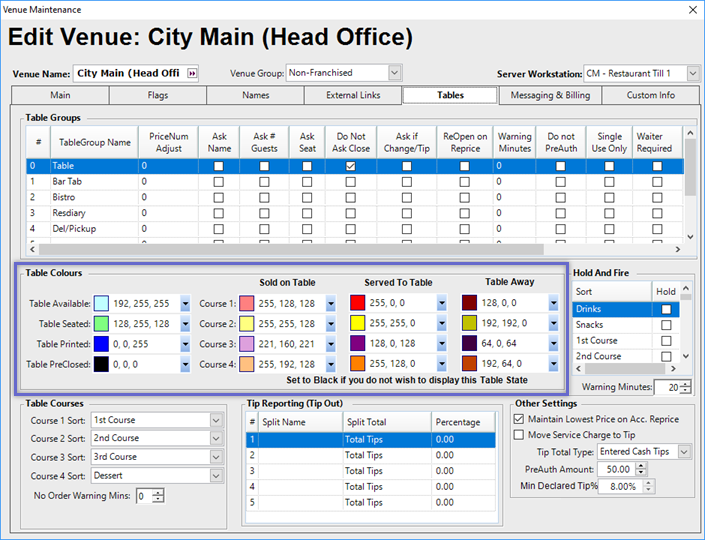
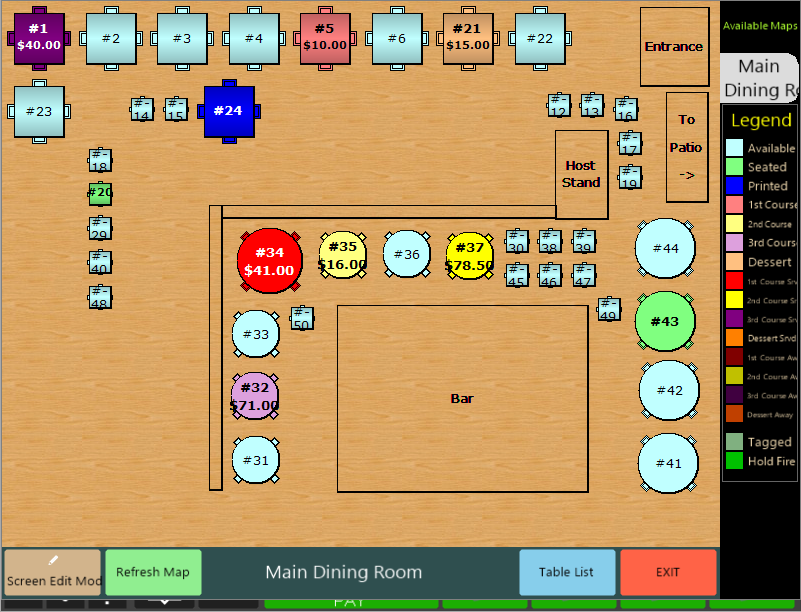
- The Table Colors section allows for defining the color representation of Table statuses within a Graphical Table Map
- These apply to all Table Groups in the Venue
- The color set for each status will appear in the legend of the Table Map and the Tables themselves in the Table Map will take on the color that corresponds to its current status
- Optionally, for any status not desired to be displayed in the legend or used in the Table Map, set the color to Black
Hold & Fire
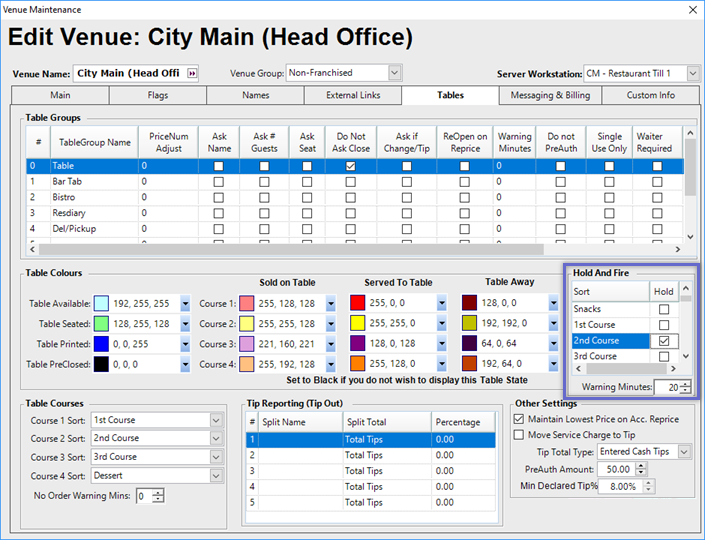
- The Hold And Fire section is used to configure which Product Sorts will automatically be Held back from Printing when an Operator Saves a Table Transaction in this Venue using the Save Table Hold Fire function
- The list will replicate the list of all thirty (30) Product Sorts as configured in Global Settings for the Organization
- If a flag is enabled for a Product Sort then all Products belonging to that Sort will automatically be Held for later Printing when the Save Table Hold Fire function button is selected via a SmartPOS Workstation
- The Products which have been Held from Printing can then be Printed manually when desired using the Print Table Hold Fire Products function
- This allows for Operators to take a full order and enter all Products into the SmartPOS Workstation at one time, but will not Print desired Product Sorts yet
- This has no impact on Manual Hold And Fire
- The Warning Minutes field is used to configure how many minutes must elapse after a Transaction has been initially Saved using the Save Table Hold Fire function before triggering a prompt via SmartPOS notifying that the Products belonging to the Held Product Sorts haven't yet been Printed
- This applies to all Hold Product circumstance; i.e., products being Held when using the Save Table Hold Fire function and also when using the Manual Hold Fire function
- The Warning prompt will then repeat every "X" amount of minutes if the Product/s remain on Hold
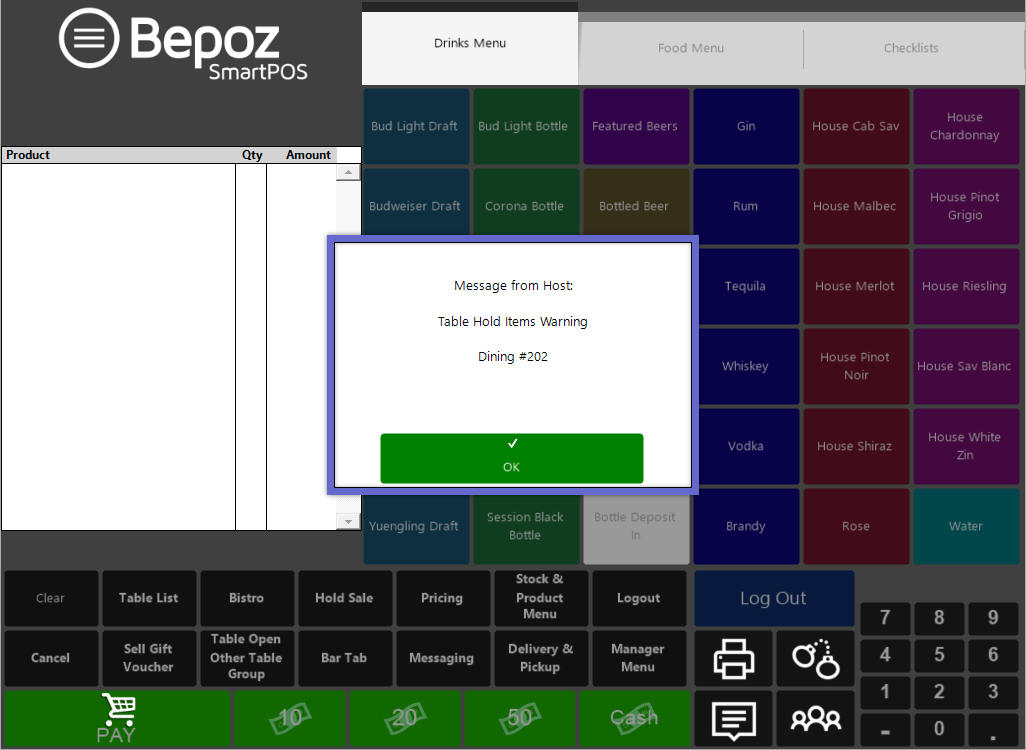
Table Courses

- The Table Courses section allows for configuring up to four (4) Sort Types to be defined as Courses 1 through 4
- All of the System's available Product Sorts as configured in Global Settings will be available to set for each Course
- The Product Sort selected relates to the Graphical Table Map and which corresponding Table Color will be used based on the Products' Product Sorts and the Table's progress
- Each Course has three (3) statuses - Sold, Served and Table Away
- The No Order Warning Mins field is used to configure the number of minutes that must elapse after the Table has been sat with no Order placed or after an Order has last been placed for the Table to be marked with a warning - either by being highlighted in red in the Table List or with a red dot on the Table on a Graphical Table Map
- I.e., if this is set to 5, then 5 minutes after a Table has been Opened with no Order placed for it, the warning will be activated and also if an Order is placed, then 5 minutes later, the warning will be activated
- This configuration is useful to ensure that Tables are not left unattended or that an Operator has not forgotten to take and/or place an Order

Tip Reporting

- If the Venue uses Tip Outs, this section of Venue Maintenance is where up to five (5) different Tip Out slips can be configured
- Each Tip Out can be configured with a Split Name, a Percentage, and select which Total the Percentage is calculated from by choosing from the Split Total drop-down (Total Tips, Total Sales, Drink, Food, etc.
- Each split may be paid to a chef, bartender, runner etc.
Other Settings
Configuration Option |
Description |
| Maintain Lowest Price on Acc. Reprice |
|
| Move Service Charge to Tip |
|
| Tip Total Type |
|
| PreAuth Amount |
|
| Min Declared Tip % |
|