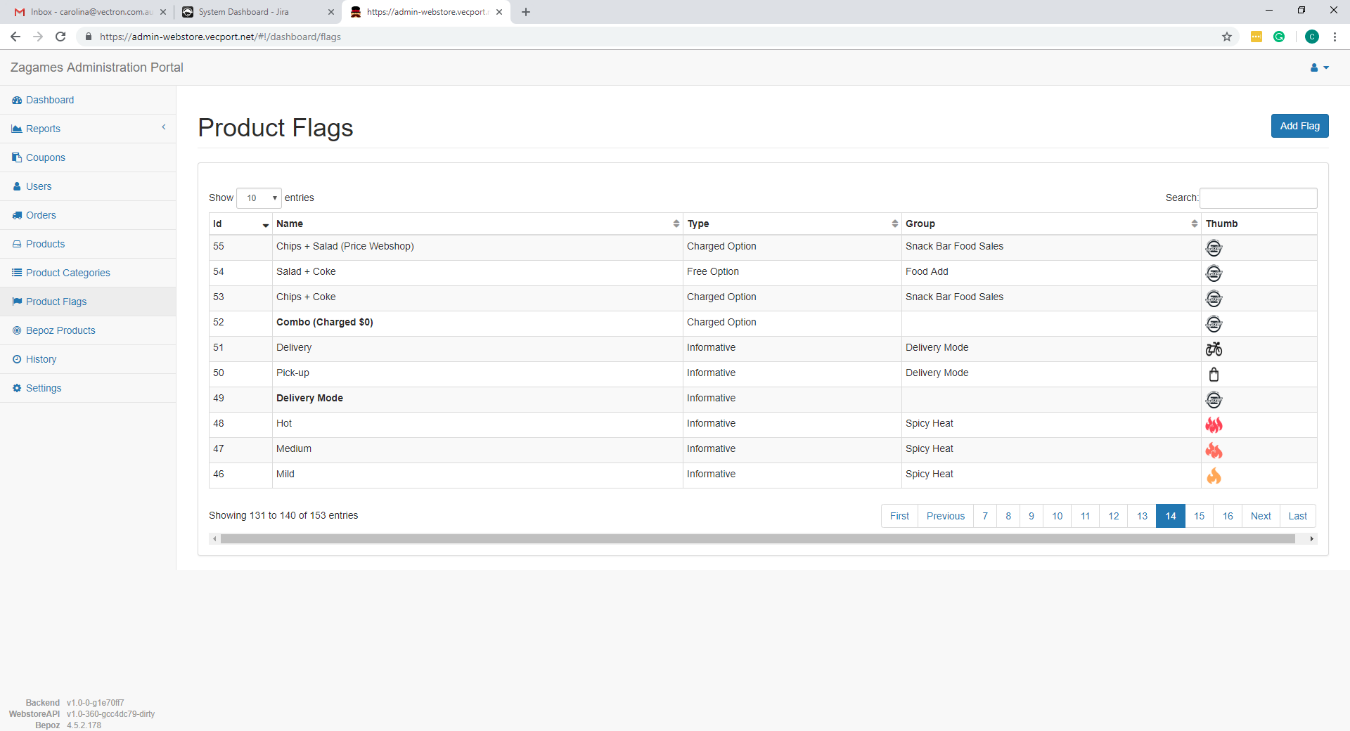
2 | View and Update Product Flags
By clicking on Product Flags menu item in the left navigation, Back-Panel users can see all the product flag groups (in bold), their food adds (condiments) and informative flags (product filters) that are being used in YourOrder. On this page, users can also see the ID field, type, group (if applicable) and thumbnail. By clicking on the product flag’s name, the edit page will open.
By clicking on Product Flags menu item in the left navigation, Back-Panel users can see all the product flag groups (in bold), their food adds (condiments) and informative flags (product filters) that are being used in YourOrder. On this page, users can also see the ID field, type, group (if applicable) and thumbnail. By clicking on the product flag’s name, the edit page will open. In this page, the Back-Panel users are able to see further information, change it if necessary, to see a list of all the product flags in the parent product flag group, any products that using a singular product flag, and check the history, which shows all the changes that have been done to the group or a singular product flag.
The flags can be used in 3 different ways in YourOrder, depending on their type:
(1) Informative: All Product Flags that are added to a Product Flag group classified as “Informative” will display their icon under the filter function in the YourOrder Menu page. It also appears under the product’s name as well. It helps customers to filter and find products easily, e.g. vegetarian, gluten-free.
(2) No-charge: Allows the customers to work out how they want their products to be cooked and modified (e.g. well-done steak, No onion and No ice), and to customise their products by adding extra ingredients to the original product for free. Each Product Flag that is added to a Product Flag group classified as “No-charge” must have a Bepoz product linked to it.
(3) Charged: Similar to No-Charge, it allows the customers to customise their products by adding extra ingredients to the original product but it adds extra price to the total cost (e.g Extra bacon $3.50). Each Product Flag that is added to a Product Flag group classified as “Charged” must have a Bepoz product linked to it.
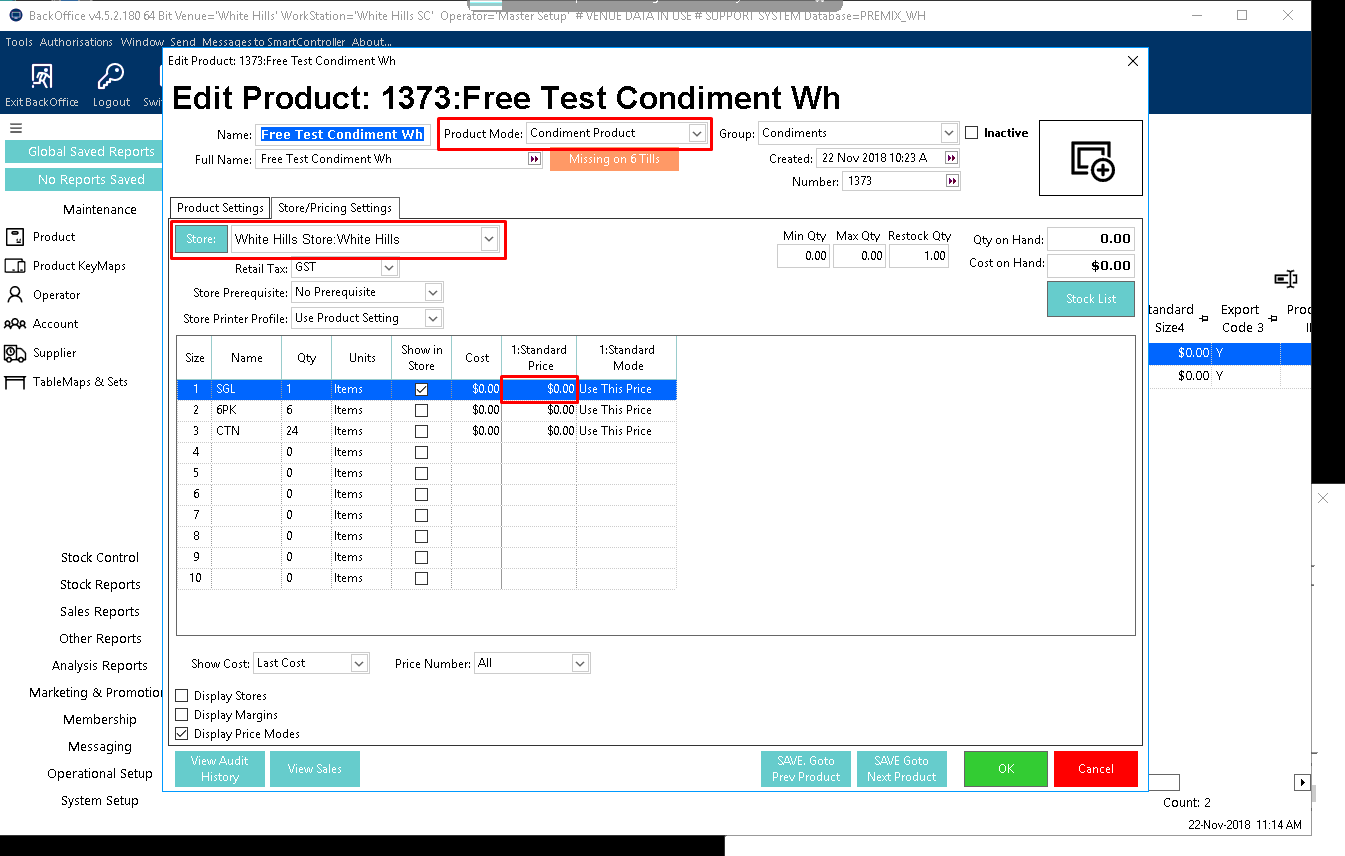
Add a New Condiment Product in Bepoz
When creating a product flag and adding it to a Product Flag group not classified as “Informative”, the Admin Back-Panel user will be asked to select an existing Bepoz condiment product. To enable this the condiment product needs to first be created in Bepoz Backoffice. The newly created product in Bepoz should also have “condiment product” selected as a Product Mode (See image below).
PLEASE NOTE:
- To find the edit product screen in Bepoz, click on Product under the Maintenance heading.
- Set the product standard price to zero for no-charge YourOrder product flags or set a standard price for charged product flags
- For multiple stores in a single venue, the condiment needs to be created under the correct store’s name
*Please contact our Bepoz support team or authorised dealer for further information.
Add a New Flag to YourOrder
By clicking on the “Add Flag” button in the Product Flags section, a new screen will open for a Product flag to be created. The first field requested is “Group”, which will define if the new flag will be a Parent Group or a Child Flag (that belongs to a Parent Group).
(1) Parent Group: The Back-Panel users can create a parent group by selecting “parent group” in the drop-down. When selected, the field “Name” will be unlocked & “flag type” will be displayed underneath for selection.
PLEASE NOTE: All the child flags that belong to this group will have the same flag type. In case the flag is set with the type “Non-charge” or “Charged”, Minimum and Maximum fields will also be displayed.
(1.1) Maximum - sets the maximum number of product flags the customer can select before adding this product to the cart. E.g. a parent product flag group used by the product, “Steak” is “Cooking Instructions”, and its flags are: “Rare”, “Medium Rare”, “Well Done”. If the maximum sell is set as 1, the customer will at most be able to select one 1 product flag before adding the steak to the cart. Note in other scenarios ticking the No-Maximum checkbox enables the customer to select all applicable flags before adding the product to the cart
(1.2) Minimum - sets the minimum number of product flags the customer needs to select before adding this product to the cart. E.g. a parent product flag group used by the product, “Steak” is “Cooking Instructions” and its flags are: “Rare”, “Medium Rare”, “Well Done”. If the minimum sell is set as 1, the customer needs to select at least 1 flag to add the steak to the cart. Note in other scenarios having Minimum set to zero or empty would enable customer to not select any applicable flags before adding the product to the cart
(2) Child Flag: The Back-Panel users can create a Product flag item by selecting an existing group from the drop-down list. When selected, the field “Name” will be unlocked & “Flag type” will be displayed underneath (same as the parent group and not editable). Depending on the parent group flag type, other fields may display, such as Price and Bepoz Product.
PLEASE NOTE:
(1) Before adding or updating a Product Flag in the Back-Panel it is best to check a Product Flag with the same name wasn’t already added. This will prevent issues linking to the wrong Product Flag. E.g, food modifier is free when it should be extra
(2) Only one Product Flag linked to the same Bepoz Condiment Product can be added into the same parent group. For example, ‘Gluten Free Bun’ [$1.00] and ‘Gluten Free Base’ [FREE] must be two separate products in Bepoz if added to the same ‘Gluten Free Option?’ parent group.
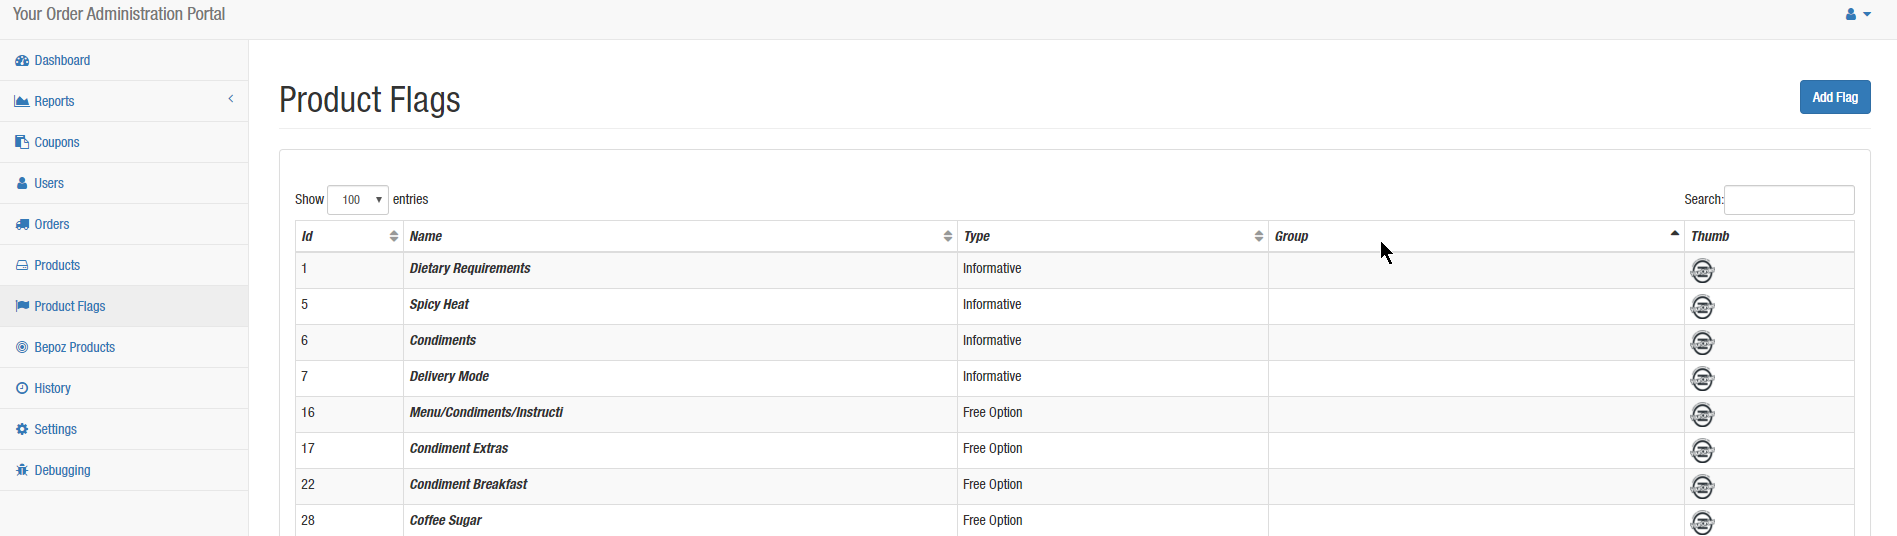
Sort Flag Display
Clicking on the Group column heading in the Product Flags page displays all Product Flag items (non-bold) and groups (in
bold) in YourOrder at the top of the list.
Group Column selected
By clicking on a Product Flag group, Back-Panel users can see a list of all the Group’s individual Product Flags. Product Flags in the group are listed in their display order which either matches the sequence in which they were created or the sequence set by the user.
The Product Flag Group’s Items section of this page allows the Back-Panel users to change the product flag’s display sequence in all product’s using the product flag, which can be done by dragging and dropping the product flag’s name into the desired position.
Drag product flag to desired position in product flag group
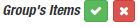
Tick and Cross buttons display next to the ‘Group’s Items’ label to save or cancel the display order changes as soon as a product flag changes position. Once all product flags have been dragged to their correct position, press the Tick button to save changes or the Cross button to cancel.
Display Order Tick and Cross buttons
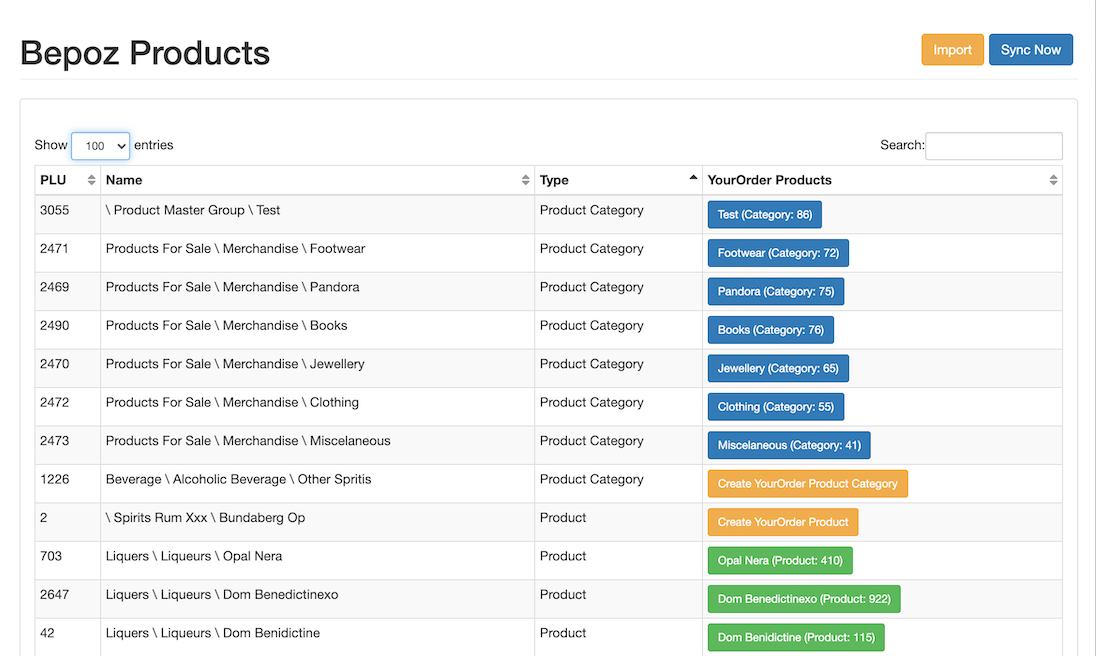
Bepoz Products
This section shows all the products and product flags (e.g. sauces, toppings) YourOrder pulled in from Bepoz, which are displayed in a list with the product’s ID, name, type and YourOrder products. The ‘YourOrder Products’ column can allow the user to check if a Bepoz product is not yet linked to any YourOrder product, or how many times a YourOrder product or product flag was created which linked to one Bepoz product. This can be determined from the number of buttons in the row and their colour. Clicking on a button in the YourOrder Products column will open the update screen for that item.
DARK BLUE: for Bepoz product categories that were imported into YourOrder.
ORANGE: for Bepoz products that have not yet been created/imported into YourOrder.
GREEN: for Bepoz products that have been created/imported into YourOrder.
BLUE: for product flags that have been created in YourOrder.
Products created in Bepoz can take up to 10 minutes to appear in the back panel. If you want to speed up the sync, you can click the “Sync Now” button which will sync the data and take up to 2 minutes. After the sync process is complete, clicking on the Import button will attempt to create products from BEPOZ in YourOrder using the same names and product categories as BEPOZ.
PLEASE NOTE:
1. While manual sync takes up to 2 minutes, auto-sync can take up to 10 minutes for products to be synchronised from Bepoz into YourOrder so it is highly recommended to add items during non-service periods and leave adequate time prior to service.
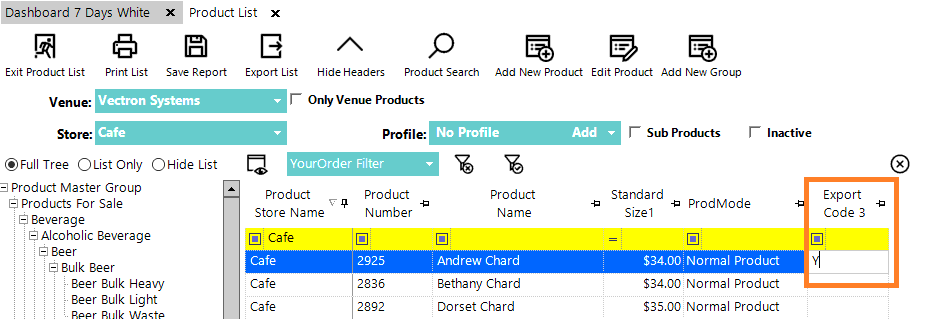
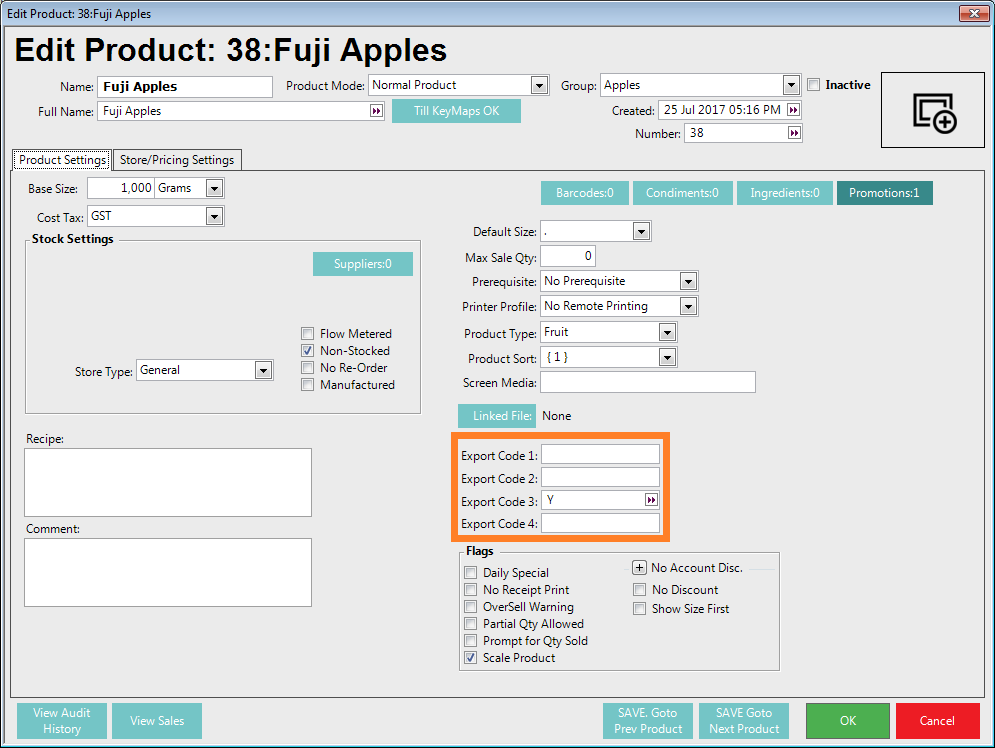
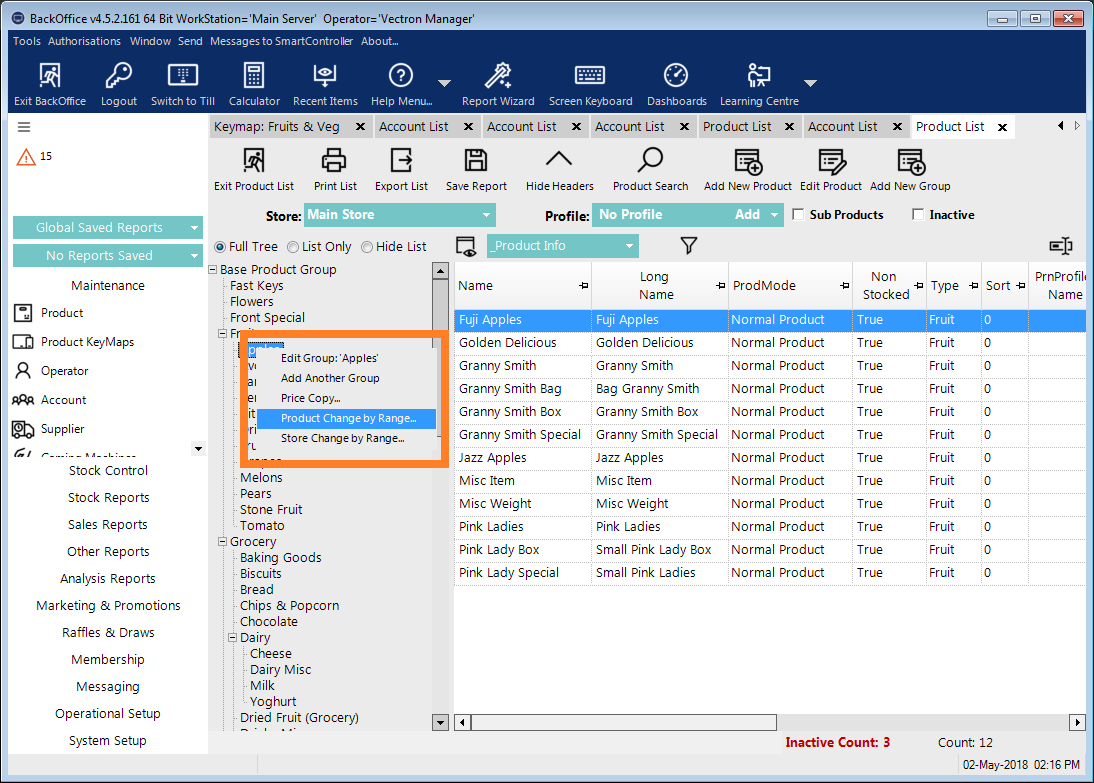
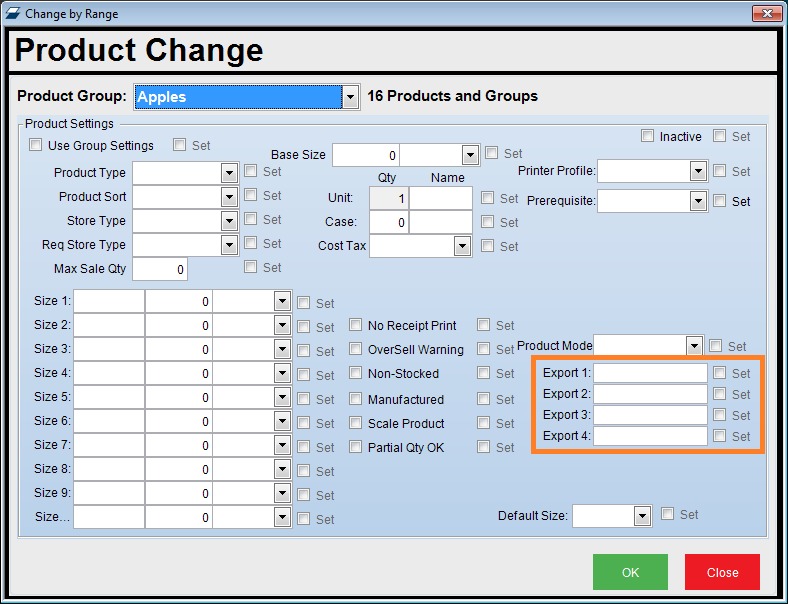
2. YourOrder is using Bepoz product Export Code to synchronise product information between both platforms. Products displayed in the Bepoz Products section of YourOrder Admin Back-Panel have an Export Code set in Bepoz (Please check the images below for reference). Admin Back-Panel allows the user to define which Export Code to use and which value it will have. In the Product list in Bepoz, add the relevant value to the desired Export Code against the Product so that YourOrder can link to the intended Product. Product Export Code in Bepoz can be set by individual product or by groups. In case of setting by the group, the users can point to the desired product group in the product list of Bepoz and click the right button of the mouse on a product category and hit "Product Change by Range”.
Caution: Please consult Bepoz support team or Authorized dealer if you are not familiar with the ‘Product Change by Range’ function.
3. For any product change in Bepoz, it is recommended to check the product section in the Admin Backpanel of the YourOrder platform. Ensure pricing is correct in YourOrder, such as, if the selling price in Bepoz is modified; If a new product is created in Bepoz, a new product may need to be created in the YourOrder item which links to the Bepoz product. To verify member prices, user may need to sign in, add items to the cart and progress to the checkout page to review discounted totals.
4. Prior to clicking the Import button, it is recommended that all product groups in BEPOZ have matching Store, Export Code and Product Mode values to their contents or product items inside that group. For example, if ‘Add Pepper’ in the Ingredients group has a Product Mode of ‘Condiment Product’ then the Ingredients group (parent) should also have a Product Mode of ‘Condiment Product’ prior to clicking on ‘Import’. Second, it is advised that the manual ‘Sync’ button in Admin Backpanel is clicked and the product sync process runs completely before the ‘Import’ button is clicked to ensure the latest item names are imported from YourOrder. Last, it is recommended that the BEPOZ setup is completed as a once off to the extent that it matches the intended YourOrder setup before the Import is run. Multiple imports are usually not recommended as they almost always lead to manual rework.
BEPOZ BACK OFFICE – ADD EXPORT CODE INTO PRODUCT RECORD
Product List Edit Mode – Insert text into Export Code cell
BEPOZ BACK OFFICE – ADD EXPORT CODE PRODUCT DETAIL PANEL
BEPOZ BACK OFFICE – SETTING EXPORTING CODE BY GROUPS/CHANGE BY RANGE