
Overview
Prerequisites
Bepoz BackOffice Setup has been completed
Customer will need a Stripe account. This is ised as a payment gateway when a customer buys a Gift Certificate, Ticket or Promotional Voucher. This is to be done by the customer - more info here:
Customer will need to provide pictures, such as the Company logo, background image, banner images and other pictures for the gift certificate, promotion and/or Ticket
Setup Procedure
1. Log In to the Bepoz Admin Panel
Back panel: https://apps-admin.vecport.net
Username and password stored in LastPass.

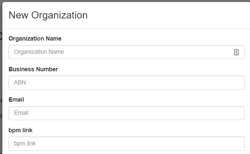
2. Add New Organisation
Enter organization name
Enter organization ABN (you can override for each venue)
Enter customer’s main email (this email is used on the invoice and as a username)
Leave bpm link blank
Bepoz and Stripe settings can be entered at the Organization Level, however it is preferred to set this at the Venue Level.
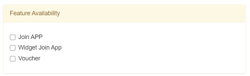
Choose which products this organization has
Join App - when the customer has EzeJoin on a tablet.
Widget Join App - when the customer has EzeJoin on a web browser.
Voucher - when customer has EzeGift or EzeTix or EzePromo
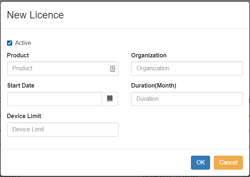
3. Add Licenses for this new organisation
Select the 'Licenses' section in the side navigation panel and set the following:
Set Active true
Select the product
Join App - when the customer has EzeJoin on the tablet.
Widget Join App - when the customer has EzeJoin on the web browser.
Voucher - when customer has EzeGift or EzeTix or EzePromo
Select 'Start Date' as today
Select the Organization
Set duration to 99999
If setting up the EzeJoin tablet app, check how many devices has they signed for. Otherwise set to 1
4. Venue Setup
Once the organization is created it is now time to create a venue. An organization can have as many venues as needed.
*You will need multiple venues if the customer wants separate revenue streams (Stripe) or separate URL/branding
**This is generally done at the venue’s back panel: https://join-admin.vecport.net
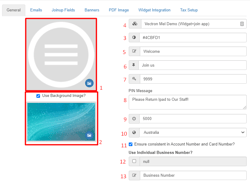
4.1 General Settings
Configure each of the settings below
Logo - Choose the venue logo
Background Image - Choose if you want a background image and which image
Background Colour - If not using a background image, choose background colour
Venue Name - Enter the venue name
EzeJoin Header - Enter the text that will be displayed as header on EzeJoin
EzeJoin Submit Button Text - Enter the text that will be displayed in the submit button on EzeJoin
Staff Pin - This is the PIN if an EzeJoin field is protected by pin
Pin Message - This is the message the end user will receive if an EzeJoin field is protected by pin
App banner time - Screensaver images that can be added to the EzeJoin app. This is the time between image transitions
Country - Select venue Country
Ensure card number consistency - If you want the card number to be populated
Business register name - Default is “ABN” but you can override the default. E.g. NZBN
Business register number - Enter the business registration number.
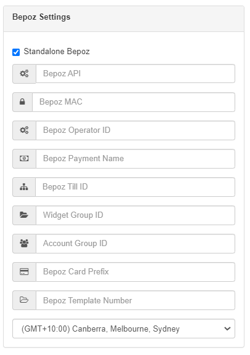
4.2 General Bepoz Settings
Enter the Bepoz BackOffice configuration details in each tab under venue setup, including the logo, background image and other design specs.
4.3 Payment Settings
Enter the customers' Stripe payment gateway settings.
Stripe Testing ID = acct_1F7Fi0EA4ydWW9RL

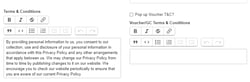
4.4 Terms & Condition Settings
You can have a separate T&C's for EzeJoin and for the voucher products (EzeGift, EzeTix, EzePromo). You can also turn off T&C for the vouchers.
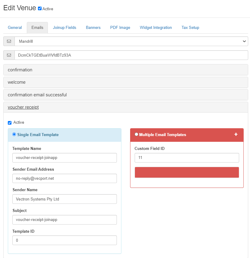
5. Email Settings
Before configuring this session, you need to create the email templates in Mailchimp. Please refer to section 5 – Appendix A
Enter the Mandrill API Key [zFv7k14uhApoL7L5F262Uw]
Enter the template name for each email. This must match Mailchimp template name
Enter the sender email address. The domain must be @vecport.net
Enter the sender name. Generally this is the venue name
Enter the email subject. Normally this would not change
Where are these templates used?
Confirmation - When new member joins (EzeJoin) they must confirm their email
Welcome - Once the email is confirmed, they receive a welcome email
Confirmation Email Successful - Once the email is confirmed, they receive this
Voucher Receipt - This is sent to the voucher buyer and it contains the invoice
Voucher - This is sent to the voucher recipient and it contains the voucher pdf
6. Field Settings (EzeJoin Only)
6.1 General Fields
Allows the user to personalise the online form and get the necessary information from their customers.
ACTIVE - tick the fields that will be displayed in the online form. If 'account number' and 'card number' are activated, the Scan button will also be enabled (scans with the iPad back camera).
REQUIRIED - mandatory fields that need to be filled in before submitting the form.
PIN PROTECTED - protected fields will require a PIN to be filled up. These fields are filled by staff members only.
6.2 Special Fields
Special Fields are set up by our development team only, and they can be requested through the requirement form or our support team. It is used for report proposes in JoinUp.
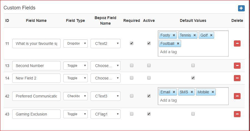
6.3 Custom Fields
These fields are also integrated with Bepoz, and all the answers will be available in the app’s Back-office and Bepoz as well. Customs fields can be set as a number of field types as outlined below.
Select 'Add New Custom Field' to create the fields you want to include, and configure as below:
Field Name – Name to show in the JoinUp page
Field Type – this has six options for different answer connection.
Text – provide space to enter a string of text (e.g. Nationality)
Number – provide space to enter a numeric value (lucky number)
Date – provide space to enter a date (Anniversary date)
Dropdown – enter a number of answers and allow the user to choose one of these answers
Checkbox – enter a number of answers with tick box option for selection (can select more than one answer)
Toggle – Put the tick box in front of the Field name
Bepoz Field Name – This is mapped with the Bepoz Account custom fields. Only allow one JoinUp field mapping with one Bepoz account custom field
Required – check this flag to make the field COMPULSARY
Active – check this flag to make the field visible on the JoinUp page
Default Values – allows you to put answers in “Dropbox” or “Checkbox” selected in Field type. Type word in the “Add a tag” space and press [Enter] to save it
Delete – remove the custom fields in system
7. Banners Settings (EzeJoin App Only)
This is only used for the tablet app. Images can be added as screensavers when the app is not in use.
8. PDF image Tab
Used for PDF files for vouchers, tickets and gift certificates. This is the only customization possible to the voucher PDF file. It is an image of size (816 x 350px ) that displays as a header on the voucher PDF.
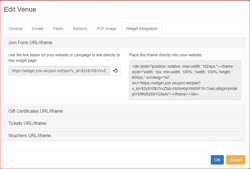
9. Widget Integration Tab
These are the links and iFrames which we need to provide to the customer's Web Designer. The designer needs to add these code snippets into the customer’s website, providing customers access our platform. There are four different URLs for each of the products included in the Web AddOns bundle.
Next Step
Once the WebAddon BackPanel configuration is complete, proceed to Q&A - Gift Certificate Security