24 | Workstation Maintenance - Header Settings & "Till Setup" Tab
This article focuses on the header section of the window and the Till Setup for Workstation Maintenance. Workstation Maintenance is used to configure each individual Workstation and includes key identifying fields as well as dozens of other possible settings throughout its tabbed structure. The header provides general fields for the Workstation and also has options which affect what other settings will be available on the subsequent tabs.
This article focuses on the header section of the window and the Till Setup for Workstation Maintenance.
Workstation Maintenance is used to configure each individual Workstation and includes key identifying fields as well as dozens of other possible settings throughout its tabbed structure.
The header provides general fields for the Workstation and also has options which affect what other settings will be available on the subsequent tabs.
The Till Setup tab contains a plethora of configuration options which are used to select general settings and design of the Workstation.
Prerequisites
- To access Workstation Settings, the applicable Operator Privileges will need to be enabled
- Operator Maintenance 'General' Tab
- System Setup: "Access Venue, Stores & Tills" Flag
- System Setup: "Maintain Venue, Stores & Tills" Flag
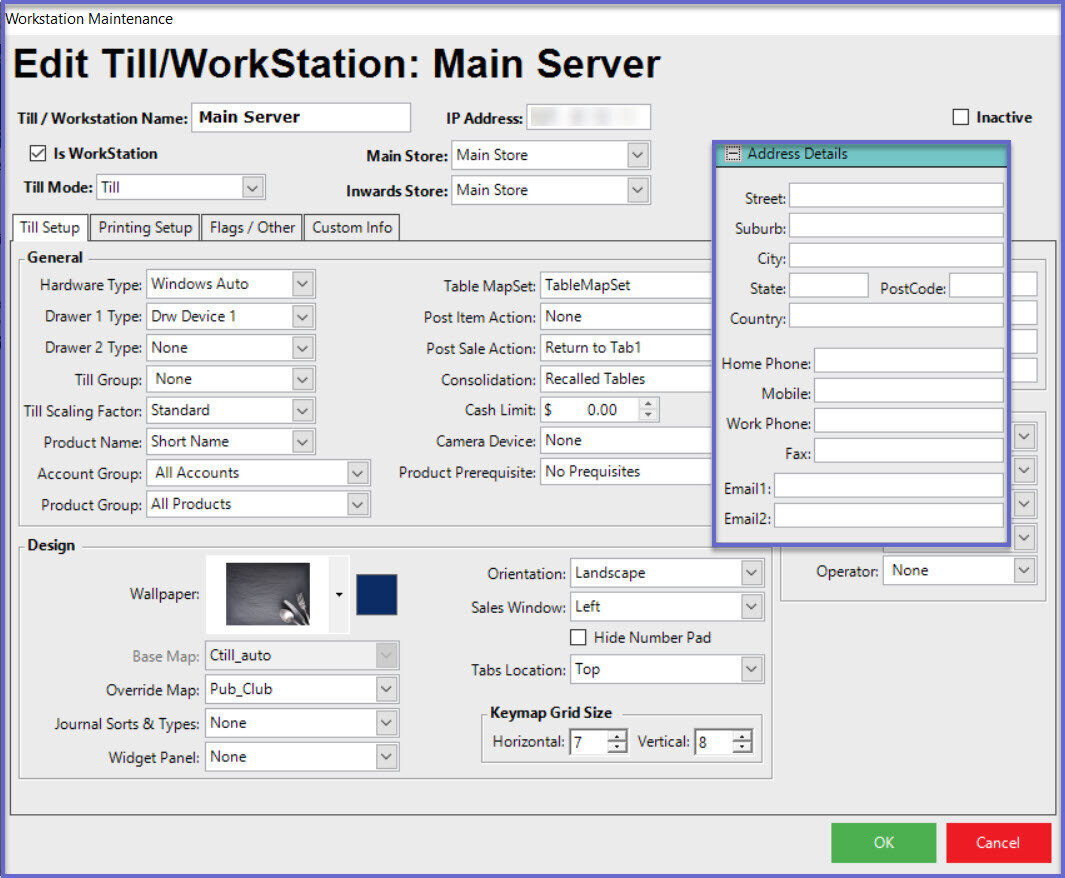
Workstation Maintenance Header
- The header section of the Workstation Maintenance window contains a handful of important SmartPOS Workstation configuration options that will be visible in this window regardless of which tab is selected below
Configuration Option
|
Description
|
| Till/Workstation Name |
- This is the Name of the SmartPOS Workstation and is used to define it throughout BackOffice including Reports
- This will also be displayed on the SmartPOS Workstation screen after login
|
| IP Address |
- This is the IP address of the Venue's SmartController as accessed from Head Office or another Venue if it is the server
- Otherwise, it is the local IP address of the SmartPOS Workstation
|
| Is WorkStation Flag |
- This flag must be enabled for any computer or Till that needs to run BackOffice software
- If disabled, BackOffice will not be able to run
|
| Till Mode |
- There are six (6) different Till Modes which affect the behavior of the Workstation and should be set up accordingly as required:
- None
- Till
- Door Terminal
- Product Inquiry
- Raffle Draw
- API Till
- Depending on the Till Mode selected, various configuration options within Workstation Maintenance may be grayed-out or removed
|
| Main Store |
- This is the Store used for Reporting, deducting Stock, and getting Prices
- Although Stock and Prices can be redirected elsewhere, all Reports for this SmartPOS Workstation will appear in this Store
|
| Inwards Store |
- If this Workstation receives Stock, this is the default Store to receive the Stock into
- This can be overridden by each receipt
|
| Address Details |
- These are the address details for the SmartPOS Workstation
- Clicking this will expand to reveal all of the Address Detail fields available
|
| Inactive Flag |
- Enabling this flag will mark this Workstation as inactive, i.e., it cannot be used
- It will no longer appear on any lists for selection etc., but will still appear in Reports
|
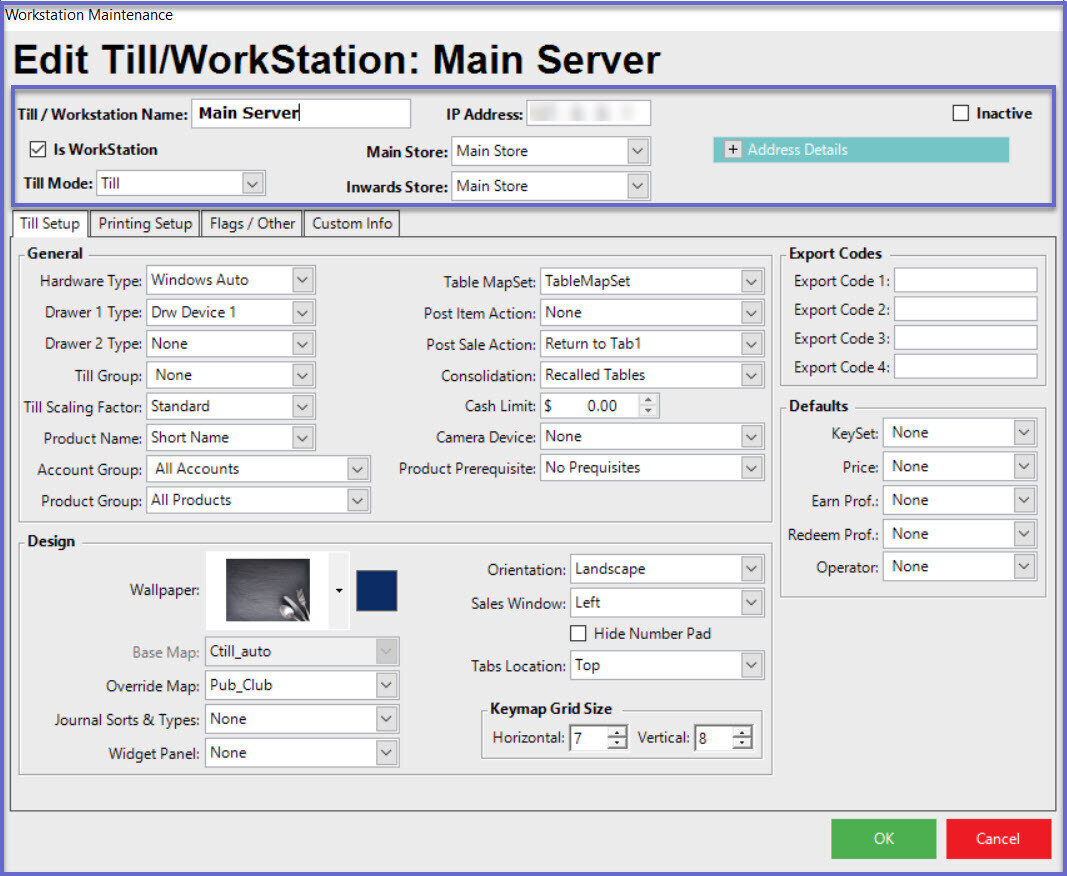
"Till Setup" Tab
- The Till Setup tab contains many configuration options which relate to the overall function and operation of the Workstation such as the till's Hardware setups, till Defaults, and Design of the till screen
General
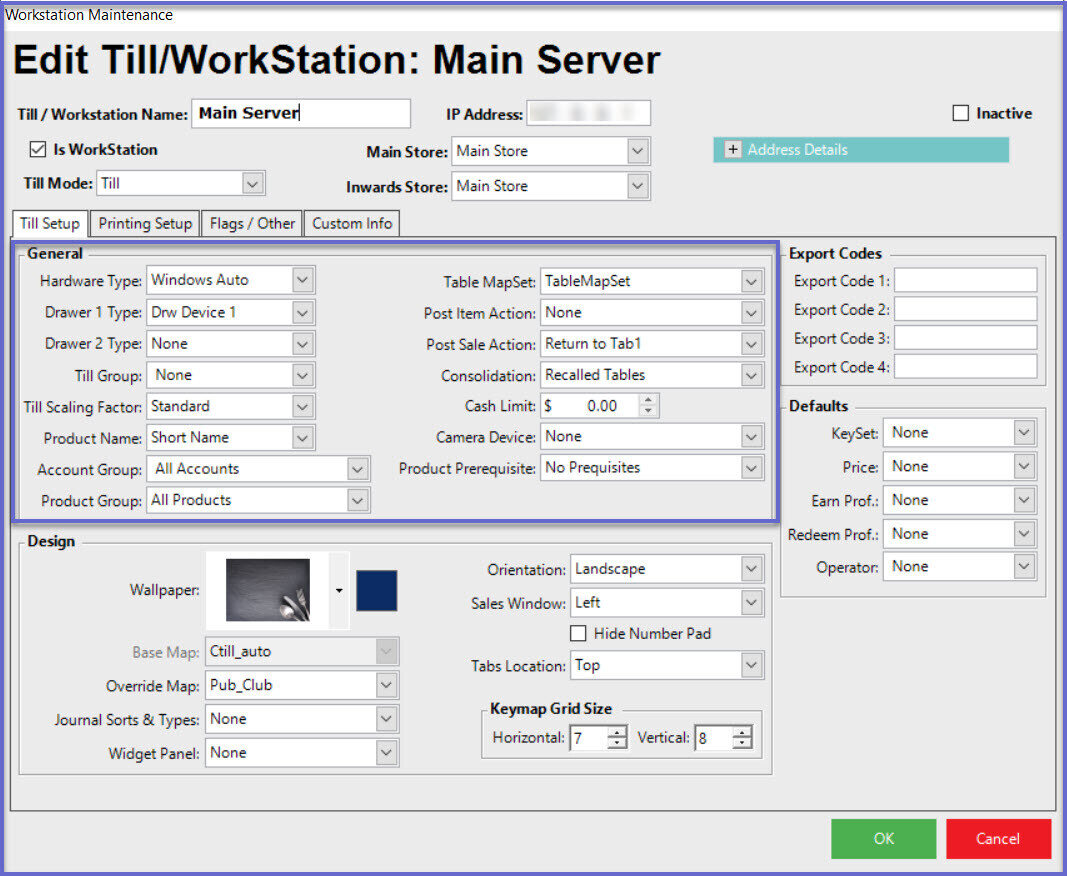
- This section of the tab mostly consists of drop-down selections that are used to define how the Workstation will perform for its intended use
- A few settings here should only be changed by Bepoz Support Personnel
Configuration Option
|
Description
|
| Hardware Type |
- This defines the Hardware being used for this Workstation - select the correct type for this SmartPOS Workstation
- An incorrect selection may cause the Till to malfunction
- This should only be changed by Bepoz Support Personnel
|
| Drawer 1 Type |
- This defines the main Drawer being used with this SmartPOS Workstation if a drawer is connected
|
| Drawer 2 Type |
- This defines the secondary Drawer being used with this SmartPOS Workstation if a 2nd drawer is connected
|
| Till Group |
- This is used for various functions and External Links; e.g., it allows all tills in an area to appear the same to a Room Charging system
- This should only be changed by Bepoz Support Personnel
|
| Till Scaling Factor |
- If the Text and buttons are small on the device, set this to one of the larger settings
- Options include:
- Standard
- A Little Larger
- Large
- Extra Large
- Smaller
- Quite Small
|
| Product Name |
- Use this to select the Product Name that will be used at this SmartPOS Workstation:
- Short Name
- Long Name
- Second Name
- To utilize Product Second Names, the "2nd Language Name" must first be configured on the Global Settings "Main" tab
|
| Account Group |
- Select from the System's available Account Groups - or All Accounts
- The selection here will limit all Account Lookup lists via this SmartPOS Workstation to only show Accounts under the Group selected
|
| Product Group |
- Select from the System's available Product Groups - or All Products
- The selection here will limit all Product Lookup lists via this SmartPOS Workstation to only show Products under the Group selected
|
| Table MapSet |
- Select from the System's available Table MapSets
- If this SmartPOS Workstation is intended to use a Graphical Table Map, this is the Graphical Layout Map of the Tables serviced by this Workstation
- Table Maps and Sets are maintained via BackOffice Maintenance > TableMaps & Sets
|
| Post Item Action |
- This determines the action (Product KeyMap Tab to now be active) to be taken after a Product is selected to be added to a Transaction from a Product Map via this SmartPOS Workstation
- Select from:
- None
- Return to Tab1
- Return to Prev
|
| Post Sale Action |
- This determines the action (Product KeyMap Tab to now be active) to be taken after a Transaction is completed from this SmartPOS Workstation
- Select from:
- None
- Return to Tab1
- Return to Prev
|
| Consolidation |
- This selects the way this SmartPOS Workstation consolidates Products sold that are the same
- 'Base Product' means that only Products without condiments are consolidated
|
| Cash Limit |
- When this Till drawer contains more than this currency amount, an audit will be created in the System
- It can then be linked to an Alert
|
| Camera Device |
- If security cameras are used, this SmartPOS Workstation will send its Transaction data to the selected camera
|
| Product Prerequisite |
- Select from the System's available Prerequisites
- The prerequisite selected must be met prior to selling any Products from this SmartPOS Workstation
|
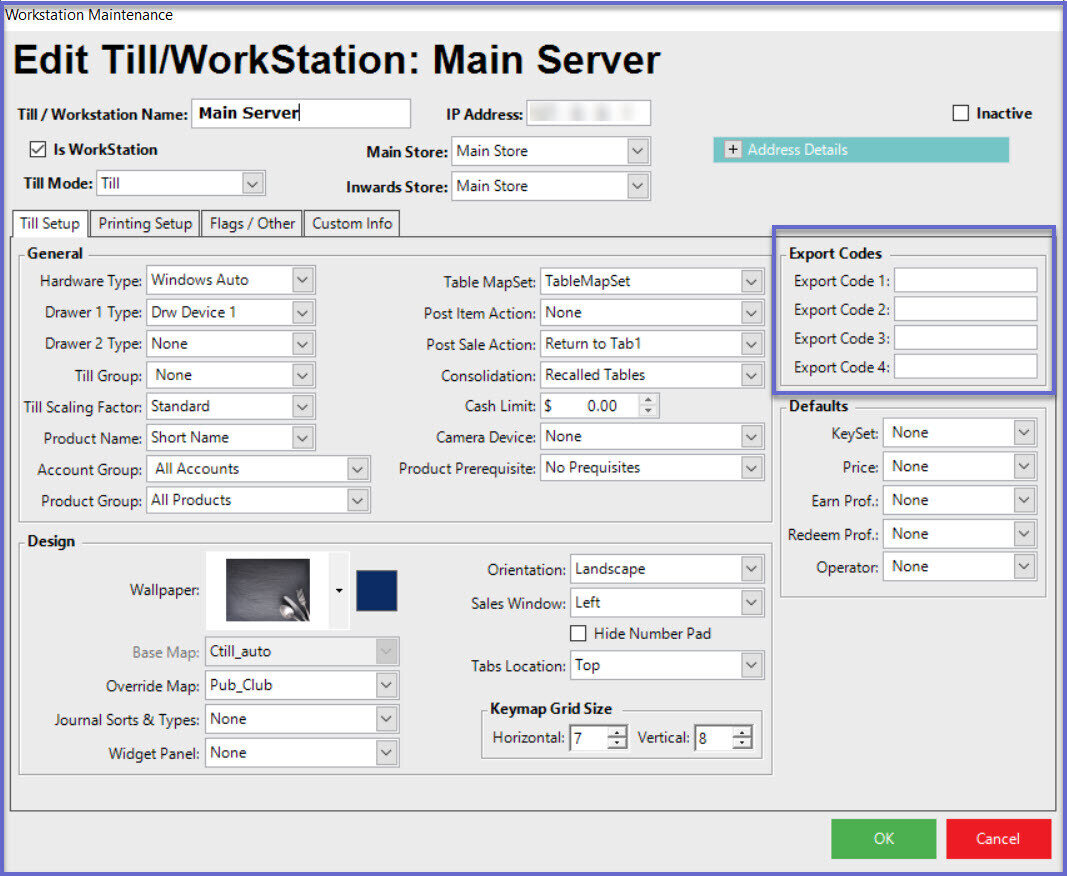
Export Codes
- These are used for devices and reports
- There are four (4) Export Codes available which can be named via Global Settings
- These are sometimes used when exporting and importing to match the Products to another database
- These can also be used as Custom Fields for in-house reporting and filtering purposes
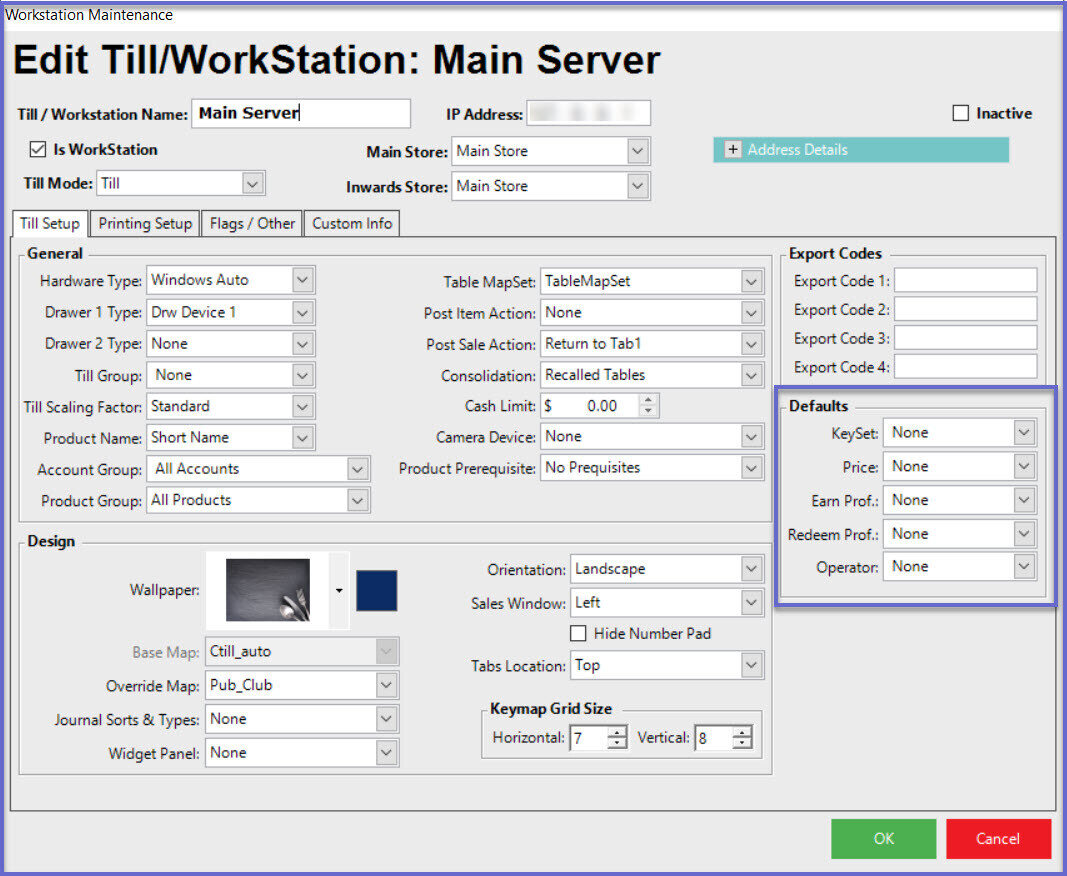
Defaults
Configuration Option
|
Description
|
| KeySet |
- Select from the System's available KeySets
- This will be the default KeySet used permanently if no Schedule KeySet changes are defined
- If Schedule KeySet changes are defined, this is the KeySet activated at midnight Sunday
|
| Price |
- Select from the Venue's available Price Names
- This will be the default Price Number used permanently if no Schedule Price Number changes are defined
- If Schedule Price Number changes are defined, this is the Price Number activated at midnight Sunday
|
| Earn Profile Points |
- This will be the default Earn Points Profile used permanently if no Scheduled Points Profile changes are defined
- If Scheduled Points Profile changes are defined, this is the Earn Points Profile activated at Midnight
- Select from the available Points Profiles
|
| Redeem Profile Points |
- Select from the available Points Profiles
- This is the Default Redeem Profile to use if the selected Account does have one
|
| Operator |
- Select an Operator from the System's Operator List or leave as 'None'
- If a Default Operator is set for this SmartPOS Workstation, that Operator will be automatically logged on whenever the Till is started
|
Design
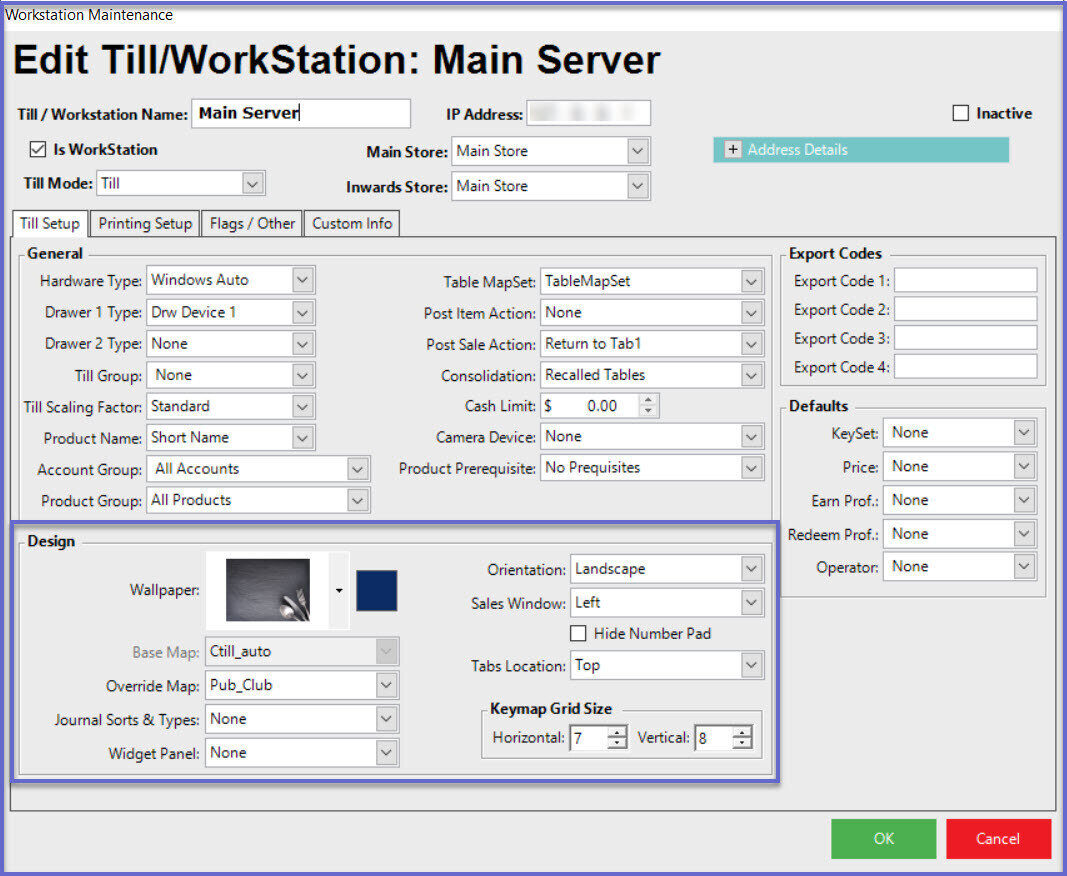
- The Design section of this tab is used to configure the physical look of the SmartPOS Workstation
- The available options here may be grayed-out (and therefore made unavailable) depending on which Till Scheme has been set in Global Settings on the "SmartPOS Scheme" Tab
- In the above example, the 'Flat' Till Scheme has been configured in Global Settings
- When using the 'Classic' or 'Tiles' Till Schemes - Wallpaper, Orientation, Upper (Sales Journal), Tabs Location, and Lower (Number Pad) will not be available
- These same settings when used with the 'Flat' Till Scheme can be used however desired and in many different combinations depending on user preferences
Configuration Option
|
Description
|
| Wallpaper |
- This will set the Wallpaper for the login screen of this SmartPOS Workstation
- There are about a dozen wallpaper options to choose from
- This is only available when the 'Flat' Till Scheme is set in Global Settings
- If the Wallpaper is changed in BackOffice, it will be updated in real-time the next time the login screen is loaded for the SmartPOS Workstation - restarting SmartController is not necessary
|
| Base Map |
- This is the base Keyboard Design Map of this SmartPOS Workstation
- It will define the total "look & feel" of the Till screen
- The selection is determined by the physical Till type and should only be changed by Bepoz Support Personnel
- This is only available when the 'Classic' and 'Tiles' Till Schemes are set in Global Settings
|
| Override Map |
- Select from the System's available Function Maps
- This is the map of the custom Function Key layouts
- It will overlay on top of the Base Map to allow for many different Function button layouts
- These are maintained via BackOffice > System Setup > Till Function Maps
|
| Journal Sorts & Types |
- Select from None, Sort, Type, Sort Group, or Type Group
- This will set the selected group to display in the Sales Journal/Transaction Window with each Product
- I.e., if Sort is selected then the Product Sort will be displayed in the Transaction Window with the Product line
|
| Widget Panel |
- Select from None, or Operator Details
- If this is set to None, the SmartPOS Widget Panel will display the Bepoz SmartPOS logo
- However, if this is set to Operator Details, the following will be displayed in the panel on SmartPOS:
- Operator Name
- Average Sales Data for the Operator, for the Venue, and the difference between the two -- by default this will be displaying data for the Current Shift
- Buttons to provide for changing the period of the Average Sales shown
- An Operator Messages function button which will give the Operator access to their Messages/Memos
|
| Orientation |
- This sets the SmartPOS Workstation's screen orientation which may depend on the hardware being used and/or business preferences
- Select from either Landscape or Portrait
- When using Portrait Orientation, Panel size and shape will change based on the screen resolution of the Hardware being used
- This is only available when the 'Flat' Till Scheme is set in Global Settings
|
| Upper (Sales Journal) |
- This sets the SmartPOS Workstation's display position of the Sales Journal (Transaction Window) on the screen
- Select from Left or Right
- This is only available when the 'Flat' Till Scheme is set in Global Settings
|
| Tabs Location |
- This sets the SmartPOS Workstation's display position of the Product KeyMap Tabs on the screen
- Select from Top or Side
- This is only available when the 'Flat' Till Scheme is set in Global Settings
|
| Lower (Number Pad) |
- This sets the SmartPOS Workstation's display position of the Number Pad and associated buttons on the screen
- Select from Right, Left, or None
- This is only available when the 'Flat' Till Scheme is set in Global Settings
|
| Keymap Grid Size |
- Use this section to set the necessary/desired buttons on the SmartPOS Workstation's KeyMap area
- E.g., if Horizontal is set to 6 & Vertical is set to 8 then 48 buttons can be displayed
|