
Overview
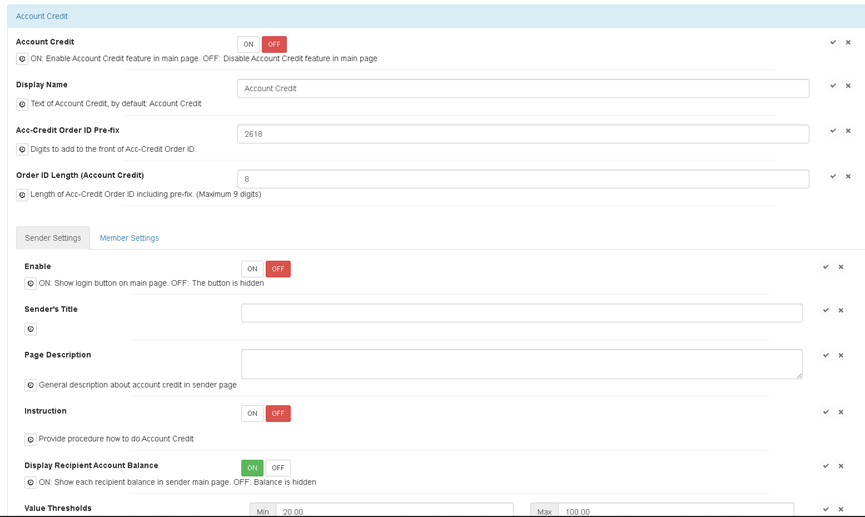
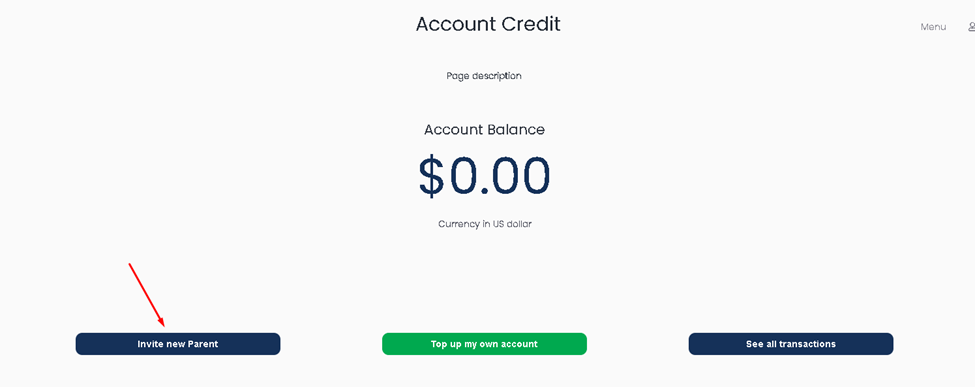
Account Credit
Account Credit are funds within an account that a customer can use to purchase products. The transaction will have a payment option that allows charging an account if there is an available amount in the balance. This feature will only work with Bepoz integration.
The Account Credit setting is where configurations can be made. It contains general account credit features and two tabs for different account types: sender and member. Each type has different privileges and a single account cannot be both. A sender can only top-up a member account, while a member can purchase with credits and top-up accounts by themselves.
|
Feature |
Description |
|
Account Credit |
ON: Allows Account Credit feature to display to customers OFF: Disables Account Credit feature on the frontend |
|
Display Name |
Custom name used as the title for account credit page and the button to access it |
|
Acc-Credit Order ID Pre-fix |
Digits to add to the front of Acc-Credit Order ID |
|
Order ID Length (Account Credit) |
Length of Acc-Credit Order ID including pre-fix. (Maximum 9 digits) |
|
Sender setting |
A tab that opens features specific to sender accounts |
|
Member Setting |
A tab that opens features specific to member accounts |
Note:
-
Acc-Credit Order ID Pre-fix, Order ID Length (Account Credit) will be configured prior. Please consult YourOrder support team, if you are unfamiliar with these features.
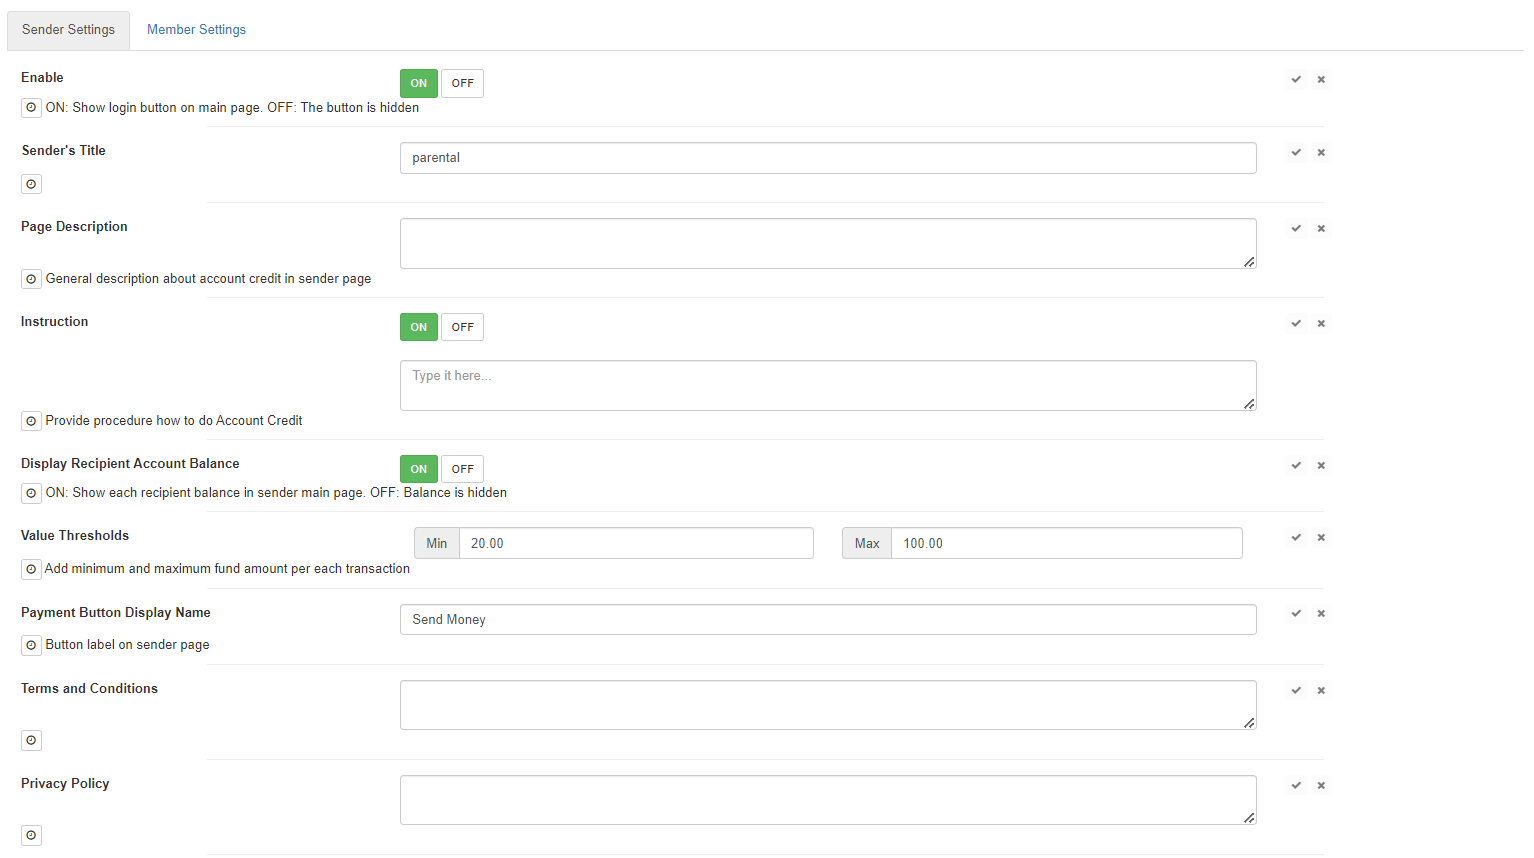
Sender Setting
Sender accounts have limited privileges, they can only send money to members and cannot make any orders from the menu. The sender settings contain configurations that apply only to sender type accounts.
|
Feature |
Description |
|
Enable |
ON: Shows button for sender accounts to login OFF: Disables the login button on the homepage |
|
Sender Title |
A name to be displayed on the sender login button. The default title is Parent |
|
Page Description |
Custom description of account credit within sender page |
|
Instruction |
Information seen by customers on how to use account credit ON: shows textbox to input steps and shows information to customers on sender page OFF: Disables instructions and textbox |
|
Display recipient account balance |
ON: Display recipients account balance OFF: hides account balance |
|
Value threshold |
Limits the min/max amount that can be sent to recipients, per transaction |
|
Payment button display name |
Custom name shown on payment button |
|
Terms and conditions |
Rights and responsibilities for both business and users |
|
Privacy policy |
Information on how client data is collected, used and managed |
Sender Account Setup
Backpanel Steps
-
Confirm that Account Credit is turned on.
-
Enable ON, to allow sender to login.
-
Input a display name for payment button, if left empty the default text, “Send Money” will be applied to the button.
-
Input a min and max limit fields for transactions. If any is left empty then a popup will appear to fill empty fields.
-
Optional:
-
Input a custom title, if left empty then the default text, “Parent” will be applied.
-
Input a general description of what the sender page is about, if there is no input then it will appear empty on the frontend
-
Turn ON and input the instructions on how to use the account credit, it can be left empty if desired.
-
Turn on to display recipient account balance.
-
Input the company terms and conditions, if applicable. The default is an empty field.
-
Add a company privacy policy, if applicable. The default is an empty field.
Note:
-
If both terms and condition and privacy policy are left empty then the other info dropdown on the front end will not appear.
Member setting
Member accounts have the privilege to make purchases with their account balance and top up their own accounts but cannot send money to other accounts.
For example, A child would like to purchase an apple juice from the canteen but only has $0.10 in their account balance. The child asks their friend to transfer some funds to their account to make the purchase. The friend cannot do so as they both hold member accounts. Instead, the friend, with a balance of $1.00 adds more credit to their account and makes the purchase for them.
This section is used to make changes to member accounts and how the account credit page is viewed by customers.
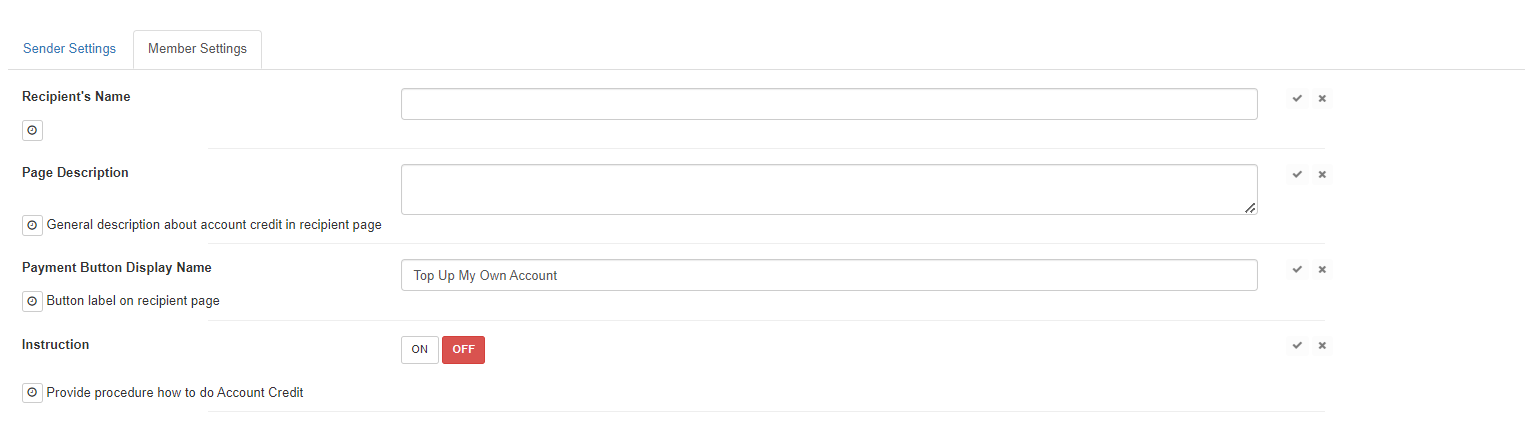
The member features: page description, payment button display name and instructions, function the same way as the sender settings, but are displayed on the account credit page. Recipient's name feature will display a title on the member login button and the default name is Student.
Member Account Setup
Backpanel Steps
-
Confirm Account Credit toggle is on.
-
Input text in Recipient’s Name field for log-in button. If it is left empty it will use the default text, Student
-
Input a Payment Button Display Name. If left empty it will use the default text, Top up my own account
-
Optional:
-
Add a general description of member page. If there is no input then it will appear empty on frontend
-
Turn instructions ON and input a procedure on using account credit, it can be left empty if desired
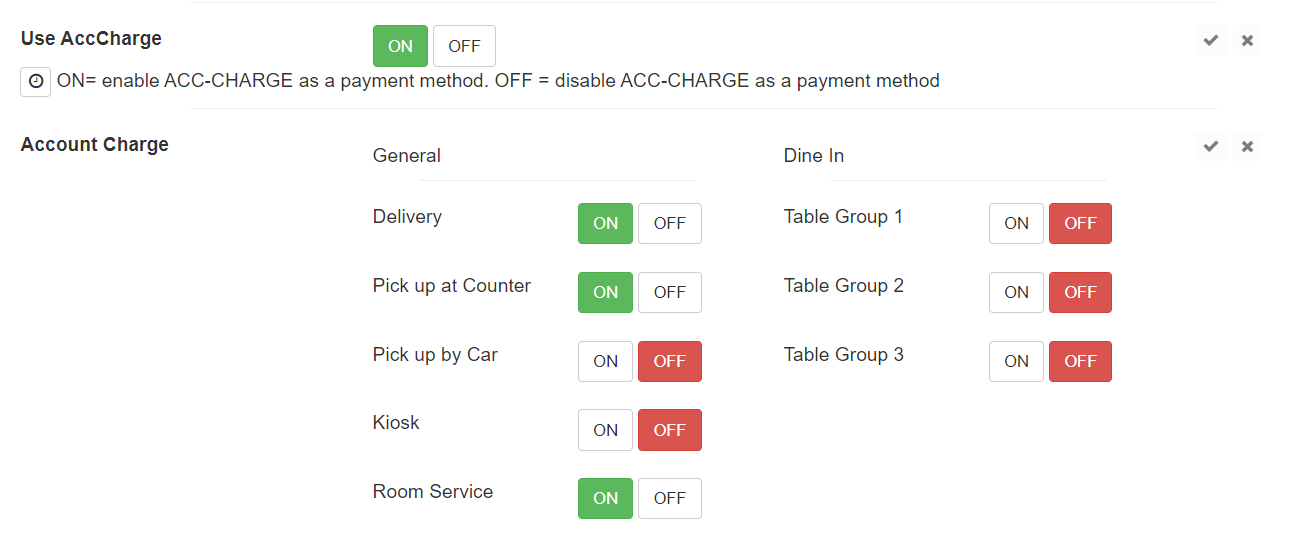
Account Charge Setup
Back panel users also have the option to toggle the account charge function. These settings can be accessed by clicking “Settings” on the left side panel. When the new window appears, click the “Bepoz” heading to expand the section, then scroll down till the below image is in full view. “Use AccCharge” is the main toggle to turn this feature on/off. Clicking ON till it changes green and pressing the

button to save, will enable the function.
The “Account Charge” configuration below, has a separate toggle for each ordering type. As some users may only need this payment method for specific services. Each toggle works the same way, by Clicking ON till it turns Green to enable the payment option and OFF till it changes to a red colour to disable them. After choices are finalised, click the
button to save.
Frontend Functionality
Sender accounts
Sender Account Sign up
-
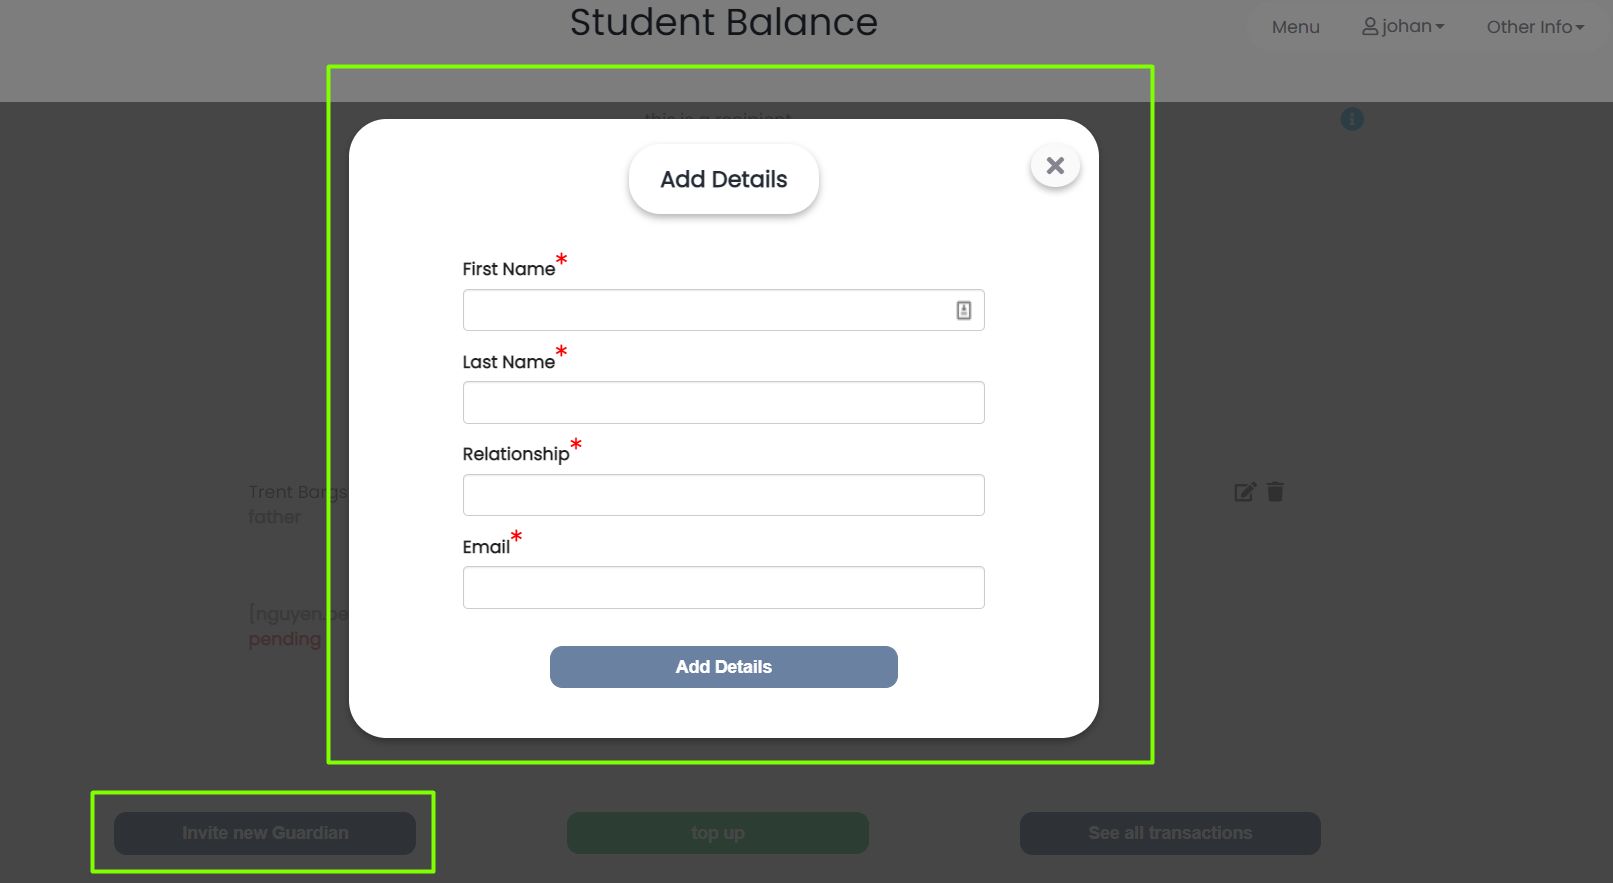
These accounts cannot be signed up through the standard signup process. Member accounts have the privilege of inviting an individual to acquire a sender account. This links both accounts after the email invitation is accepted. This Is done through the invite button on the members account credit page. Once clicked a popup will appear with 4 fields. When all required fields have appropriate values, another popup occurs and an email will be sent to the email address.
-
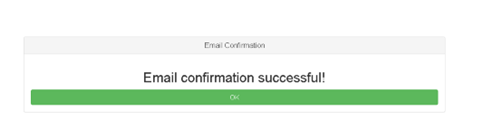
Within the email, individuals will be able to accept the invite by pressing “Click here to confirm”. Once confirmed, there will be a new window to type a one-time password for login.

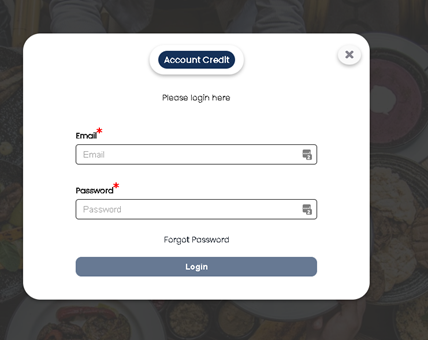
Next need to set a new password and confirm it.

-
When the password is accepted, the customers will be sent to the Sender Account page. Within this window, many back panel features will be displayed. At the top, the display name changes are shown. Member settings configurations such as page description, instructions and display recipient account balance can also be seen. In the top right corner, there will be displayed 3 tabs:
-
The will have a dropdown where customers can view profile information and reset password
-
The other info tab will show the terms and conditions as well as the privacy policy, if they have been applied
-
a log out tab

Linked accounts will also be displayed and using

the allows deletion of the account. There also is a payment button and a button to see your previous transactions.
Sender account page
Sending Credit
Send to a single account
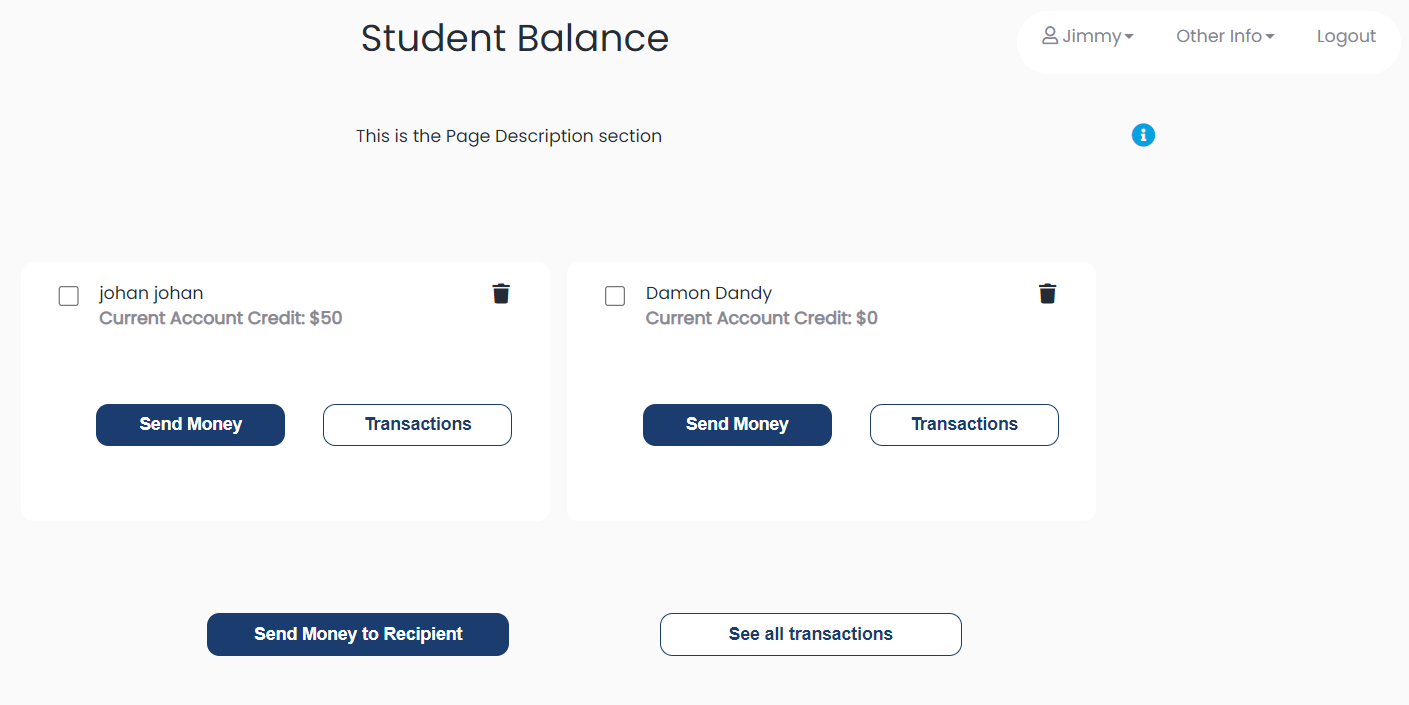
Clicking the payment button within the panel of a linked account will allow sending of credits. A popup should appear. In the window, there will appear a minimum and a maximum threshold, a field for the amount to send and a box to request an invoice by email. Input the desired amount and press the button on the bottom and the credit card panel will appear. If a value is not between the required range, then some text will display asking to input a value in the range.
In the credit card panel, if input in any of the fields is incorrect a warning text will appear. After submit is pressed, it will begin to process the payment to a credit card. Payment will be displayed on the account credit page of the paid member.
Sending credit popup
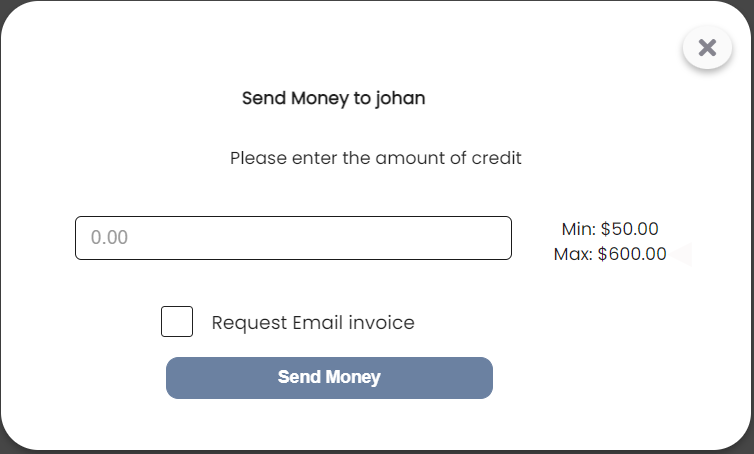
Send to multiple accounts
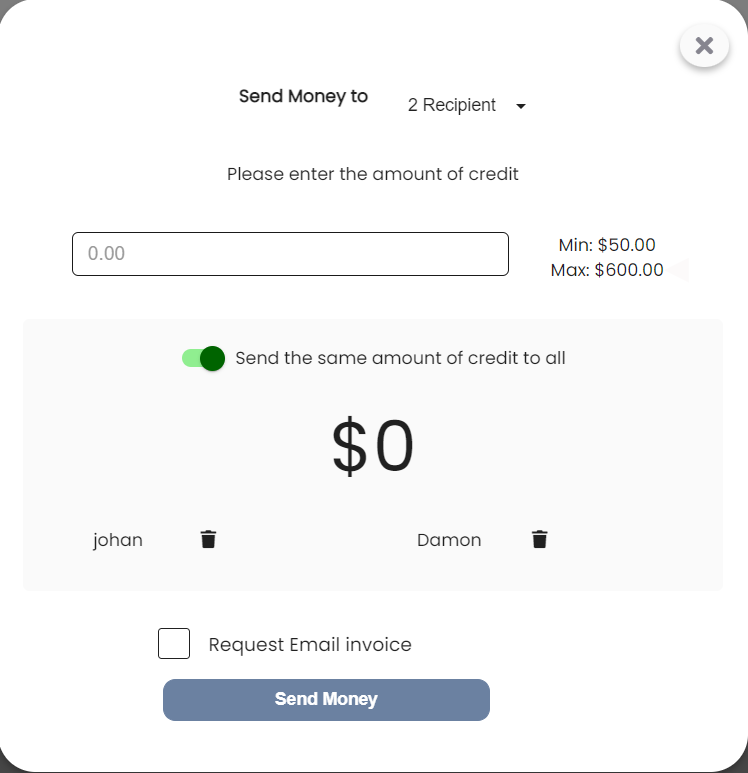
If individuals are sending funds to more than one account, they will have to select accounts by clicking the boxes within the account panels. After selection, click the payment button at the bottom of the screen and a popup will occur. In this window, individuals can apply an amount in the minimum and max range and send all accounts the same amount or by pressing the

, a new screen will appear. In this popup, users can send separate amounts to each recipient account by filling the amount fields and pressing the payment button. When fields are accepted and payment button is clicked the credit card screen will open and the process will be the same as sending to a single account.
Multiple recipient's popup
Separate amounts window
Note:
-
A credit card processing fee is included within the transaction.
-
When applying separate amounts to different users the total of all the amounts needs to be between the min/max thresholds.
Member Accounts
Member Sign up
Steps
-
Click a service type from homepage
-
Go to top right corner, click login button next to guest user
-
Press the sign-up tab and fill in fields. After Click sign up button at the bottom
-
Account created pop up will appear, click continue
-
Click the
with the account name and click the second option to access the account credit page
Purchase by Account Credit
Steps
-
Select products from menu screen and click checkout
-
Press the account charge button in payment screen
-
Choose a tips option in the tip popup
-
Place order panel will open, click confirm
-
In the checkout screen, the transaction receipt will show the amount charged and remaining balance
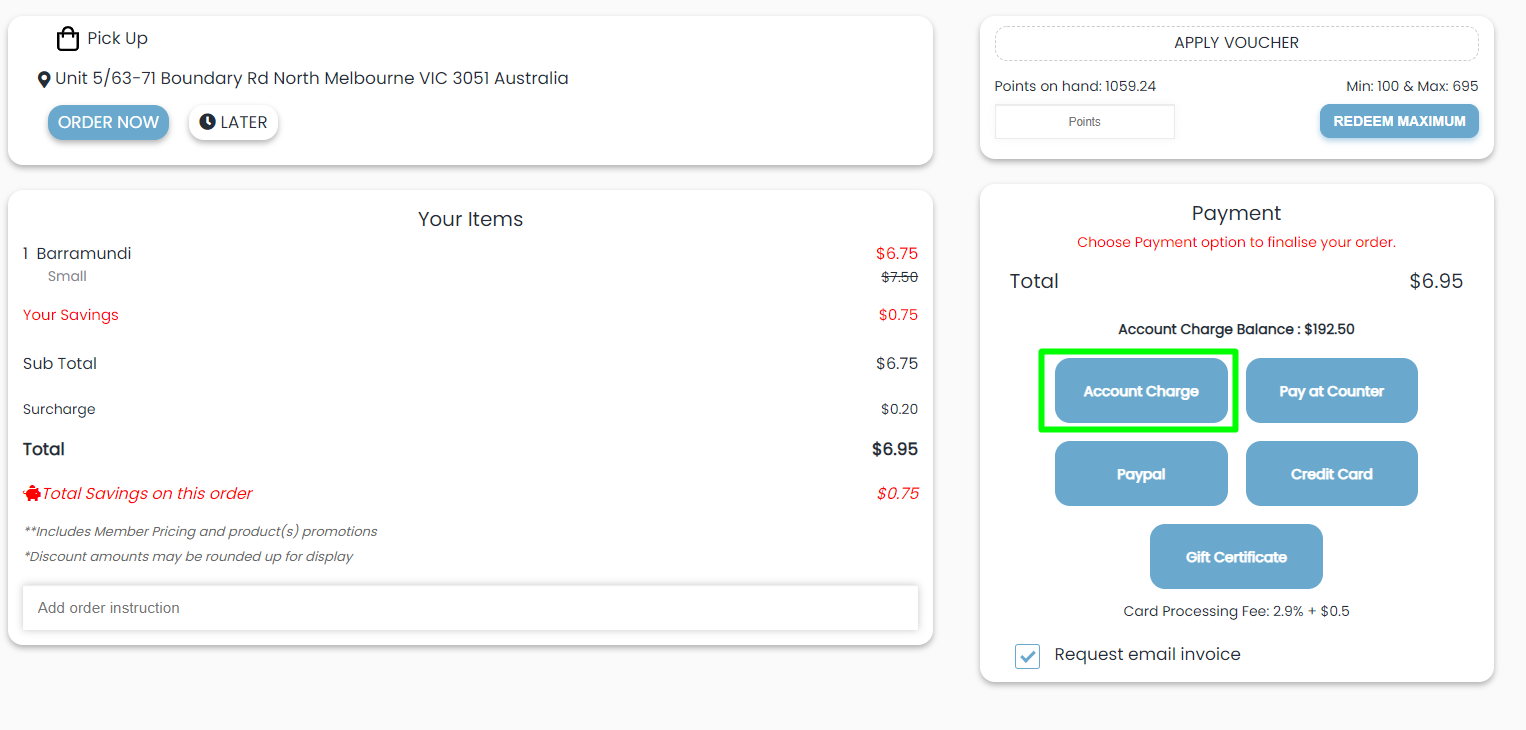
Payment screen
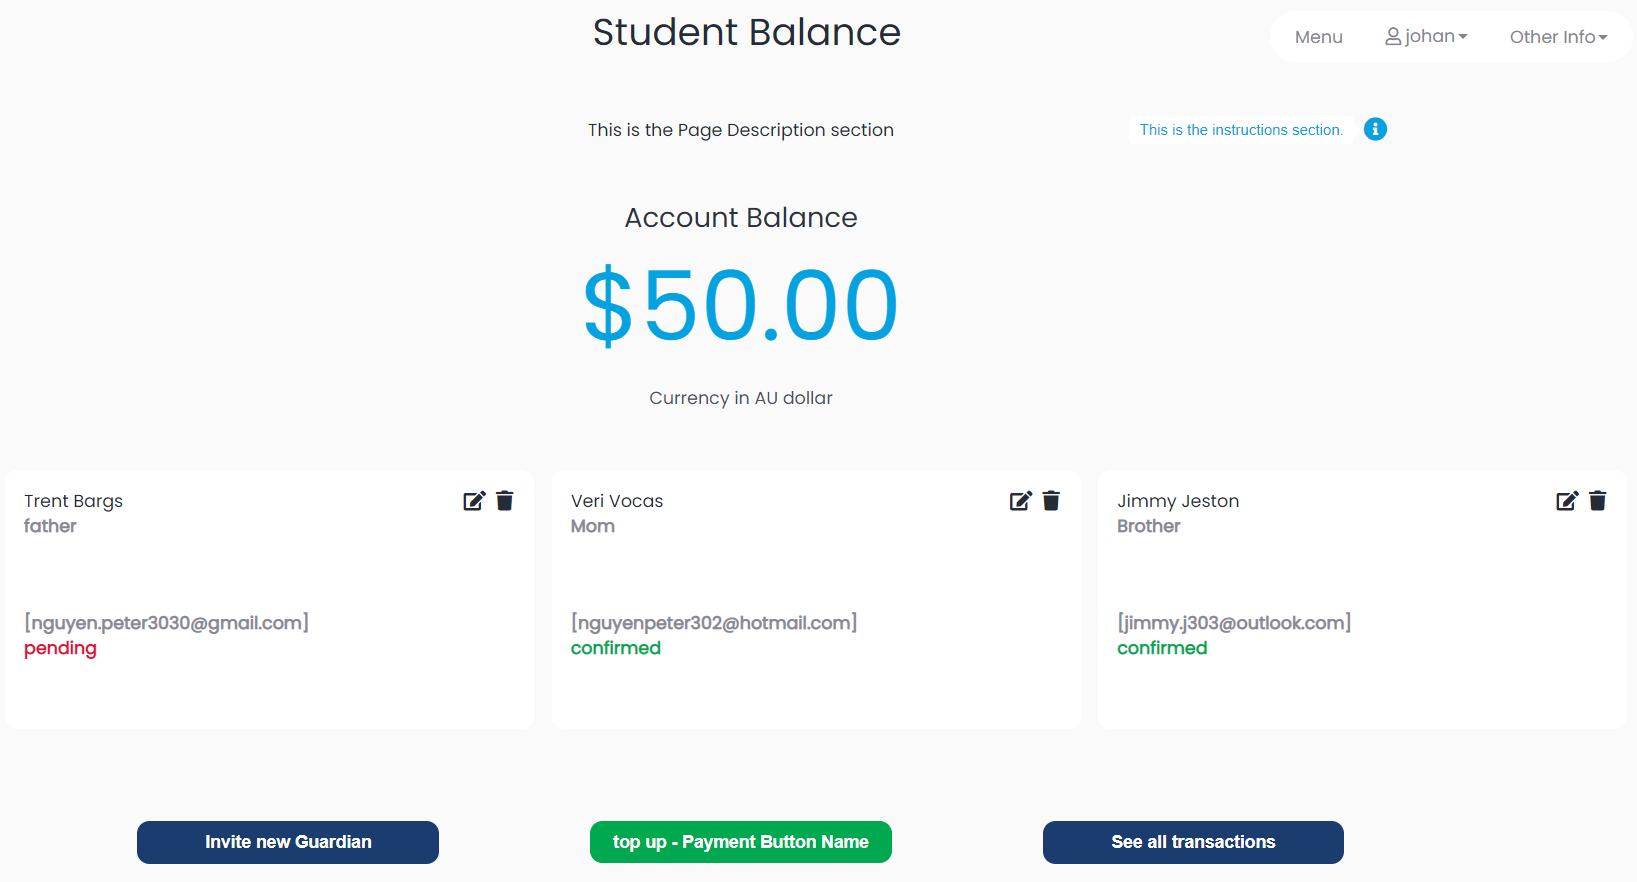
Account Credit Functions
This window displays many of the back panel configurations. It shows the Page description, payment button di button display name and instruction changes from member settings as well as the display name field at the top of the screen. This window also includes a view of account balance, linked senders and three buttons to allow linking a new account, topping up the account and viewing previous transactions.
In the top right corner, 3 tabs will display: The menu tab is used to move to menu screen, the will have a dropdown where customers can view profile information, enter the account credit screen, access order history and log out and the other info tab will show the terms and conditions as well as the privacy policy if they have been set-up.
Account credit page
Note:
-
When filling in sign-in fields, consider these limitations:
-
Mobile number is the only field not required
-
Email will need to be a valid email address and cannot be empty
-
Password limitations are shown within the hint under the field
-
-
The “account charge” button in the payment screen may be greyed out and unclickable. This will happen when a member has insufficient credit for the transaction. Members will need to top up before proceeding with an account charge.
Bepoz Setup
Account credit configurations and information are also avaliable in bepoz. On BackOffice, click “Maintenance” on the left side. Once it has expanded, click “Accounts”. In this screen there will be a list of account groups. Select one and all accounts belonging to this group will appear. Click a row and the Account Maintenance panel will open.
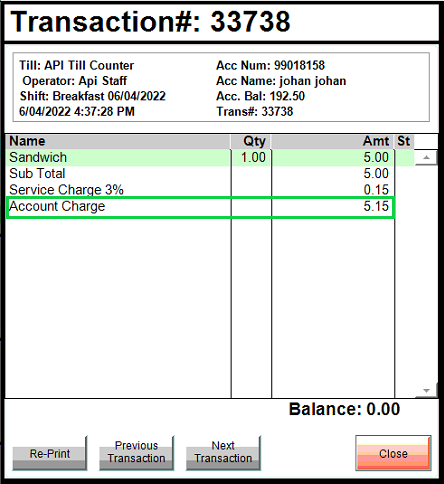
In the History section, it will show the account credit and the gross/net turnovers will include account charges made. The “Credit Limit” field will allow accounts to go into a debt based on an input value. Account charge payment can be disabled by ticking the box next to “Stop Credit” and users can limit accounts to only use this payment by ticking the “Charge Only” box.
There are also configurations for the points system and discount features within this window.

Account Maintenance Panel
Bepoz Reports
Account charges will be recorded within sales reports in bepoz. These records can be accessed by clicking “Sales Reports” on the left-hand side. When the panel expands, users have two choices where account charges will be displayed, Transaction Journal and Account Summaries.
Clicking “Transaction Journal” will open a window where users can access all transactions within a time period. If a user double left-clicks a row, it will open a panel displaying information about the order. If an account charge was used as payment, then it will appear in the list.
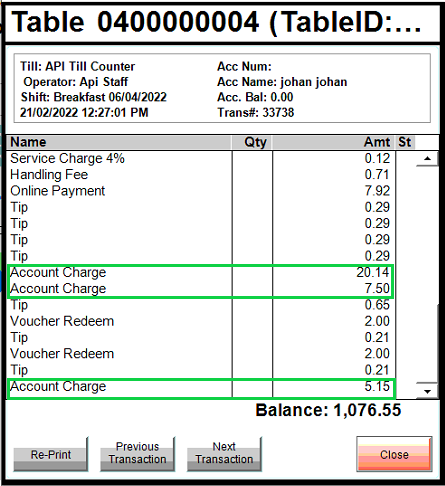
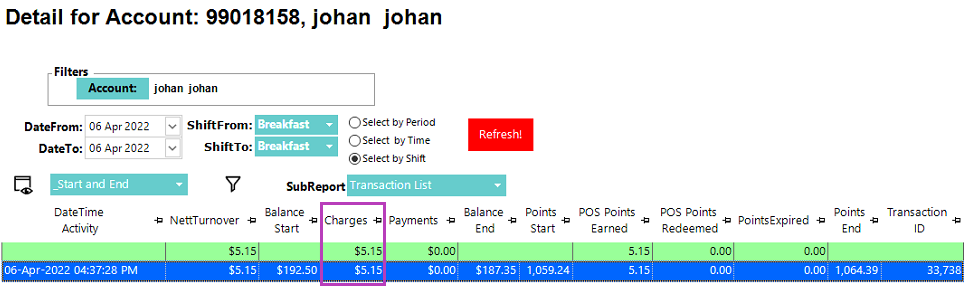
Clicking “Account Summaries” will open a new window. On this screen, users can view accounts that have made transactions within a specified timeframe. Clicking an account will open the account summary details window that shows more information on transactions and any account charges can be seen in the Charges column. Clicking a row will open a summary panel, showing more details and scrolling towards the bottom will display the different account charges.
Transaction Panel
Account Summary Panel
Account Summary Detail Window