
Overview
Implementation Plan
General Implementation Flow.
Complete Router Port Forwarding to the Venues BEPOZ Server. Suggested port is 9192, but any can be used if not available. Ensure the firewall on the Bepoz server is open on this port, as well as port 9193. 9193 is for internal communications, and isn’t required for the router forwarding.
Ensure the venue has a static IP on the internet.
Complete Bepoz Setup – Correct version, New Operator, Account Group, Account Template & Bepoz StoredProcedure API Jobs, etc
Add SQL Database StoredProcedures & Firewall inbound rule for new port forward
Complete Admin Backpanel Setup:
a) BEPOZ section
b) Branding section
c) Times section
d) Miscellaneous section
e) Stripe section (just add Connect ID from Stripe)
f) Legal Notices section from templates
g) Product section
Go Live:
a) Bepoz sect: Turn OFF Training Mode
b) Payment Gateway sect: Turn OFF Test Mode
c) Live Trade
Configure Bepoz
1.Get server public IP and send it to Jacky C or Saeed by CW ticket to generate SSL certificate.
As provided by Jacky C, here are the Bepoz Version requirements.
If any current version 4.5.x.x or any earlier version, e.g, 3.5, 4.1, 4.3, need to upgrade to 4.5.2.184 - 4.5.2.188.
If any sites have 4.6.0.x, need to upgrade to 4.6.0.30.
If any site using 4.6.1.0 – 4.6.1.4. No need to upgrade.
Licenses. An API till requires a till license of its own. It never shows as Online in smart controller, but it must be Available, and not Unlicensed. A real physical till with Smart POS is required to finalise sales received from Your Order. So as a rule of thumb, two SmartPOS licenses are require per API till. One for the API, and one for the existing SmartPOS on a terminal already in the venue.
Ensure any tills that are not licensed are set to Inactive in Back Office. Any till that is Inactive, but is required to run smart print, needs the SmartPOS unchecked from the Bepoz Auto Run settings in database.exe.
4.
Download StoreprocInstall.exe and place it in Bepoz folder, then run it as admin to download the latest dll version.
Additional Hotfixes DLLs are required for version 4.6.1.3 and 4.6.1.4 see link below. Place them in the same programs folder.
4.6.1.3 DLLs Folder
4.6.1.4 DLLs Folder
4.6.1.5 DLLs Folder
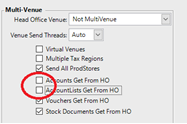
If the Venue is a Multi Venue, and they are on Version 4.5.2.XXX, you must uncheck these two options in Global Settings. There is a fault in the API in that version which will prevent the Your Order working with the Bepoz API. Long term fix is to have them upgraded to a compatible 4.6.X.XX version, but as venues are closed to walk in traffic, turning this setting off for the time being shouldn’t negatively impact how the venue works for the time being.
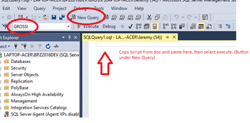
Run the 4 scripts in order on the Bepoz Database. Open SQL Management Studio, Select New Query and ensure you have the correct database selected. It defaults to Master. Copy the Script from doc and paste into the query window, then select execute. (Button under New Query). Do each in turn.
Script 1
SET ANSI_NULLS ON
SET ANSI_NULLS ON
GO
SET QUOTED_IDENTIFIER ON
GO
CREATE PROCEDURE [VoucherUpdated]
@date nvarchar(20)
AS
BEGIN
SET NOCOUNT ON;
select *
from Voucher v
where v.dateupdated >= @date
END
Script 2
SET ANSI_NULLS ON
GO
SET QUOTED_IDENTIFIER ON
GO
CREATE PROCEDURE [VoucherUpdated]
@date nvarchar(20)
AS
BEGIN
SET NOCOUNT ON;
select *
from Voucher v
where v.dateupdated >= @date
END
Script 3
SET ANSI_NULLS ON
GO
SET QUOTED_IDENTIFIER ON
GO
CREATE PROCEDURE [ProductsUpdated]
@date nvarchar(20)
AS
BEGIN
SET NOCOUNT ON;
select *
from Product p
where p.dateupdated >= @date
END
Script 4
SET ANSI_NULLS ON
GO
SET QUOTED_IDENTIFIER ON
GO
CREATE PROCEDURE FindAccount
@Email NVARCHAR(250),
@Mobile NVARCHAR(250),
@AccountNum NVARCHAR(250)
AS
BEGIN
SET NOCOUNT ON;
SELECT Account.*, Address.Email1st,Address.Mobile FROM Account
JOIN Address on Address.AddressID = Account.AddressID WHERE
(AccNumber = @accountNum AND AccNumber <> '') OR
(Email1st = @email AND Email1st <> '') OR
(Email2nd = @email AND Email2nd <> '') OR
(Mobile = @mobile AND Mobile <> '')
END
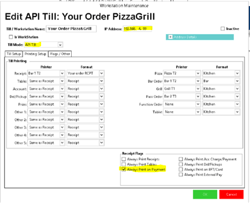
Each API till requires a till license to run. Create an API till with printing channels set to where the venue wants dockets to print to. In a multi venue, the API till(s) is setup in the remote sites stores. Not at HO. Name it API YourOrder XXXX, where x is the name of the area in the venue if more than two will be required. Suggest when creating the API till, copy a till that has the right channels already setup if possible. If the Venue is offering two or more outlets for Your Order sales to be collected or dispatched from, then and API till per outlet will be required. This is mainly so the different printing can be accommodated for. Drive thru orders need customer receipts in the bottle shop, delivery or collect orders at the counter need receipts to print into Bistro area. Always print on Payment needs to be checked per API till. Add the API till to the store they are selling the products from. This will also be the store the sale report too.
IMPORTANT NOTE: With venues wanting to lower their Bepoz License commitment, they still need at least 1 SmartPOS till active per API till active. This is so they can finalise the sale once the customer collects, or they dispatch the order via delivery. Each Order comes through as a table, which you will see the setup for further in the document. The important part is that all the remote printers(kitchen) may not be connected to this one terminal. The customer must leave any till running that drives a remote printer, so Smart Print can still run. Smart Print isn’t controlled by the SmartPOS license, so the venue can still lower their costs, by disabling the till license, but they cannot power those tills off that run a needed remote printer. Ensure the venue has this explained to them, and they understand and don’t accidentally turn off needed terminals.
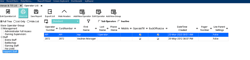
Create API operator, I usually put this in the support group like below. Use API YourOrder as the Operator name, and set API as the Operator and Card Number. Note down the Operator ID. You will need it later.
Add a new account group in Back Office called YourOrder Guests. This is not a have too, but any customer that signs in as a guest to order, will be created as a new generic account. Bepoz will receive the customers first name, their mobile number and a randomly generated number in the surname. Any future time they sign in as a guest, will not match to a previous sign in, so a new account gets created every time. To prevent a site true loyalty list from being populated with unwanted records, it is recommended to add a separate group.
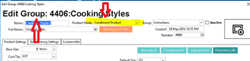
In this group, create a template account called YOURORDERTEMPLATE in the surname, you CANNOT use this text as the account number and card number, it must be a number. Suggested 99,001.
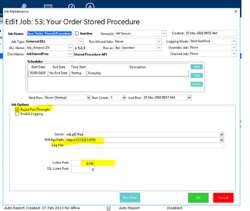
Create a Scheduled Job for the stored procedure. Normally external systems talk directly to the Bepoz XML API, but YourOrder requires features not yet part of the API, so a separate job will accept the incoming communications from the YourOrder AWS instance, and pass that through to the Bepoz API internally. The Stored Procedure Job will listen on the same port that is port forwarded through the venue’s router, in this case 9192, and then pass the communication though to the XML job listening on http://127.0.0.1:9193. The secret is the MAC key that needs to be put in the YourOrder back panel and in the XML API. Use last pass to create this, and store a copy there in the customers record. In a multi venue these jobs are setup to run in the remote venue, not HO Set up YourOrder Stored Procedure job Like below:
NOTE: Please refer to the SSL Setup guide on how to configure the jobs if you are installing the SSL at the same time as the Bepoz setup. If not, ensure you return and change the setup before the venue goes live. This is compulsory, no SSL, no live.
Create an API XML job - Use INTERNAL port 9193 to match the Stored Procedure Job created in the previous step. The till must be a till already setup as an API till. If you have nothing in your drop down, you haven’t set that correctly, or you may need to restart smart controller.
NOTE: Please refer to the SSL Setup guide on how to configure the jobs if you are installing the SSL at the same time as the Bepoz setup. If not, ensure you return and change the setup before the venue goes live. This is compulsory, no SSL, no live.
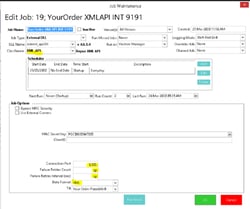
It’s possible to test if the ports have been forwarded correctly and the API job can see the requests. In a browser on an external PC from the venues internet, enter in the static IP of the venue followed by the Port number. 103.217.167.196:9192. If you receive an XML message including the line Mac not found, you have made the connection.
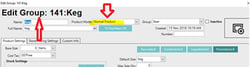
Bepoz Product setup for export. Before designating products for export to YourOrder, one maintenance task must be completed first. Each product group must be set to the correct product mode relevant to the products they contain. The Product mode against a bepoz group, has an impact on how those products are treated during the import. If a product is in a group that is set to Normal Product Mode, then your order brings them in as normal products. If the Bepoz group is set to Condiments Product Mode, then regardless of how the individual product is configured, all items in that group flagged with the Y will be imported as a condiment into YourOrder. And YourOrder will also create the Bepoz group as a new Condiment group in your order. NOTE: All bepoz products (Normal mode) must have a price above $0.00 in the store your order connects to before being imported. If not, they will import as inactive into your order and will require manually switching to active. Bepoz Condiments are excluded from this.
To export a product to your order, in Export code 4, enter the character Y in the product details screen. Do this individually for Bepoz groups that only need some of the products uploaded. You can use Change by range on the group if all products need to be uploaded to speed up the process.
The first time a product is imported from a group, YourOrder will take that group name, and create a new Category in YourOrder (Bepoz groups set to Normal product mode). In the case of a Bepoz group in Condiment product mode, a new Condiment & Flags group in will be created.

Setup Handling Fee as a Normal Product for all Bepoz Versions. Note down the Product ID for use later. Do not use the system generated Handling Fee product found in later versions. It’s not compatible with Online Ordering.
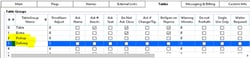
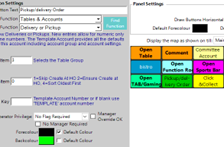
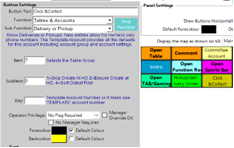
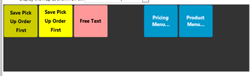
In venue settings, create appropriate table group names. It’s not recommended to use the same ones the venue uses for other tasks. Create a function button on the function maps for each till, using the Tables and Accounts function, with sub function Delivery/Pickup. Ensure the Save as Delivery and Save as Phone buttons are added to the Home/Delivery Panel. Check if the customer needs other functions in case they also take direct orders from their customers over the one. One button and table group per YourOrder service type. The examples below don’t have the table group ID’s line up correctly, so please make sure yours do. These Table Group ID’s will be required later, so note them down.
10. Add in the Home Delivery Panel and add the required buttons for their service types. This only applies to Pickup/Delivery. Dine in will use the normal table groups they already have. If the customer wants to also use these table buttons for phone orders, explain they must save the order for Pickup first, before taking payment. Bepoz treats all delivery function orders as a delivery order until you save it as something else first. If you don’t save it first with a pickup order, it will print to the kitchen saying Home Delivery instead of pick up. Graphical user interface, application
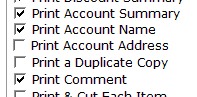
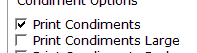
11. In printer formats, create a copy of the receipt and order docket formats that will be used to print the orders from existing tills. Turn on the below flags for both types of docket formats, and then assign these formats to the API till(s) as required. This will prevent their normal tills printing the extra information on their normal non online sales dockets, and only the online orders will have what’s needed. Suggest adding a YO to the end of each format name to make it easier to support in the future:
Rcpt YO, Std Kitchen YO, etc.
12. Discuss with the Venue how many products they feel they may use online. If the amount is beyond 800(don’t forget condiments etc), Special projects needs to be informed so a better back-end instance is used, otherwise it will freeze during back panel functions.
This completes the Bepoz Configuration side.
Configure Your Order Back Panel.
At first log in change password master password on internal support user.


Add in the webstore URL which includes the port number on the end. Do not use https:// in the URL, only the IP as pictured or http://. The port number is the number that has been forwarded through the router. This is entered in 3 times in 3 different places.
NOTE: Please refer to the SSL Setup guide on how to configure the Server address URL’s if you are installing the SSL at the same time as the Your Order back panel setup. If not, ensure you return and change the setup before the venue goes live. This is compulsory, no SSL, no live.


MAC Key goes in twice, once at MAC Key, and once further down at. Please use Last Pass to generate the MAC key. Ensure this is copied back into the LastPass record for the customer.
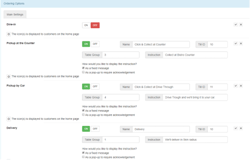
Ordering Options. Depending on what the site wishes to use, enable each section as required. Only one API till is required if the order docket and receipt printing will be the same for all order types: kitchen dockets, Bottleshop Order dockets etc, are all going to the same physical printers. The one API till can be setup with the correct printer per channels. If you need different printing per order type - Pick Up at Counter(bistro) verses Drive Thru(Bottleshop) – then two API tills need to be setup. Each API till is set with the physical printers required to match how the venue wants printing to take place. In the below example, there is two different API tills in bepoz. Till ID 10 handles Click & Collect at the counter, and dispatching Delivery orders (possibly run out of the bistro in the venue if a pub). The second till handles the Click & Collect Drive Thu orders. Each type of ordering
should be setup with different table groups. Later you will need to add these table groups to all the tills where orders can be collected or dispatched from. Dine In in Your Order Lite is to remain off. The customers have not paid for this feature. See image.

Operator ID – Take the Bepoz Operator ID, not the operator number, and add to the Operator ID in Back Panel. In this example, 37.
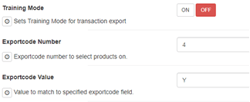
Set training mode to ON, Exportcode Number to 4, and Exportcode Value to Y. If in the Bepoz system, you needed to use a different Exportcode, then use that number instead of 4, but 4 is the recommended option.
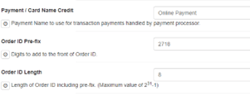
Payment/ Card Names Credit must be exactly the same as the name in