
Overview
Product Group allows users to create sets of products
Product Group
Product group feature is used to create sets of different products and place them all together on the frontend. This is useful for venues that have several of the same product but of different brands.
For example, Gin comes in a variety of brands. Instead of showing them all separately, Users can create a product group called “Gin” and add in the different gin products such as Aviation Gin, Gordons Gin and Tanqueray Gin. This keeps the frontend view tidier, simpler and shows more products within the same frame.
BackPanel Set up
Product Group can be accessed by clicking “Products” on the left side within the backpanel dashboard. On this page, click the

button in the top right and a new window will appear. The page will display as a normal product initially.
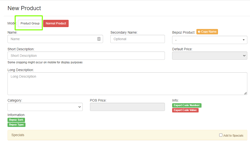
Click “Product Group” underneath the title to change this. It will remove the following fields from the page:
Bepoz product ID
Default price
Export codes
Product sizes
These fields are discarded as product groups do not sync with bepoz products and do not need these attributes. The two functions, product selection and product list are added. Alternatively, an existing product can be used as a product group by double left-clicking a row on the Products page and then pressing “Product Group”.
Steps
On the product page, click product group next to the “Mode” title. It will be green to show it is enabled
For adding products:
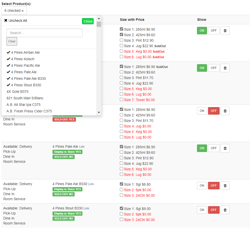
I. Click the field under the Select Product(s) title and a dropdown window will appear.
II. Search for an item by scrolling down the list or using the search bar. Press clear to reset the search bar.
III. To select items, click the name of the item until a tick appears to the left of it. Multiple selections can be made from the dropdown.
IV. If the user needs to reset the list click

button above the search bar to revert the product list to empty
V. Pressing the

button will close the dropdown window. Alternatively, users can click outside the
dropdown list
On the product list, choose the sizes for each product. If any product does not have a selected size a prompt will appear.
In the Show column, for each product click ON till it is green to show the product on the front end
Select the ordering types this group will apply towards
For adding condiments and informative flags:
I. Select condiments on the right-hand side
II. Scroll down until “Condiments and Addons” is in full view
III. Adjust each condiment min and max
IV. Select condiments to be displayed by ticking the boxes next to them or alternatively click the box next to the condiment group title to select all of them.
V. Click multiple per to allow more than one quantity of an item and click each button to allow it for specific items
Once selections are final, click save in the top right corner
Note:
When a product with condiments is added to a product group, the condiments will not be added.
Sizes with a price of zero or are in red for inactive, cannot be selected. If one is clicked a prompt occurs.
Frontend
When a customer accesses the menu page and clicks a product group, a panel will appear with all products in that set. The product images and names will be displayed along with the price range of each item. If a customer clicks a product with multiple sizes, then they will appear below the item and they can make a selection by clicking the box next to the size. Condiments will also appear when an item is clicked. If a product is sold out, it will have a label in the right corner of the item and will be unclickable.
Once Customers make a selection they can decide to add more or less quantity of the item and when selection is final, users will need to click “Add to cart” to place it in the order. Users can close the product group panel using the

button.

Product Group Panel
Cart list
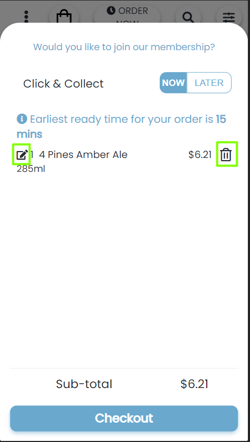
While on the payment screen, if a customer wants to modify or change their selection on items that are chosen from product groups, they will need to click “menu” in the top right corner to revert back to the menu page. To modify the item, within the cart list, end-users will need to click the

next to the item and the single product will open for modifications. If customers want to make a new selection, then they will need to click the

button next to an item to delete it and reopen the product group to make a new choice.
Note:
Products will only be displayed when the ordering type is enabled for both the product group and the product. If a product group has a service enabled but a normal product, has it disabled, then the item will not display when the panel is opened in that specific ordering type.