- INTERNAL - Bepoz Help Guides
- YourOrder
- YO | New Feature 2.7
-
End-User | Products & SmartPOS
-
End-User | Stock Control
-
End-User | Table Service and Kitchen Operations
-
End-User | Pricing, Marketing, Promotions & Accounts
- Prize Promotions
- Points, Points Profiles and Loyalty
- Product Promotions
- Repricing & Discounts in SmartPOS
- Vouchers
- Account Till Functions
- Pricing, Price Numbers and Price Modes
- Raffles & Draws
- Marketing Reports
- Accounts and Account Profiles
- Rewards
- SmartPOS Account Functions
- Troubleshooting
- Product Labels
- Packing Slips
-
End-User | System Setup & Admin
-
End-User | Reporting, Data Analysis & Security
-
End-User | Membership & Scheduled Billing
-
End-User | Operators, Operator Permissions & Clocking
-
Interfaces | Data Send Interfaces
-
Interfaces | EFTPOS & Payments
- NZ EFTPOS Interfaces
- Linkly (Formerly PC-EFTPOS)
- Adyen
- Tyro
- ANZ BladePay
- Stripe
- Windcave (Formerly Payment Express)
- Albert EFTPOS
- Westpac Presto (Formerly Assembly Payments)
- Unicard
- Manager Cards External Payment
- Pocket Voucher
- OneTab
- Clipp
- eConnect-eConduit
- Verifone
- AXEPT
- DPS
- Liven
- Singapore eWallet
- Mercury Payments TRANSENTRY
- Ingenico
- Quest
- Oolio - wPay
-
Interfaces | SMS & Messaging
-
Interfaces | Product, Pricing, Marketing & Promotions
- Metcash Loyalty
- Range Servant
- ILG Pricebook & Promotions
- Oolio Order Manager Integration
- Ubiquiti
- Product Level Blocking
- BidFood Integration
- LMG
- Metcash/IBA E-Commerce Marketplace
- McWilliams
- Thirsty Camel Hump Club
- LMG Loyalty (Zen Global)
- Doshii Integration
- Impact Data
- Marsello
- IBA Data Import
- Materials Control
- Last Yard
- Bepoz Standard Transaction Import
-
Interfaces | Printing & KDS
-
Interfaces | Reservation & Bookings
-
Interfaces | Database, Reporting, ERP & BI
-
Interfaces | CALink, Accounts & Gaming
- EBET Interface
- Clubs Online Interface
- Konami Interface
- WIN Gaming Interface
- Aristocrat Interface
- Bally Interface
- WorldSmart's SmartRetail Loyalty
- Flexinet & Flexinet SP Interfaces
- Aura Interface
- MiClub Interface
- Max Gaming Interface
- Utopia Gaming Interface
- Compass Interface
- IGT & IGT Casino Interface
- MGT Gaming Interface
- System Express
- Aristocrat nConnect Interface
- GCS Interface
- Maxetag Interface
- Dacom 5000E Interface
- InnTouch Interface
- Generic & Misc. CALink
-
Interfaces | Miscellaneous Interfaces/Integrations
-
Interfaces | Property & Room Management
-
Interfaces | Online Ordering & Delivery
-
Interfaces | Purchasing, Accounting & Supplier Comms
-
SmartPOS | Mobile App
-
SmartPDE | SmartPDE 32
-
SmartPDE | Denso PDE
-
SmartPDE | SmartPDE Mobile App
-
MyPlace
-
MyPlace | myPLACE Lite
-
MyPlace | Backpanel User Guides
- Bepoz Price Promotions
- What's on, Events and tickets
- Staff
- System Settings | Operational Settings
- Vouchers & Gift Certificates
- Member Onboarding
- Members and memberships
- System Settings | System Setup
- Reports and Reporting
- Actions
- Offers | Promotions
- Messaging & Notifications
- System Settings | App Config
- Surveys
- Games
- User Feedback
- Stamp Cards
-
MyPlace | Integrations
-
MyPlace | FAQ's & How-2's
-
MyPlace | Release Notes
-
YourOrder
-
YourOrders | Backpanel User Guides
-
YourOrders | YourOrder Kiosk User Guide
-
YourOrders | Merchant App User Guide
-
WebAddons
-
Installation / System Setup Guides
- SmartPOS Mobile App | Setup
- SmartPOS Mobile App | SmartAPI Host Setup
- SmartPOS Mobile App | BackOffice Setup
- SmartPOS Mobile App | Pay@Table setup
- SmartKDS Setup 4.7.2.7 +
- SmartKDS Setup 4.6.x
- SQL Installations
- Server / BackOffice Installation
- New Database Creation
- Multivenue Setup & Config.
- SmartPOS
- SmartPDE
- Player Elite Interface | Rest API
- Interface Setups
- Import
- KDSLink
- Snapshots
- Custom Interface Setups
-
HOW-2
- Product Maintenance
- Sales and Transaction Reporting
- SmartPOS General
- Printing and Printing Profiles
- SQL
- Repricing & Discounts
- Stock Control
- Membership
- Accounts and Account Profiles
- Miscellaneous
- Scheduled Jobs Setups
- Backoffice General
- Purchasing and Receiving
- Database.exe
- EFTPOS
- System Setup
- Custom Support Tools
-
Troubleshooting
-
Hardware
YourOrder : Serve Meal Together
Overview
This feature allows users to group items to be served together. It can be sent to printing devices that can print a docket in the desired grouping arrangements. This is a useful feature, as customers can tell staff members what products should come out together and benefits the kitchen staff to prioritize and manage their time better.
Serve Meal Together
This feature allows users to group items to be served together. It can be sent to printing devices that can print a docket in the desired grouping arrangements. This is a useful feature, as customers can tell staff members what products should come out together and benefits the kitchen staff to prioritize and manage their time better.
Example, A customer orders several kid's meals and would like it to come out earlier than the main meals, so that the children can eat first and play for a longer time. The customer can then group it with the entrée meals as they usually come out first and the kids can enjoy the meal while the adults enjoy the entrees. Children can then do other activities, such as enjoying the venue grounds or playing on mobile devices while adults eat their mains. This can increase the positive feedback and satisfaction of customers as they will see the establishment as accommodating to families.
Back panel Setup
The main configurations can be accessed by clicking “Settings” on the left-hand side of YourOrder backpanel dashboard. Once the new screen has finished loading, click the “Bepoz tab”, which will expand this section. Scroll down till the “Serve Meal/Course together” configurations are in full view.
|
Feature |
Description |
|
Enabled |
ON: Displays feature button on order list within menu page OFF: Disables feature and removes button from menu page |
|
Mode |
Two options to group products by |
|
Label |
A title to appear on the feature panel and on the checkout page |
|
Sort/type groups |
Sort/type names preset in bepoz, which values are used by printers for grouping |
Steps
-
Click “Settings”
-
Press the “Bepoz” tab to expand it
-
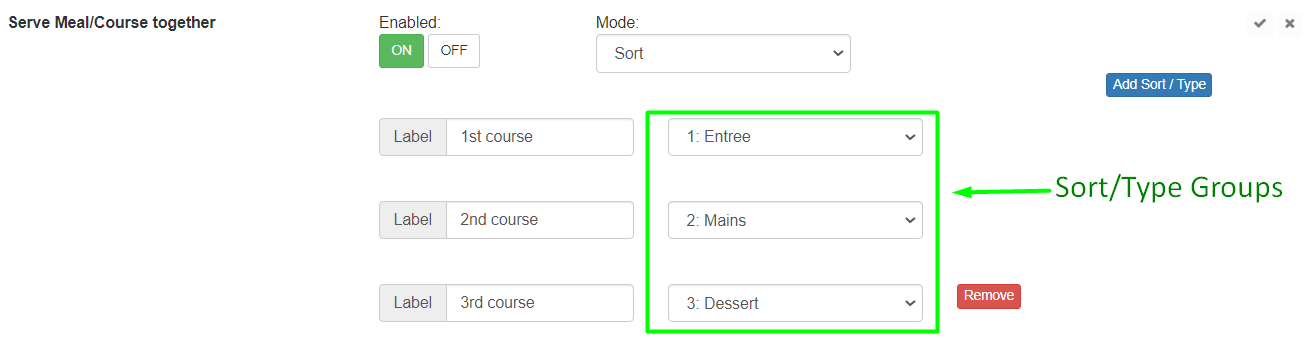
Scroll down the expanded panel, until “Serve Meal/Course together” is in view and click ON underneath “Enabled” till it turns green
-
Select to use either Sort or Type for the mode field
-
Input a title in the Label field
-
Select the preferred sort or type group
-
Click to add a new serving option

-
Click to discard the last serving option

-
Press the to save the changes

Frontend
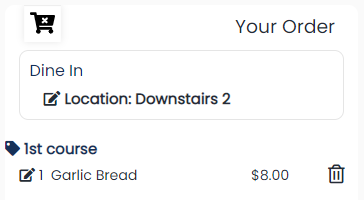
This feature will only be seen within the dine-in service. When a customer clicks a product from the Dine-in menu, the product details panel will open. Within here, there is a section called “serving options” that displays the labels set up in the backpanel

If the product has a matching sort/type to one of the configurations in the backpanel, then next to the associated label it will have an automatically ticked box. Users can simply click the box next to a new serving option if preferred. Click the add to cart and it will appear in the cart list under the selected title.
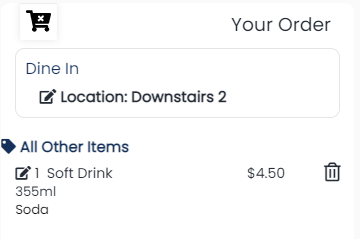
When a product does not have a matching sort/type to one of the configurations in the backpanel, then it will appear with empty boxes. Users can either tick a box and it will appear in the cart list under the selected label or not select a serving option and simply press add to cart. Not choosing an option will place the product under a new label called “All Other Items”.
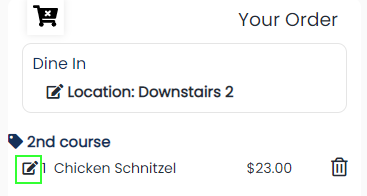
If a user decides to change the serving option of a product that is applied to the cart. Simply click the icon next to the chosen product and the product details panel will open for changing the serving option. When the add cart is pressed it will update and move the item under the new label.
After the customer clicks the checkout button, a suggestion item panel may appear. When a customer clicks a product on this panel it will open and they can choose a serving option for the suggested item. It will then be added under the selected label on the cart list. After the user finishes with the suggestion items, they will be moved to the payment screen.
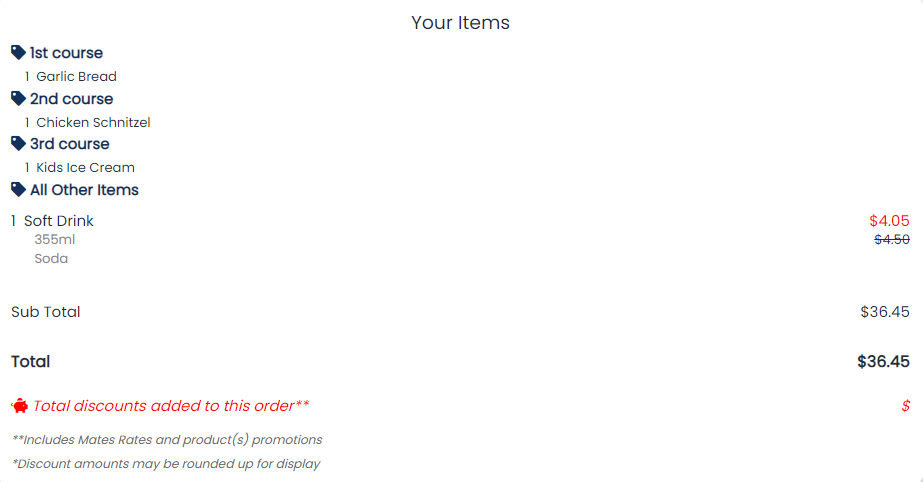
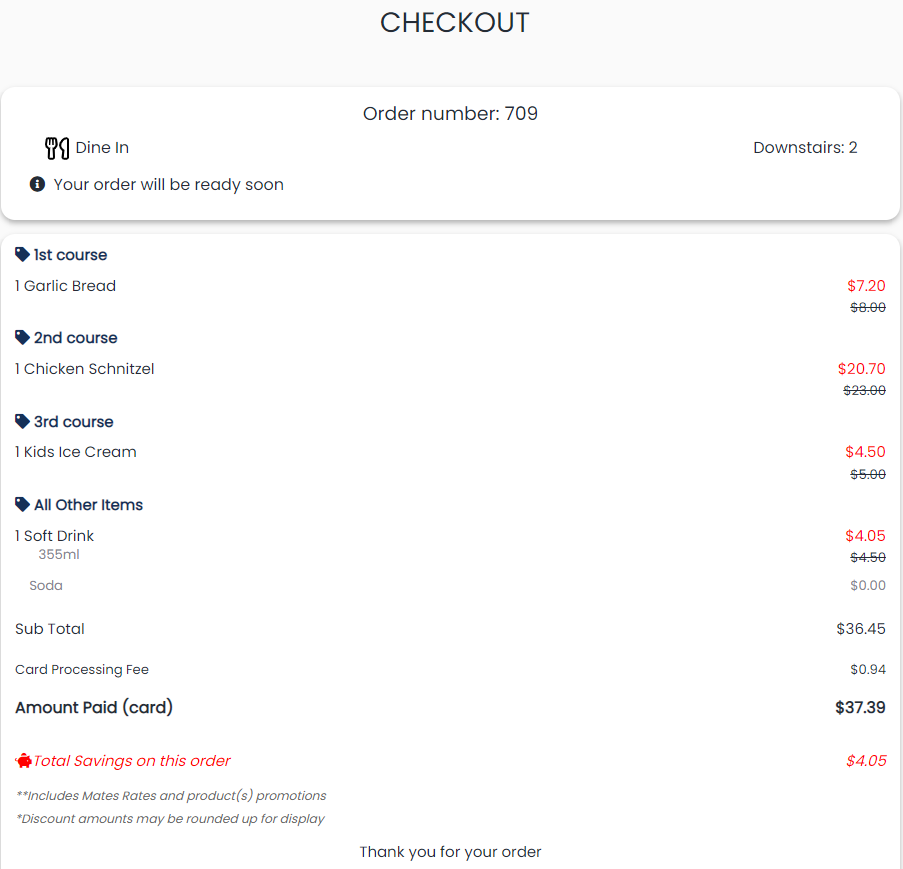
On the payment page, the products will be displayed under each label. Once payment is completed then the products will be displayed on the checkout screen within their selected labels. The groupings will also be printed on the kitchen dockets.
Payment Window
Checkout Window
Bepoz
Within Bepoz, users will need to ensure that the Printer Format is correctly set up.
-
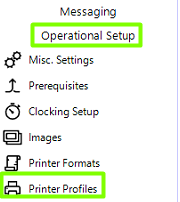
On BackOffice, click “Operational Setup” and in the expanded list, press “Printer Format”.
-
On the new screen, double-click an existing format or click “Add Printer Format”.

-
The Printer format setup panel will appear. Users will need to ensure that the “Consolidation” field is set to Full Consolidation and the “Print in Groups” field matches the value placed in ‘Mode’ field located in Serve Meal/Course Together section of YourOrder backpanel.
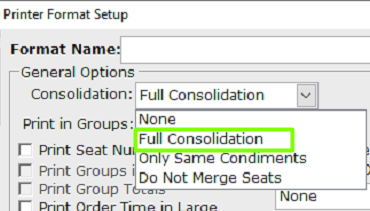
Consolidation field Print in Groups field

Mode field in YourOrder
-
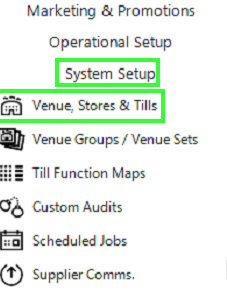
After step 3 is correctly configured, the printer format will need to be added to the API Till printer channel setup. On BackOffice, click “System Setup” and in the expanded list click “Venues, Stores & Tills”.
-
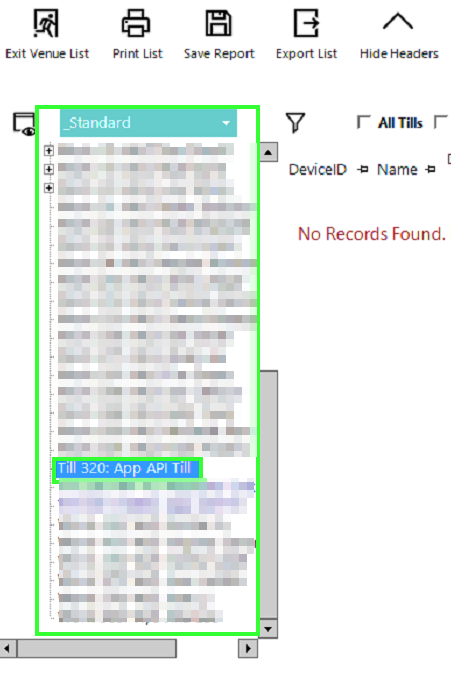
Scroll down the venue, stores & tills list and find the API till associated with YourOrder. Double left-click it and a Workstation Maintenance window will appear.
-
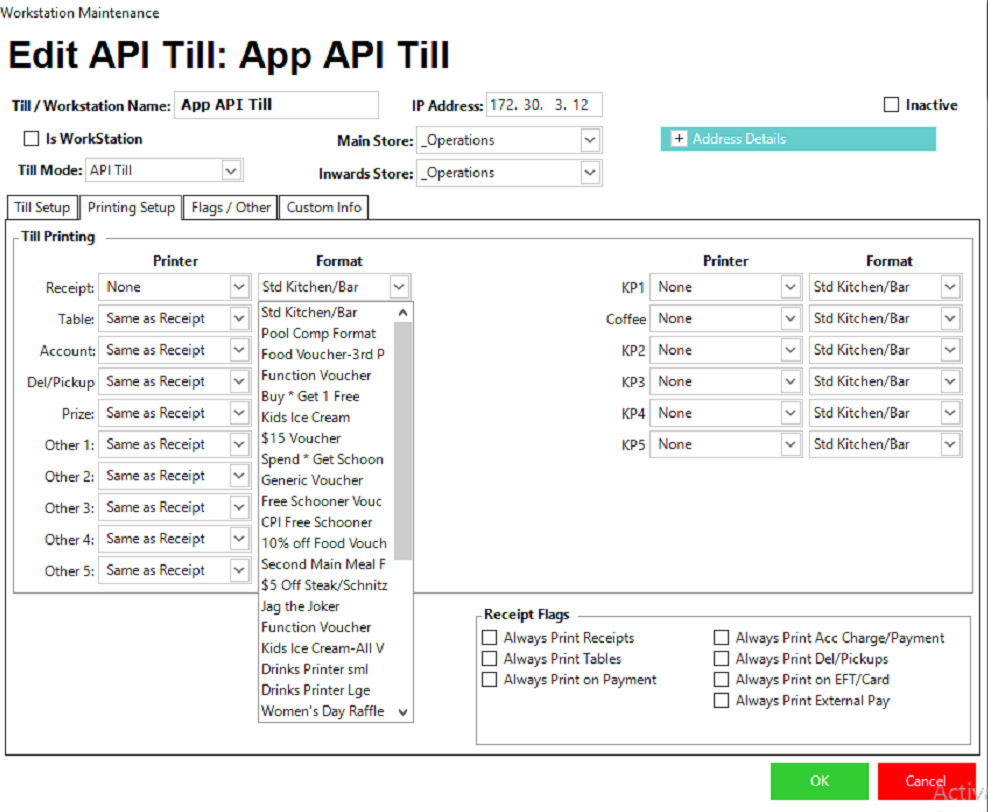
Click the “Printer Setup” tab. In the format dropdown fields, select the printer format that was created or updated previously in step 3. Click OK to save.
NOTE:
-
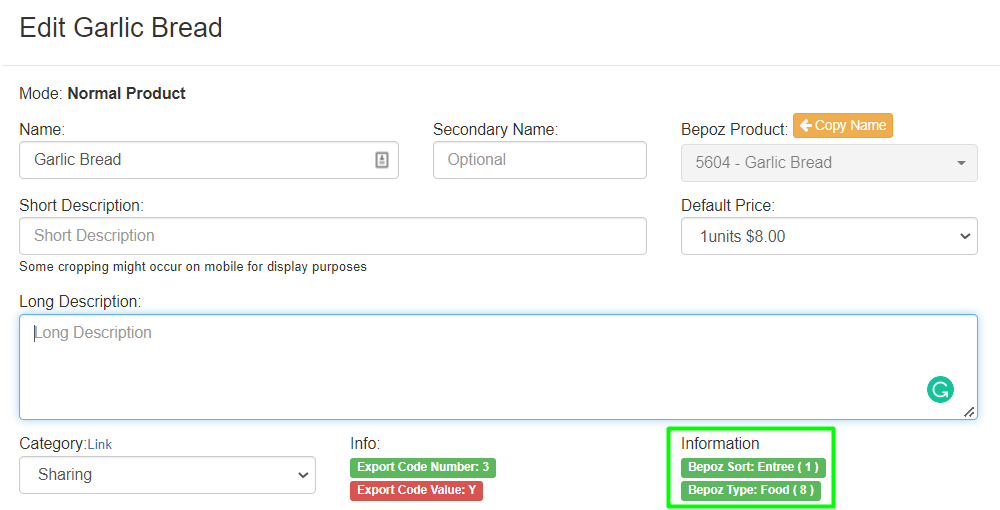
If user would like to change the sort/type of a product to match the backpanel setup. They will need to make this modification in bepoz.
-
When a sort/type group setup in “Serve Meal/Course together” matches a product's sort/type then on the frontend, it will auto-select a serving option. To ensure that the right products and options are auto-selected. Users can view the sort and type of each product by clicking “Products” on the sidebar and then double left-clicking a product. This will open up the edit product screen where the sort and type are displayed for this specific product