
Overview
Doc shows how to install YourOrder/Bepoz integration and SSL Setup on currently operating venues and new venues
This doc is how to install on currently operating venue, and for new venue. Point 10 covers what to do if it’s an existing venue.
Note: Section 2 is for Sites using Windows 7 or Server 2008. Please read this part first if you are working on a site using these versions of windows, as there are different steps for them. Steps 3 through 9 are replaced by the Section 2 for these operating systems.
Section 1 – New or Current install of Your Order.
Collect the customers public IP address for the venue. This should be the same IP that is in Your Order back panel under the Settings\\Bepoz\\Server Address. Supply this to Special Projects so they can create the SSL Certificate. Each certificate is locked to an IP, so if the venues IP changes (shouldn’t because they have to be on static) a new certificate will need to be created.
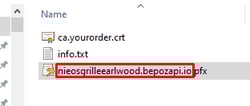
Special Projects will supply three files in a zip. Follow this link to download the one for your site.
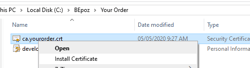
Create a new folder under the Bepoz directory called Your Order, and extract the files here.
Install ca.yourorder.crt first. Right click and select Install Certificate, then Open.
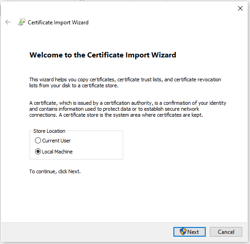
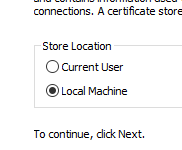
Select Local Machine then Next.
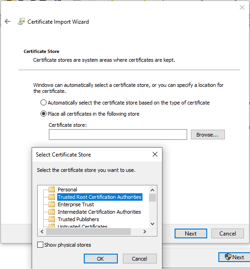
In Certificate Store select Place all certificates in the following store, and choose Browse. Select second option Trusted Root Certification Authorities, then OK, Next.
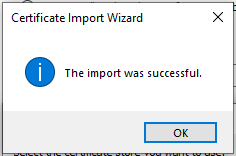
Select Finish and the wizard will answer with, The import was successful.
Right click the venuename.yourorder.io.pfx file and select Install PFX.

Select Local Machine, next.
Select Next, no need to change filename path as it will point to the file you are installing in the Bepoz\\Your Order directory.
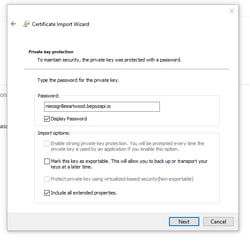
In the password screen, you need to enter the venue API name from the .pfx file as the password. The example below is for Neios Grille Earlwood. Use from the start of the .pfx name and include the .io for your venue. Select the check box for Include all extended properties, the select next. Nieosgrilleearlwood.bepozapi.io
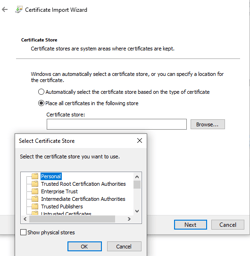
Certificate Store, choose Please all certificates in the following store, and select Browse… In the Selection window leave it highlighted as Personal, and select OK.
Then Next. Finished.
10. Go to Bepoz Back Office and open the Scheduled Job, Your Order Stored Procedure. Create a new one as per step 8 – Implementation Plan Your order if this is a new setup. Move the current port number in the Listen Port field into the SSL Listen Port field. Delete out the port number from the Listen Port.
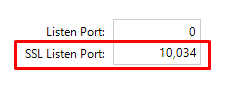
If this is a new install, put the port forwarded number into the SSL Listen Port field only. The Listen Port field will be blank. The port number in the image above is a sample only, and you should be using the port the venue was asked to port forward through their router to the Bepoz server.
11. Open an elevated command prompt (right click and Run as Administrator). Paste in the following command with the required changes for your venue copied from the info.txt file. The info.txt file has the full command required, except the specific port number for Your Order for this venue. You only need to update the port number; the venue name and the thumbprint code have already been auto added to the command.
See example below. Copy the complete command from netsh http onwards. The first line in the file “thumbprint code” has already been added to the netsh command and can be ignored. (If using a windows 7 or 2008 server OS, instructions for those are at the end of this document).
netsh http add sslcert hostnameport="venue name.yourorder.io:9192" certhash="bda1b0b2b1d6363575816f4b27fc6fef49a358f5" certstorename=MY app
Select enter and if successful you will receive the message SSL Certificate successfully added. I strongly suggest taking a screen shot of this command window and saving it in the Your Order folder as a jpg. If something doesn’t work, you can double check what settings were entered and remove them if you know.
12. In You Order Back Panel, the following fields need to be changed from using the static IP to using the host name. The format is:
https://{hostname}:{PORT NUMBER}
The host name can be taken from the PFX file earlier, and is same as what was entered for your venue as the password at step 8. moorebankindulge.bepozapi.io in this example.
https:// moorebankindulge.bepozapi.io:10034
Server Address:

Secondary Address:

Tertiary Address:

13. Restart the smart controller and test to confirm the Your Order platform can communicate with Bepoz. If all working you are finished for this process and the bottom left corner will show the Bepoz version number on the back panel. If not, it will say NOT FOUND for the Bepoz version. Recheck your steps.
14. If there is something wrong with the data you entered into the command, the port number was wrong, the code didn’t copy the correct length, or the site needs to change the port, etc, there is a way to remove the certificate and then re add it. Use the following command to remove what you have added, ensuring you are using the same name and port you already installed.
netsh http delete sslcert hostnameport="development.yourorder.io:9192"
The message SSL Certificate successfully deleted will display. You can now go back and re install the certificate with the correct or updated settings as required.
Section 2 – Other OS.
Windows 7 and 2008 Server
To install ca.yourorder.crt, select run from the start menu and enter mmc to open Management Console.
Select File then Add\\Remove Snap-in, under Available Snap-ins choose Certificates and then Add.
Select Computer Account from the bullet point options, then Next.
Leave on Local computer in Select Computer, Finish. Then OK.
Under Console Root, expand Certificates\\Trusted Root Certification Authorities Highlight Certificates under here.
In the centre window where the Certificates are listed, right click open space and select All Task\\Import.
The Welcome to Certificate Import wizard will present, choose Next.
Browse for the ca.yourorder.crt file. It should be sitting in the Bepoz\\YourOrder folder you created earlier. Highlight and select Open. Select Next.
Lease Certificate Store as is and select Next. Finish. Import was successful should be the response.
10. Go back to the options on the left and expand to Console Root\\Certificates (Local Computer)\\Personal. Right click in the centre window, select All Tasks\\Import.
11. Next in the Certificate Import Wizard, then Browse.
12. Go to the bottom right of the current window and select file types, change to be All Files. This will allow you to see the .PFX file for the venue. If not browse to where this file is saved when it was extracted earlier. Select Open, then Next on the File to Import screen
12. At the password screen, enter the host name as the password, venuename.yourorder.io, Next.
13. Leave the Certificate Store as Personal, Next. Finish. The Import was successful.
14. As in Section 1, Step 11, open an elevated command prompt. Alter the command to run from within the info.txt file with two changes below.
First, remove the highlighted text in green below and replace with the text in the second example in blue. The port number in blue must match the port for this venue. Then, remove the double quotes which are in red after the certhash= part of the command.
netsh http add sslcert hostnameport="venue name.yourorder.io:9192" certhash="bda1b0b2b1d6363575816f4b27fc6fef49a358f5" certstorename=MY app
netsh http add sslcert ipport=0.0.0.0:9192 certhash=bda1b0b2b1d6363575816f4b27fc6fef49a358f5 certstorename=MY app
Execute and this should come back with SSL Certificate Successfully added. Complete.