
Overview
Tablet Mode
Tablet mode is a feature that uses tablet devices to make dine-in orders without payment and sign-in/guest checkout. It will lock the screen to the menu page so customers cannot use the device for anything else besides ordering. End users can also view the order history of the table and once all orders are final, users will need to return the device to staff, who will reset the table number for the next table service. Tablet mode is only compatible with Ipad tablets.
This feature is a useful tool as the presented tablet devices can be used to take orders for the whole table. For example, a family of ten have decided to order. Instead of each individual making separate orders the tablet devices can be handed around and every person can place orders from there. This avoids confusion when ordering and any individual can view the order history to ensure that every item has been bought to the table as well as help in avoiding duplicate orders of products.
Backpanel Setup
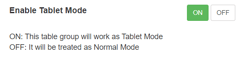
Tablet mode has a simple set up in the back panel. That consists of one configuration, which is an on/off toggle. To access this, click “Settings” in the dashboard and expand ordering options. Within the Dine-in tab, there will be several table groups. Each group will have an option called “Enable Tablet Mode”, press ON till it changes green and save using the

. When a service is enabled with tablet mode it will be removed from the responsive website and mobile views.
Note:
Tablet mode is also available for room service. The toggle will be located within the room service section, which can be found in the “Main Settings” tab.
When tablet mode is active, round drink and group ordering will automatically be disable
Tablet Device Set up
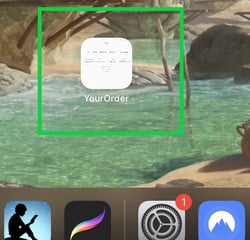
Adding a website to Ipad Home Screen
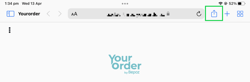
On a Ipad, open Safari and navigate to the website that will be placed on the home screen. Once the website has loaded click the share icon on the navigation toolbar at the top of the screen.
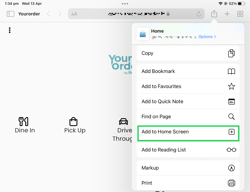
The share menu will expand. Scroll down and tap “Add to Home Screen”
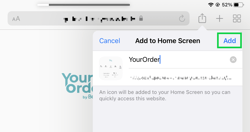
A new pop-up will appear called “Add to Home Screen”. On this panel, you can name your new Home screen icon. When user is finished, tap “Add”.
The icon for the website will appear on the home screen. When needed tap the icon and Safari will open and load the site.
Set up Guided Access
Guided access restricts IOS devices to a single app. This stops users from using any other device functionalities besides the features in tablet mode.
Steps
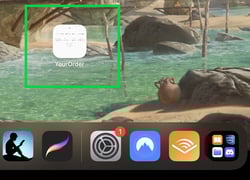
Tap the settings icon on the home screen
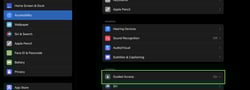
Tap Accessibility and then press Guided Access
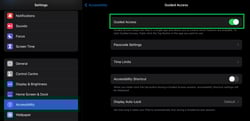
Tap the Guided Access toggle till it turns green
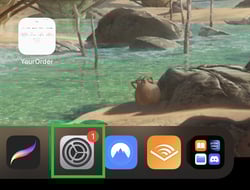
Swipe up to return to home screen and tap the app icon created in, Adding a website to Ipad Home Screen section
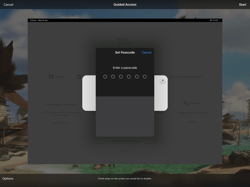
Triple-click the power button to initiate guided access and press start
Input passcodes and guided access will be active. Ensure that staff save the guided access passcode in a safe and secure place
Setup Table Mode
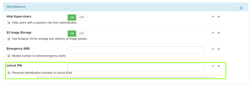
Tablet mode will need to be set up on a device, as the initial view on a tablet will be the responsive website. A passcode will be needed, which can be located within the YourOrder back panel. Access it by clicking “Settings” on the left-side of the back panel dashboard and expand the “Miscellaneous” tab by pressing on it. Within this panel, there will be a field called “Unlock PIN” that contains the code. Once the PIN is memorised head to the front end.
Steps
I. On the tablet device, click the app icon created in, Adding a website to Ipad Home Screen section.
II. Follow steps 5 and 6 in the guided access section, to enable a lock on the app
Once the homepage has loaded, tap the logo six times and a popup will appear
Input the passcode which can be found in the “Unlock PIN” field within YourOrder Backpanel and click “UNLOCK” to validate. If successful a new popup will show.
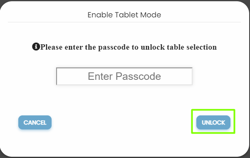
Click OK to proceed and initialize the mode
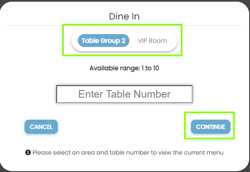
To set up table groups and ordering types on device
I. Click a service type from the homepage
II. Select a table group if needed, skip this step if it is not an option
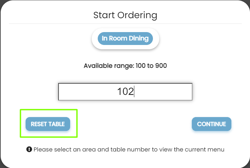
III. Input a table or room number and press Continue
Reset tables
After a customer has finished with their orders, staff will need to reset the table for the next service.
Steps
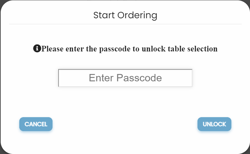
From the menu screen double left- click the room/table number located at the top left corner of the screen

Input the passcode from the backpanel
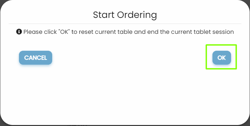
Click reset table and then click confirm. User will be taken back to the homepage and table will be reset
Note:
The table will automatically reset if the dine-in table alive time is greater than the predefined time. The default time is 3 hours but a different value can be set in the backpanel. E.g. A table 1 starts at 6pm and staff have forgotten to reset the table on a tablet. After 9pm, the table will reset and order history is erased.
All active tables will auto reset the next day at the “Roll of business” time, which can be found by clicking “settings” then expanding the “Times” tab.
Frontend
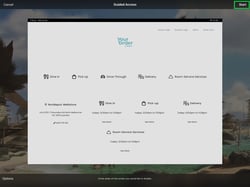
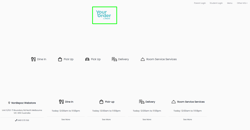
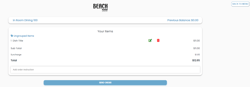
Once the device is set up, customers will be able to make an order. The menu screen should be the initial page that customers view. They can make a normal purchase by simply clicking products and then tapping view order at the bottom. This will take them to the checkout page where they can edit their items with

or discard items with

. Once the order is finalised, customers should click “send order” at the bottom.
If this is the first order, a panel will appear asking for mobile input, else they will move straight to the tips screen. Add a tip if desired and a new popup occurs asking for confirmation to send the order to venue areas or to add more items. Clicking “add more items” will send customers to the menu screen for more purchasing or pressing “Send Venue” will finalise it and the order number will appear.
Once an order is placed, the previous balance at the top of the menu screen will be updated with the total values of existing orders. To view details on previous orders, click the

in the top right corner. When a user has finished their orders, the tablet should be returned to the staff so they can reset the table on the tablet device.

Tablet mode - menu screen
Tablet mode – Checkout Screen
Note:
When devices are in tablet mode, there will be no payment options. Customers will need to pay within the venue.
This mode does not support Mix tablet mode or normal QR/manual table number entry from end-user devices.