
Overview
Wait time
The wait time feature allows customers to know the current wait time before they order. This is used to ensure that customers understand the timeframe for their order to be ready, which in turn will increase customer satisfaction and trust between the guest and venue.
For example, customer one has not received a notification on their order and they have been waiting for ten minutes. They may then be dissatisfied with customer service, as they have not been given information about the situation.
Customer two has received a notification ensuring that their order may take ten minutes. The customer has some understanding of the situation and can manage their time better. They can do other activities and return in ten minutes to pick up the order.
For this feature to be enabled on the front end, click settings on the left side and click feature control to expand this section. Scroll down till “Enable Estimated date and Time” is in full view. To enable, Click ON for the selected services till it changes to green and save with the on the right. These configurations are also located on the Wait Time page. This feature can also be configured on the merchant app.


The main configurations for this feature are found in the wait time setting. Within this screen, there are two prominent sections that work together to show different types of wait times on different products/categories.
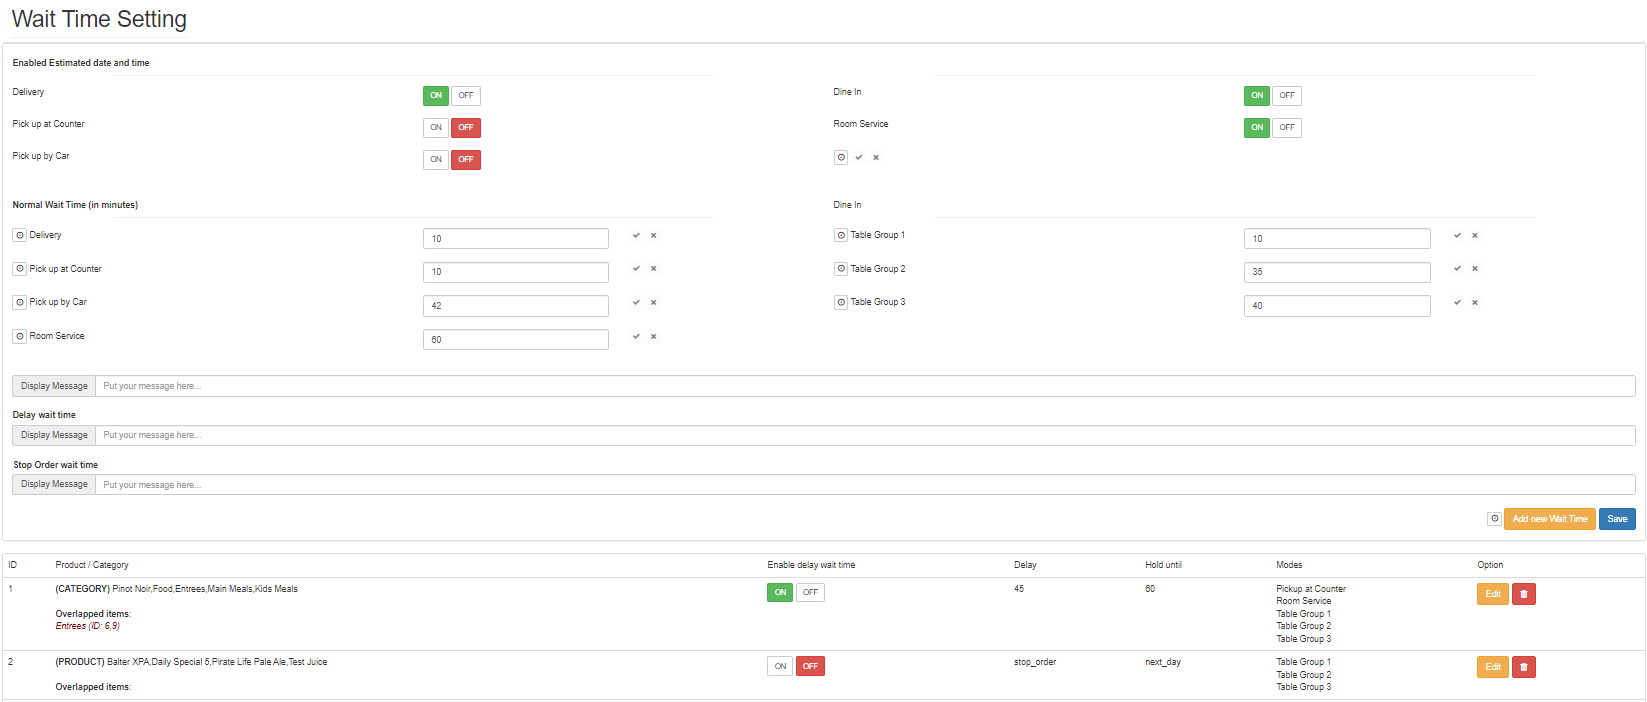
Wait Time Setup
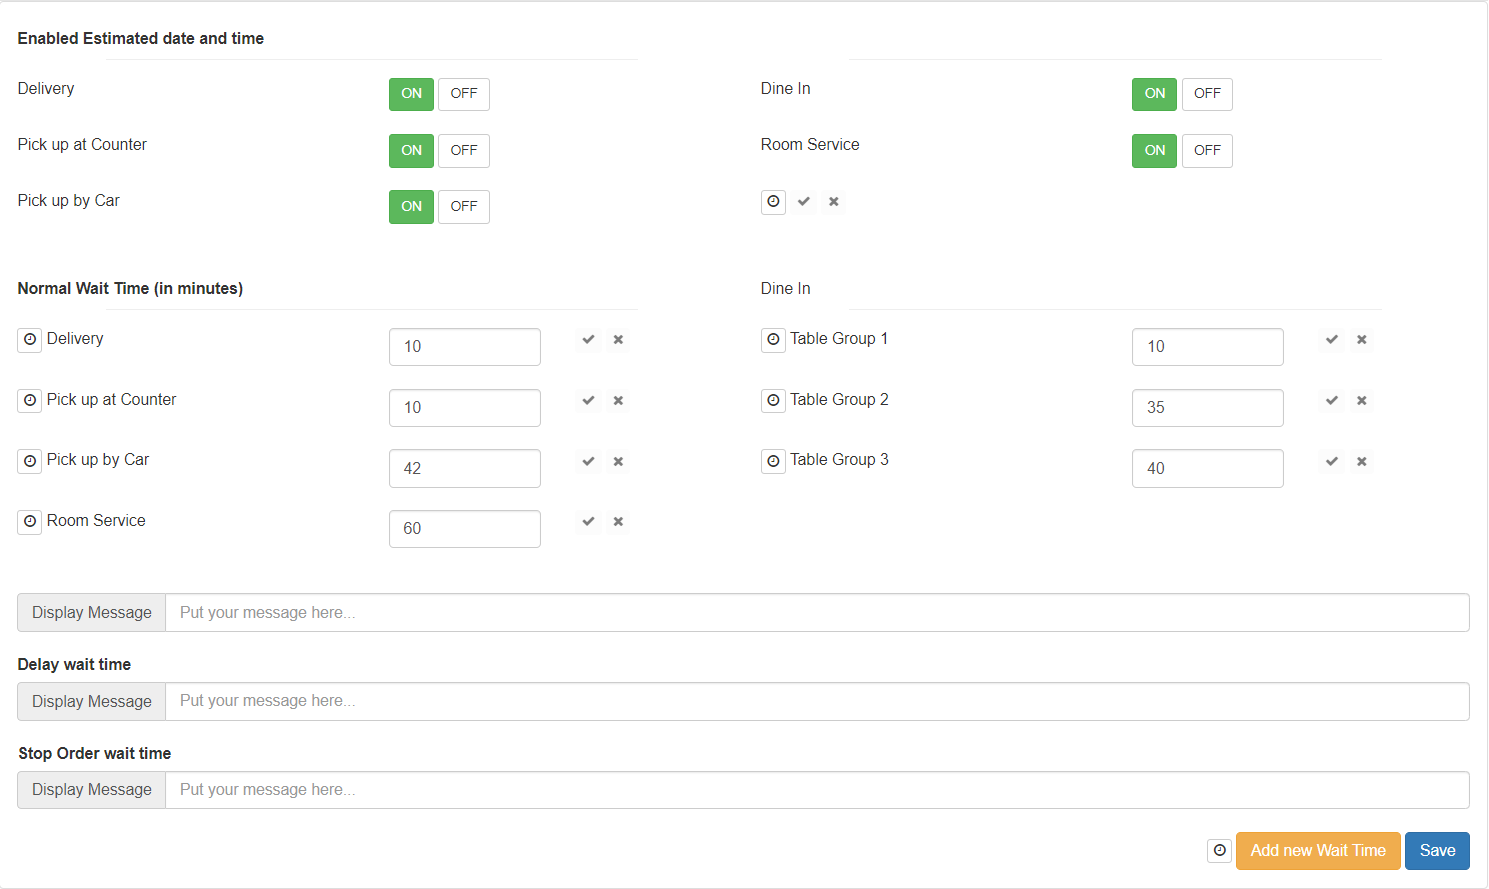
The wait time section is where the normal waiting periods can be set and the display messages for different types of waiting times can be customised. This area also allows adding new delay wait times and selecting ordering types that the feature will apply.
|
Feature |
Description |
|
Normal Wait Time (in minutes) |
Values for normal waiting times of each ordering type |
|
Normal Wait Time Message |
A message seen by customers when the normal wait time prompt appears |
|
Delay Wait Time Message |
A message seen by customers when the delay wait time prompt appears |
|
Stop Order Wait Time Message |
A message seen by customers when the stop order wait time prompt appears |
|
Add New Wait Time |
Allows users to add a new custom wait time, that products and categories can be added to. |
Steps
-
Select an ordering type in the “Enable Estimated date and Time” section and click ON to enabled the feature for this service. The ON button will turn green to show it Is active
-
Select an ordering type in “Normal Wait Time (in minutes)” section and click in the respective field next to the title
-
Input a numerical value that is above 0. If left empty, a prompt will occur asking for a value.
-
Click the to save changes or to cancel

-
Input custom text in the display message fields and save changes when all changes are finalised.
Notes:
-
When inputting a value for normal wait time, users can use an alternative method to change the values by hovering the cursor over the fields and clicking the up and down arrows.
-
If any of the fields have a decimal number as input, a prompt will show asking for a numerical value
-
Each wait time message has a default value. These values are:
-
Normal wait time - Earliest waiting time for your order is (normal wait time value) mins
-
Delay wait time - Take around {ready/delay time value} to ready
-
Stop Order wait time - Item(s) is/are temporary unavailable
-
Add New Delay Wait Time
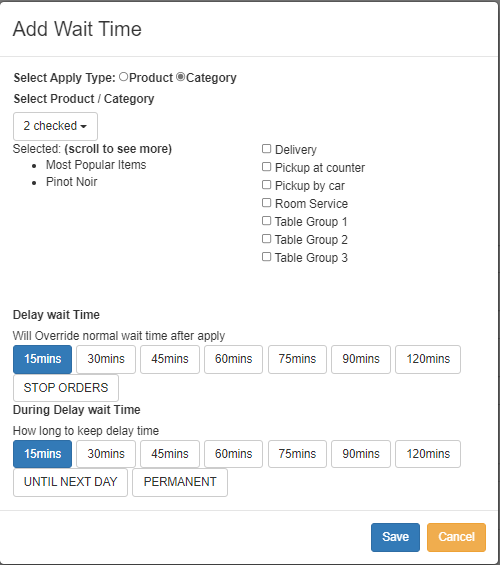
|
Features |
Description |
|
Select Apply type |
Allows users to pick either product or category items to add |
|
Select Service type |
Ordering types that wait time can be applied to |
|
Delay Wait Time |
Overrides normal wait time |
|
During Delay Wait Time |
Length of time to keep delaying time |
Steps
-
To access the Add wait time window, click the wait time settings screen on the lefthand side and click “Add Wait Time” button, located to the right of “stop wait time display message”
-
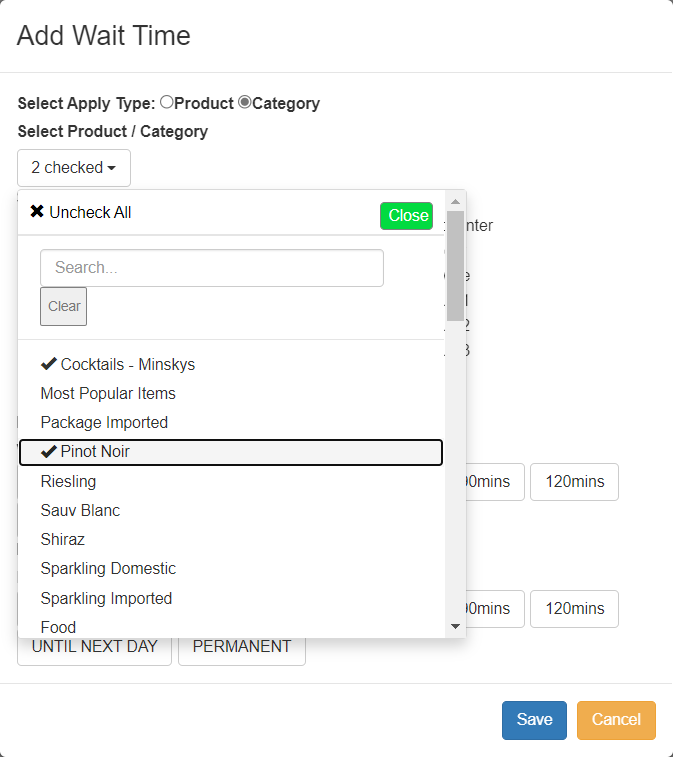
Select product or category in Apply Type. A dropdown field will appear underneath.
-
For adding products or categories:
I. Click the dropdown field named “Select” which will expand the field.
II. Search for a product by scrolling down the list or using the search bar. Press clear to reset the search bar.
III. To make a selection, click the item directly and it will be added to the selected list. Multiple items can also be selected and added to the list.
IV. If the user needs to reset the list click button above the search bar to revert the selected list to empty.

V. Pressing the button will close the dropdown window. Alternatively, users can click outside the dropdown window.

VI. If the user would like to delete an item, directly click the item and the tick will disappear.
-
Select the ordering types to apply delay time by clicking the boxes. Multiple choices can be picked
-
Choose and click a time for “delay wait time”
-
Select a “during delay wait time” option
-
Once modifications are finalized, press save to apply the new changes or cancel to discard them
-
A pop-up will appear asking if the user would like to activate the wait time, click OK to accept or cancel
Notes:
-
When selecting items, if both products and categories contain items in the selected list then whichever option appears last on the screen will be applied and the other will have its list cleared.
-
Within “delay wait time”, an option called STOP ORDERS is available. This choice will stop all orders on these products/categories and the stop order wait time message will appear on the frontend on the specified products/categories.
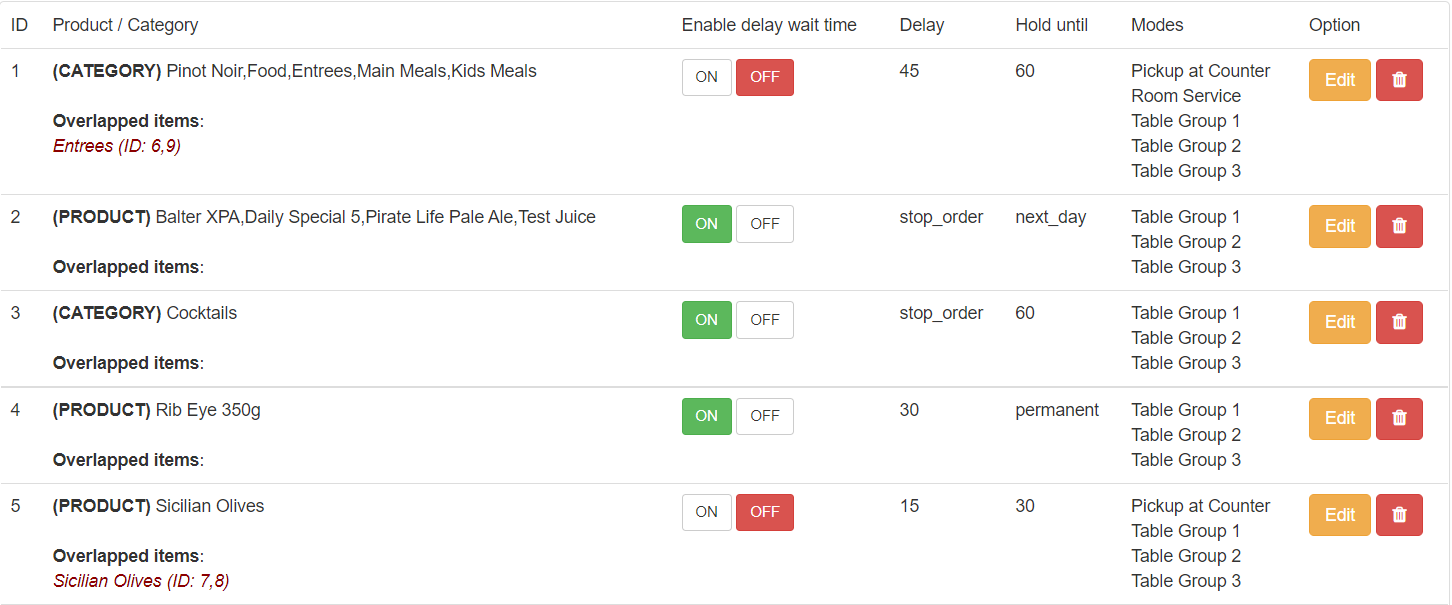
Delay Wait Time List
This section displays the existing delay wait times and their configurations, as well as several features to aid in wait time setup.
Within the product/category column, there is a title named “overlapped items”, which will show any items that have clashing wait times. Underneath this there will be the overlapping item names and the ID of the other wait time instances with the same items.
The “enable delay wait time” column will have toggles for each instance. Each toggle will allow the user to activate the specific delay time configuration and to enable them click ON till it has changed to green. The active instances will be applied and seen by customers on the front end.
The allows users to modify the existing delay times and the will discard the instance in the same row.

Notes:
-
When there is an overlapping item, the instance with the highest ID number will be used.
-
When using the or toggling “Enable wait time” ensure that the changes are applied by using the save button in the top right corner of the page.
-
Any changes made to wait time on the backpanel will be reflected on the merchant app

Merchant App
The merchant app can be used to configure wait times in YourOrder. Firstly, the merchant app will need to be enabled. Click “Setting” on the backpanel dashboard and click the “Merchant App” Tab. In the “Main Settings”, press ON for Enable Merchant App and save with the .

The permissions will then need to be set for users to edit and view the wait time in the app. Click the “Users” tab and select a row in the list by clicking it once. The “Edit User’s Access” panel will open. Tick the VIEW and/or EDIT boxes under the wait time title then click save and close.

Enable Merchant App
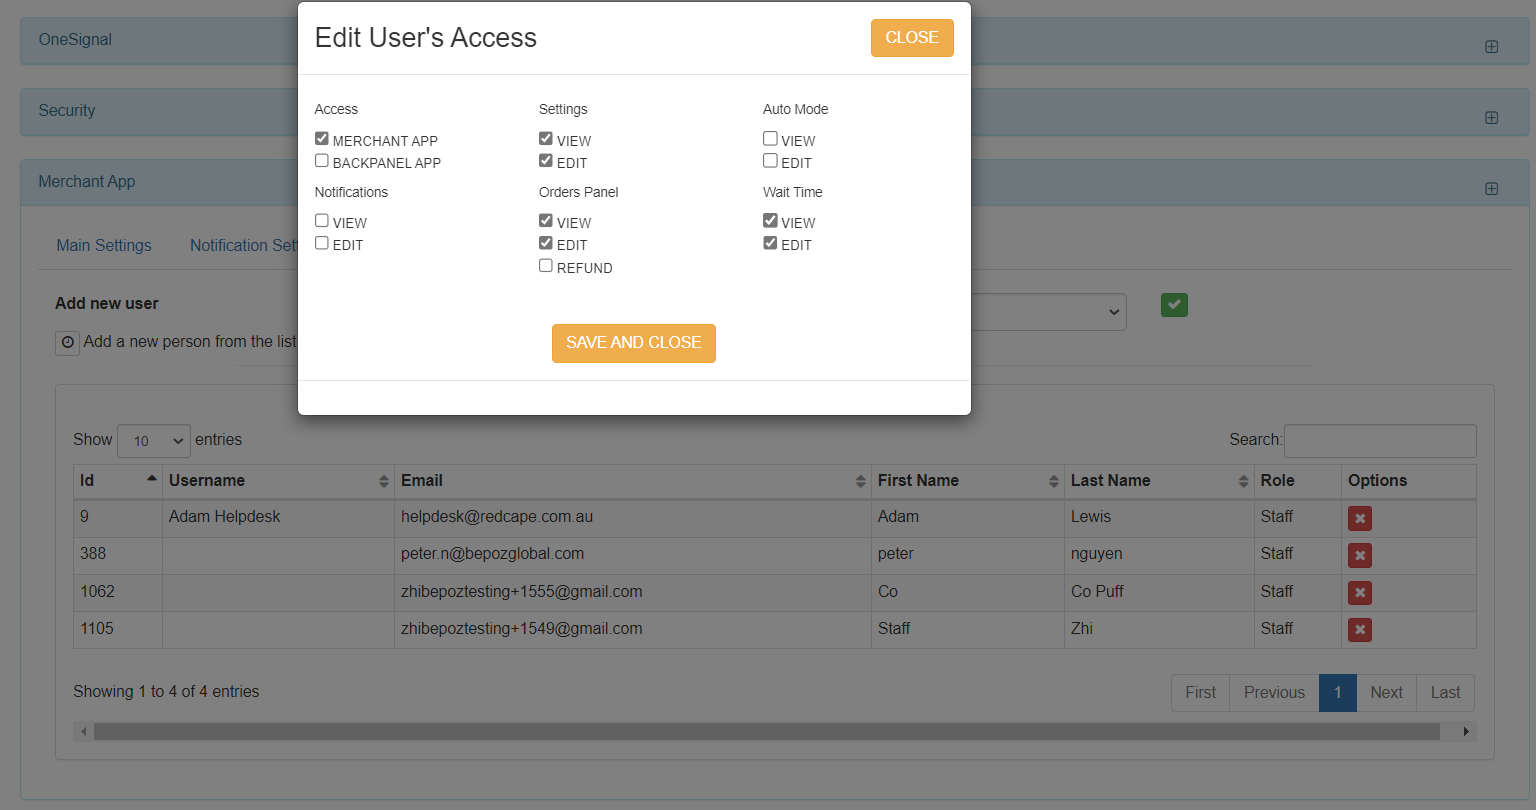
Configure wait time permissions
Once the back panel is set up, the wait time will be accessible in the merchant app. When the end-user has logged in, they are moved to the order board.
Pressing the logo in the top left corner will open a new screen displaying different sections of the merchant app. Click the wait time button and it will display wait time configurations.

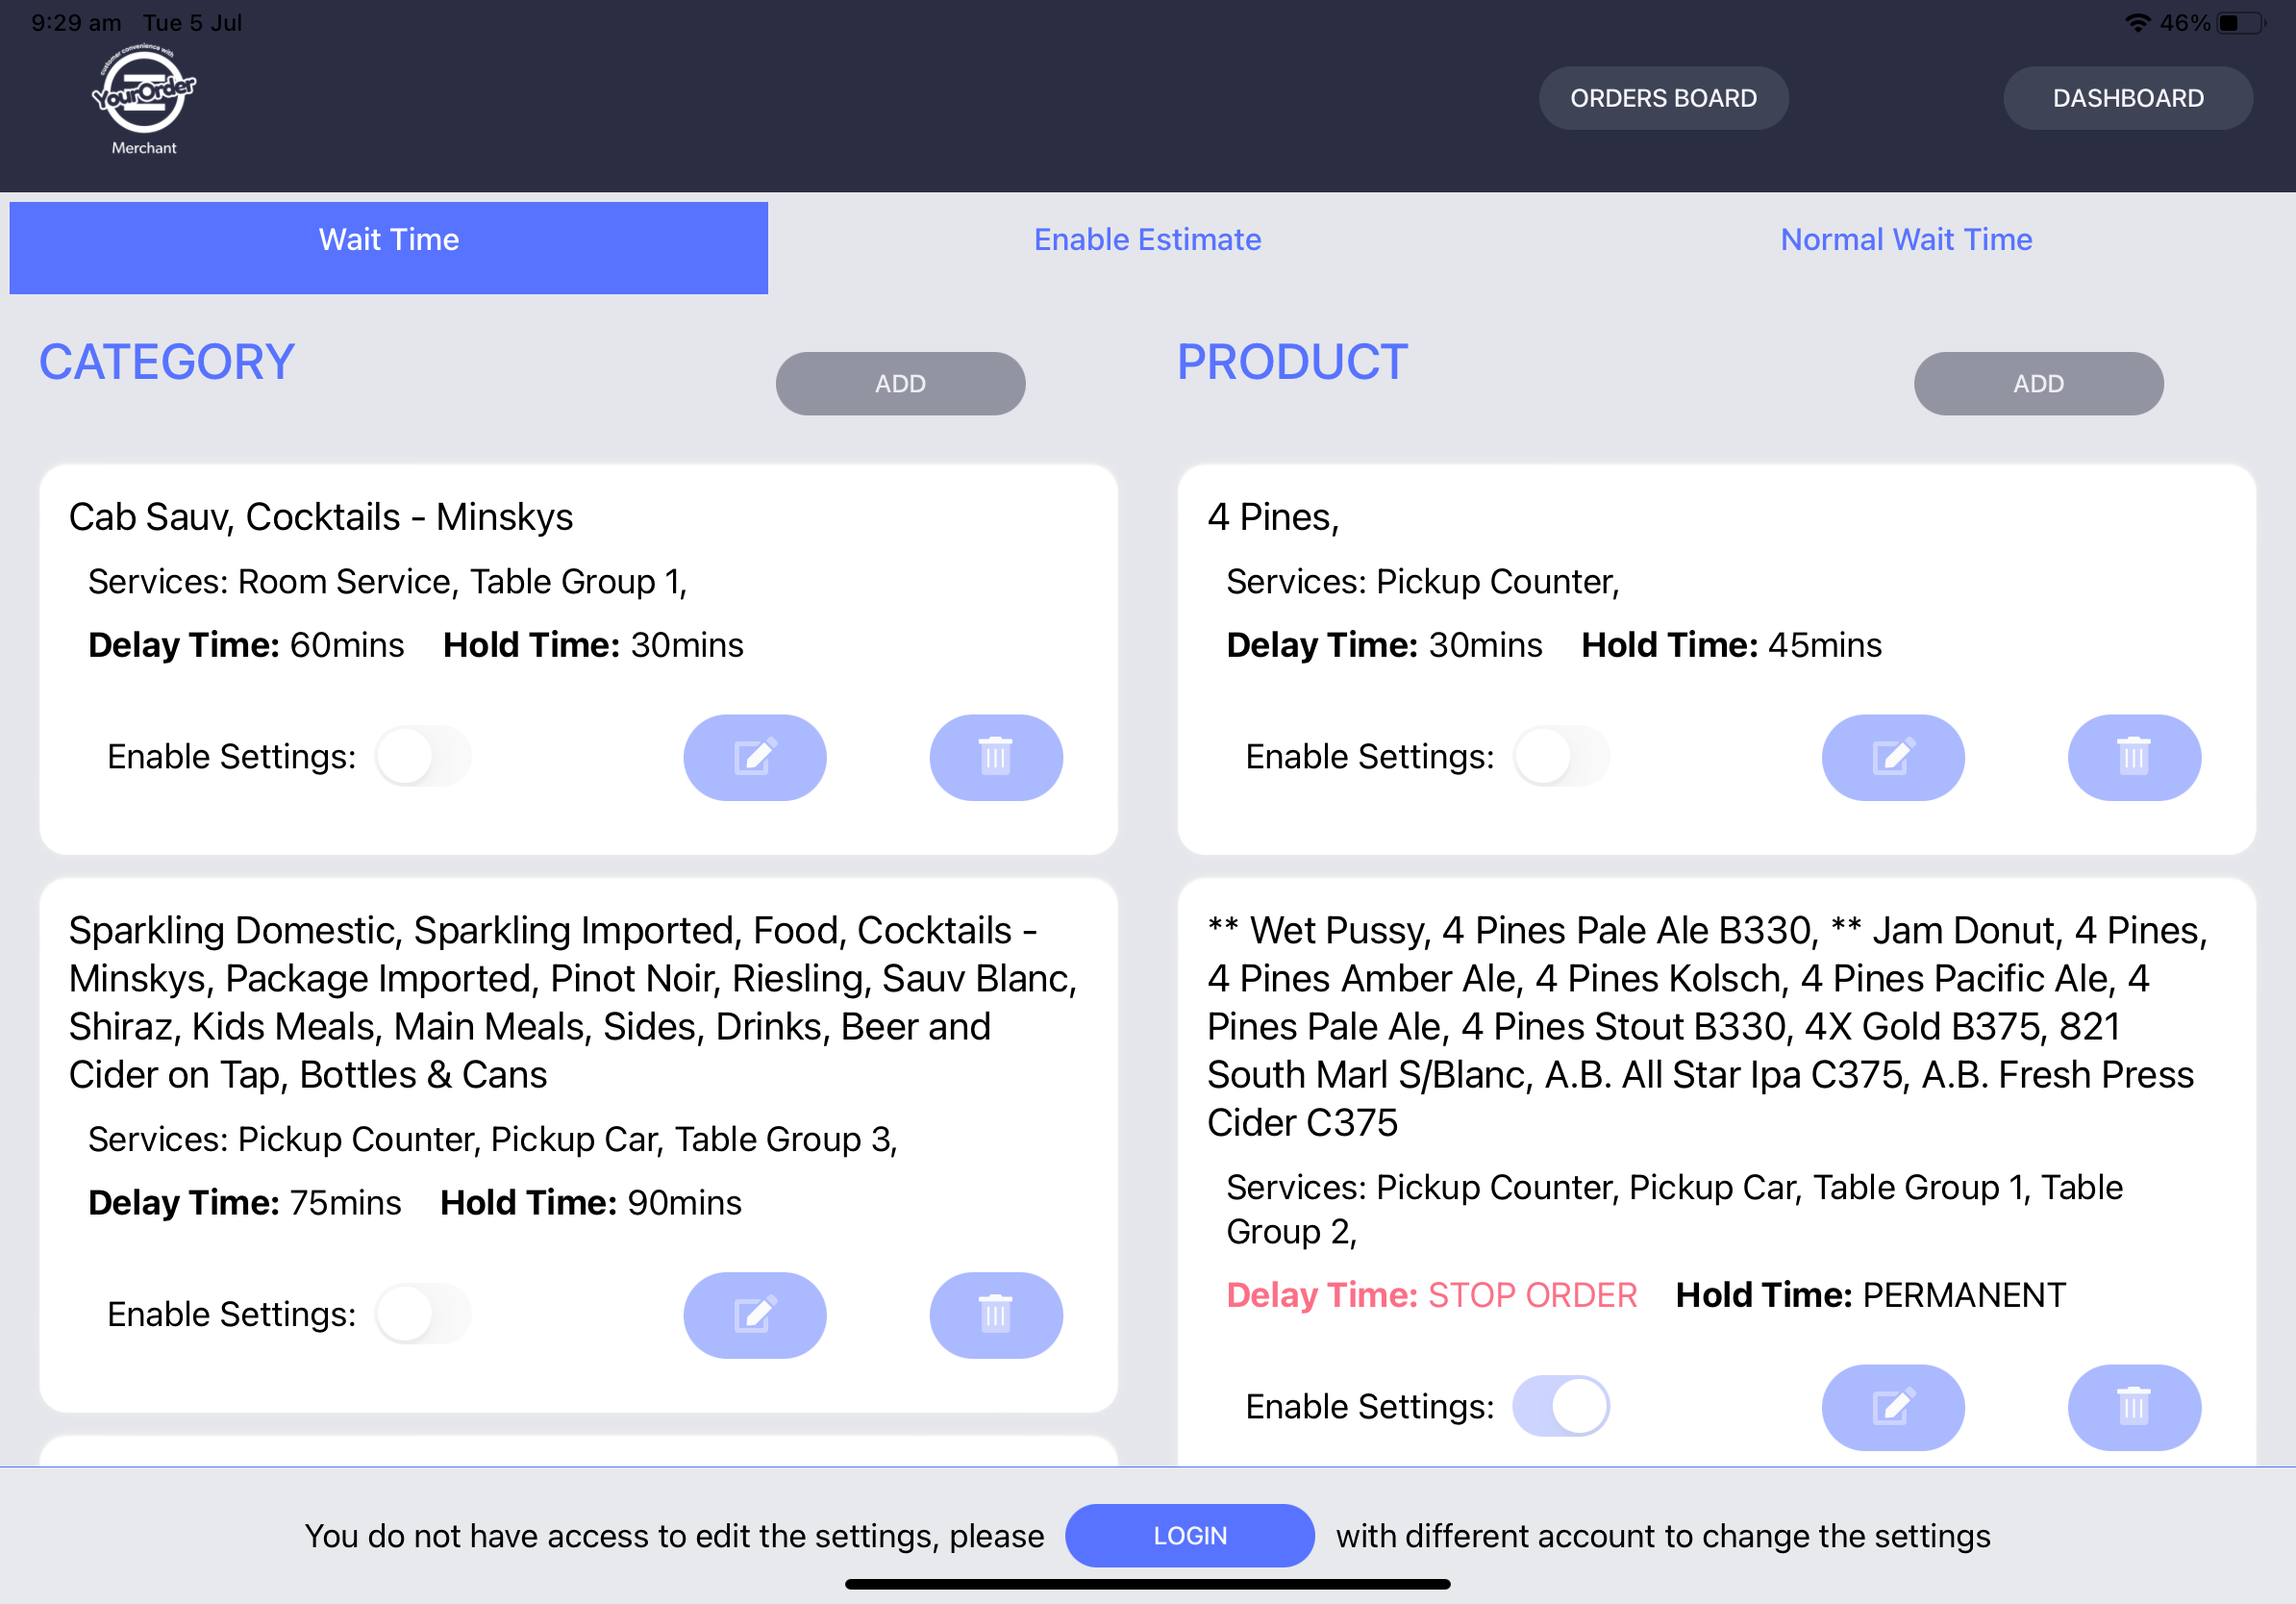
tap the “Wait Time” tab and a new screen will appear. Depending on the permissions set in the back panel, users will have different access controls. Users with view-only privileges can see the current setup but cannot make changes as all options will be inaccessible. A message will appear at the bottom with a login button for these users to change accounts to one with edit privileges. Users with editing privileges can configure the wait time setup. The message and login button will not appear at the bottom of the screen for users with edit access.
Wait time Screen- Edit Privilege
Wait time screen- View Privilege
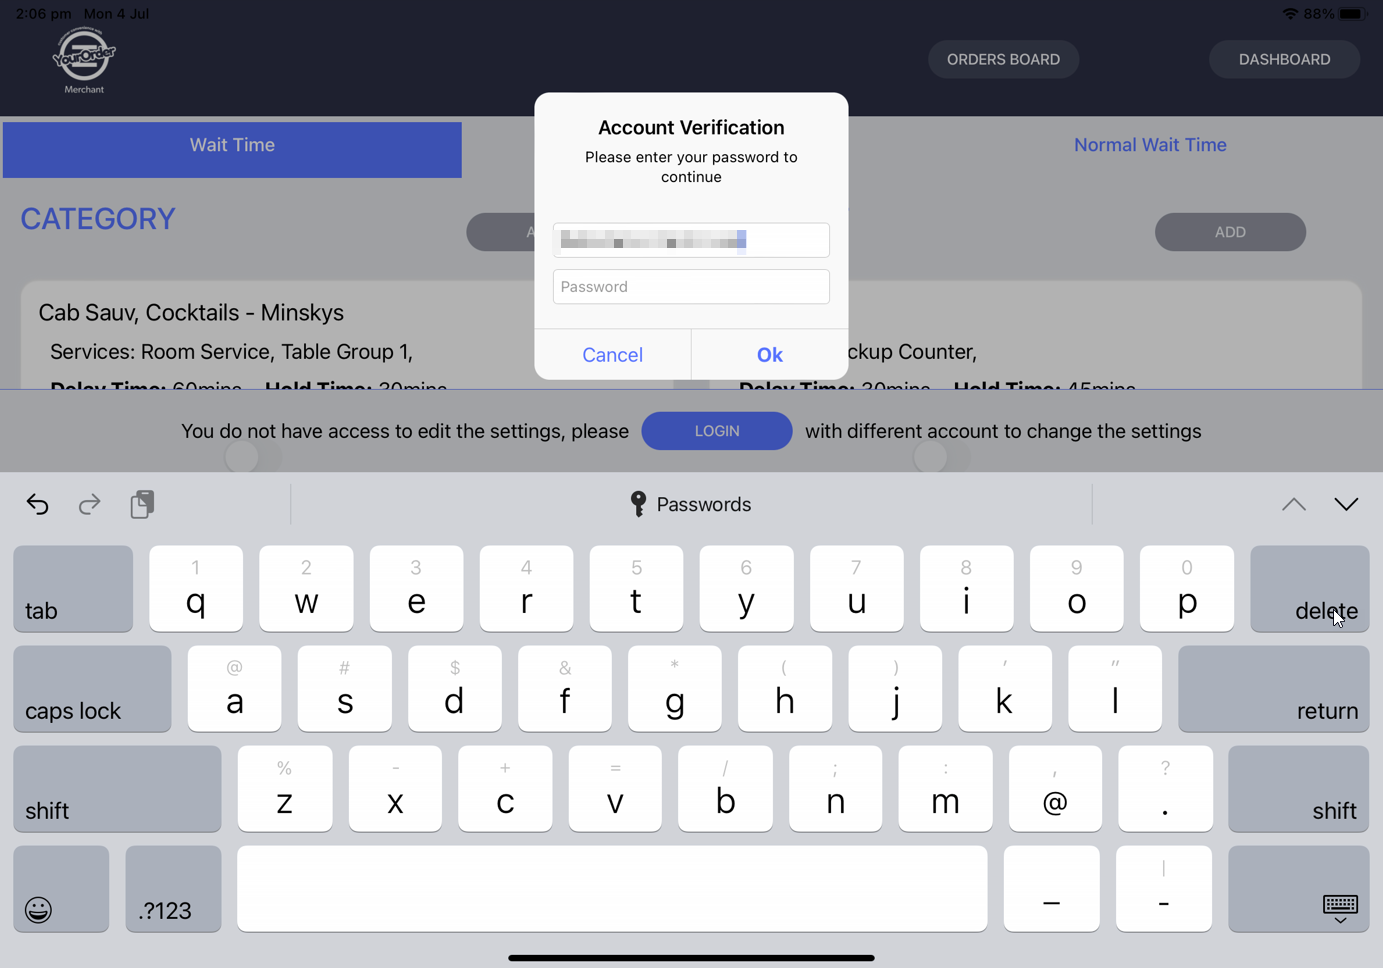
Login panel
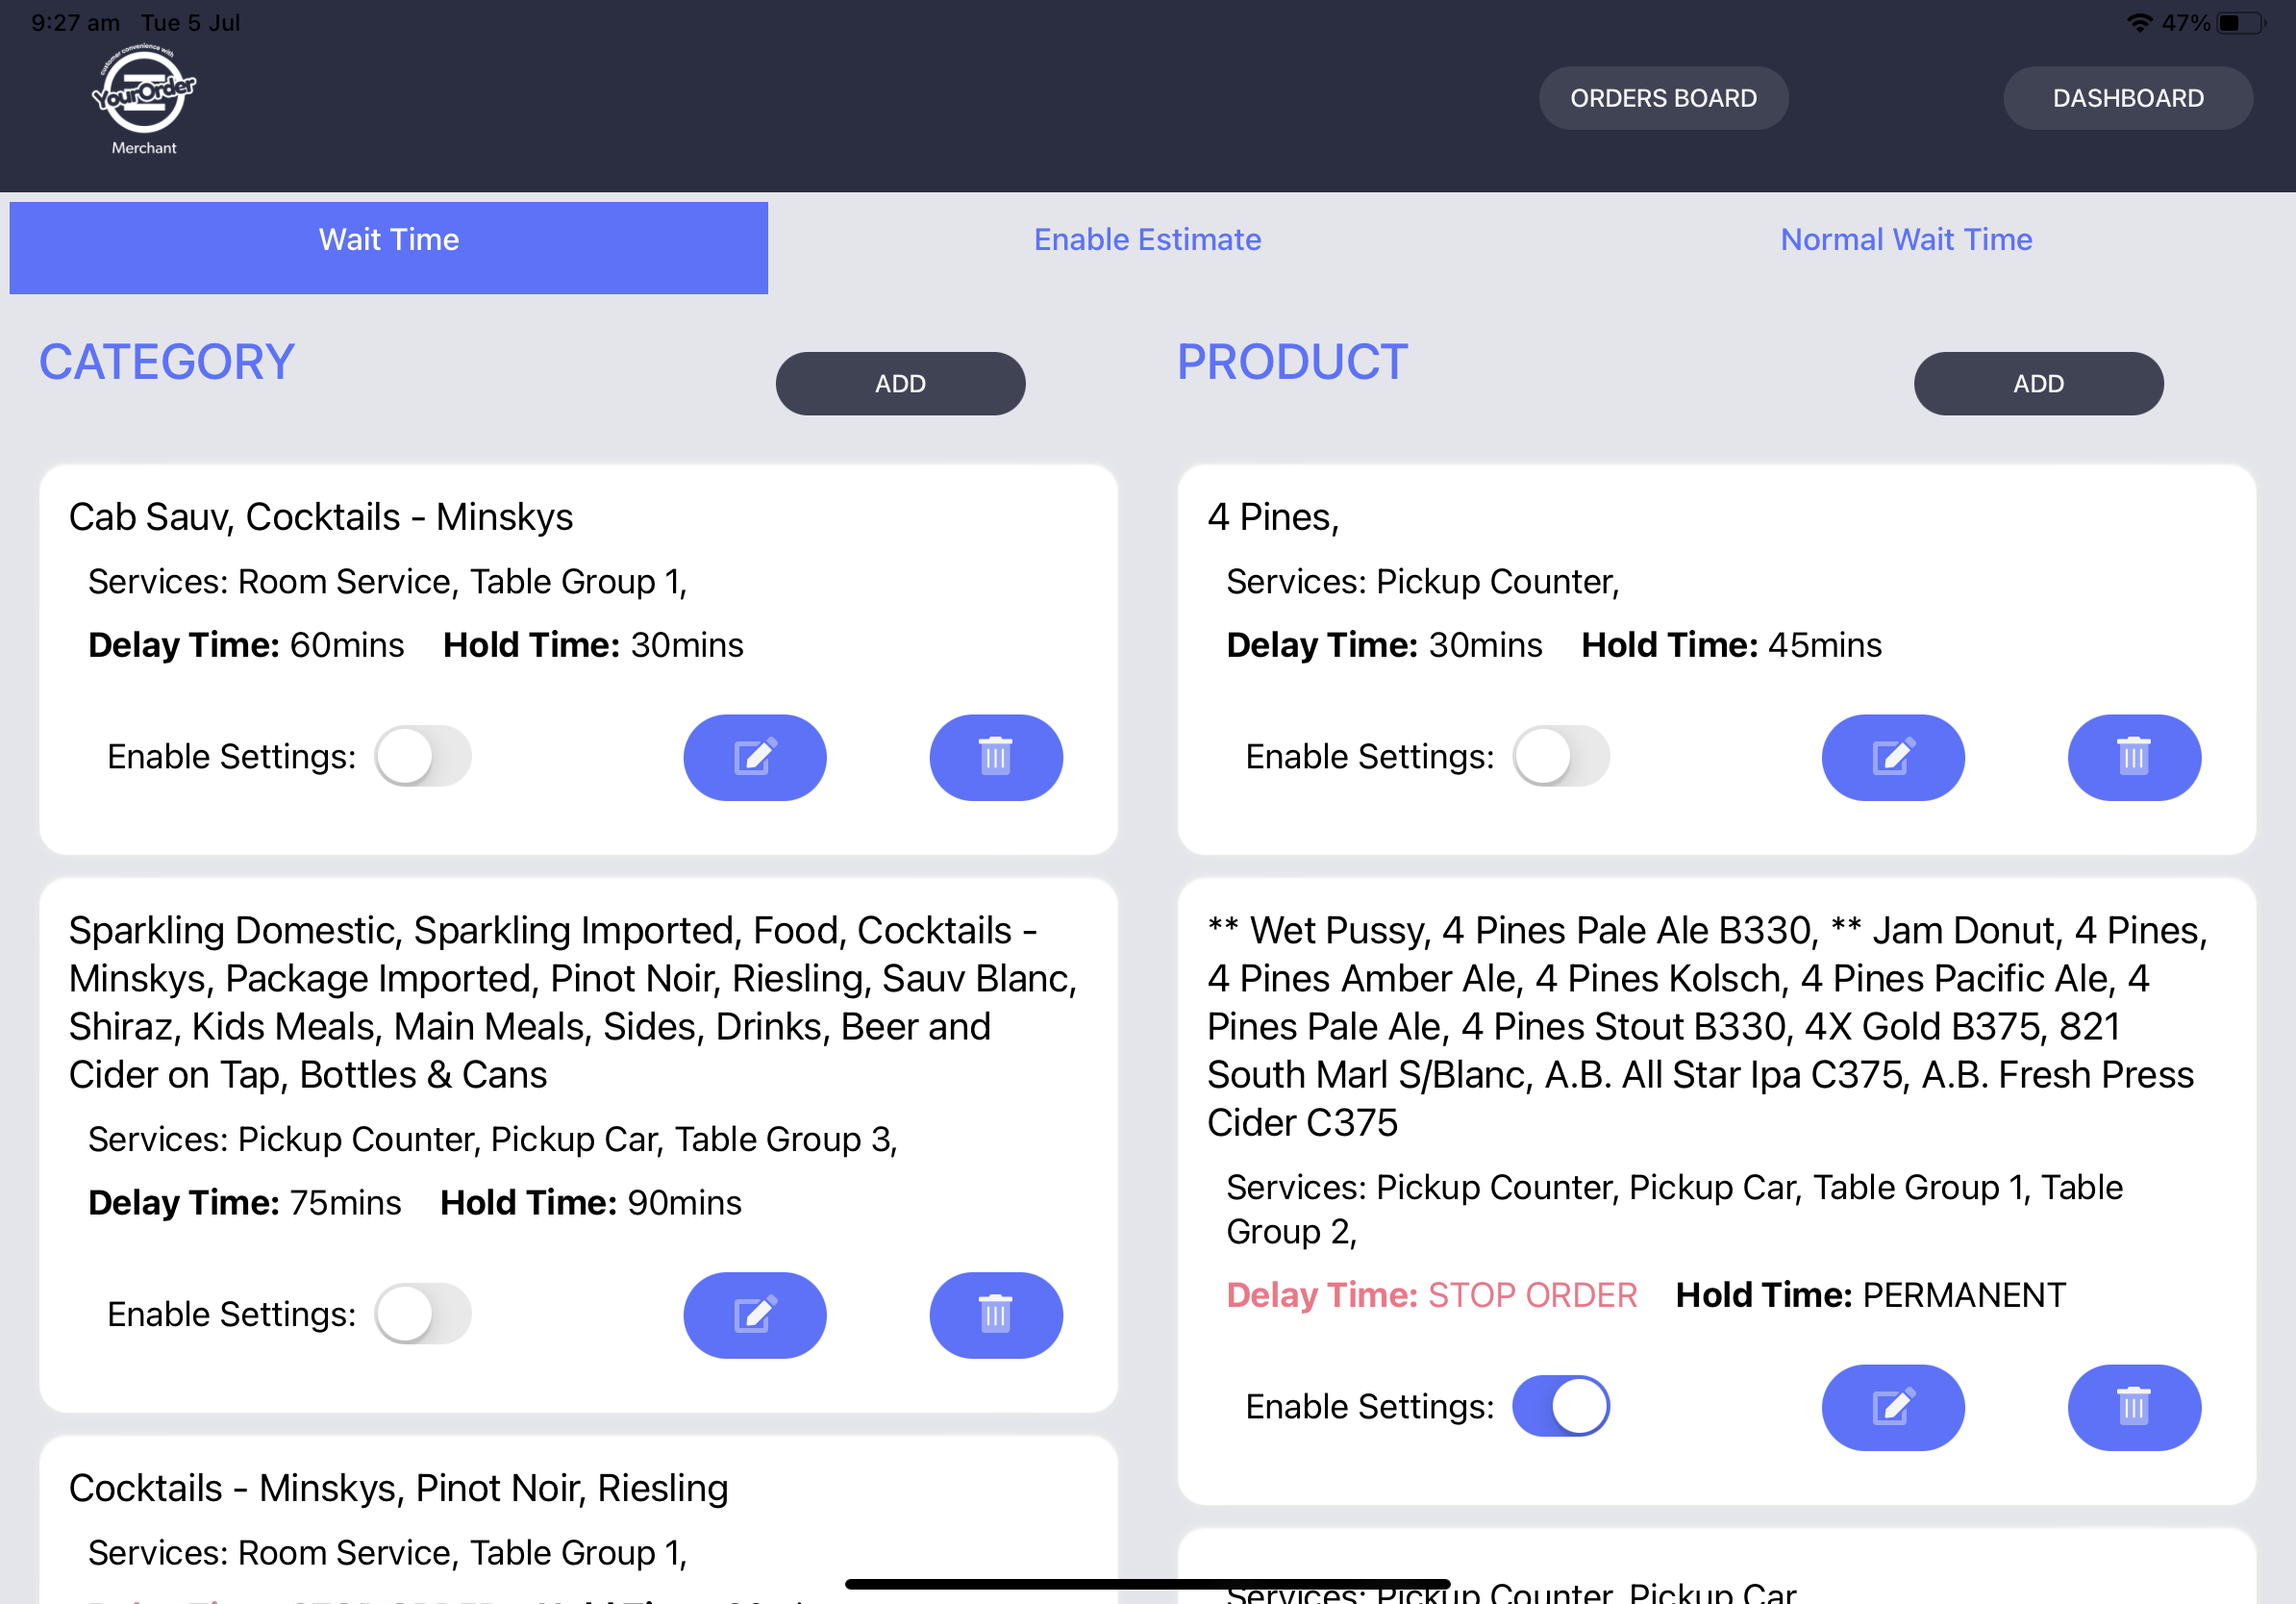
On the “Wait time” screen, users can add new wait time setups for specific categories or products and edit existing ones. To add a new wait time, press the button near the category or product titles and the “Add New Wait Time " window will appear.

The can be used to edit setups, while the is used to remove them. Tap the toggle next to enable settings label and it will be active if the toggle turns blue.

Category/Product wait time screen
If the or button is pressed, the “Add Wait Time” panel will open. Here users can toggle the wait time for services by tapping , Select a “Delay Wait Time“ and “Keep Wait Time“ by tapping the options in their respective section.

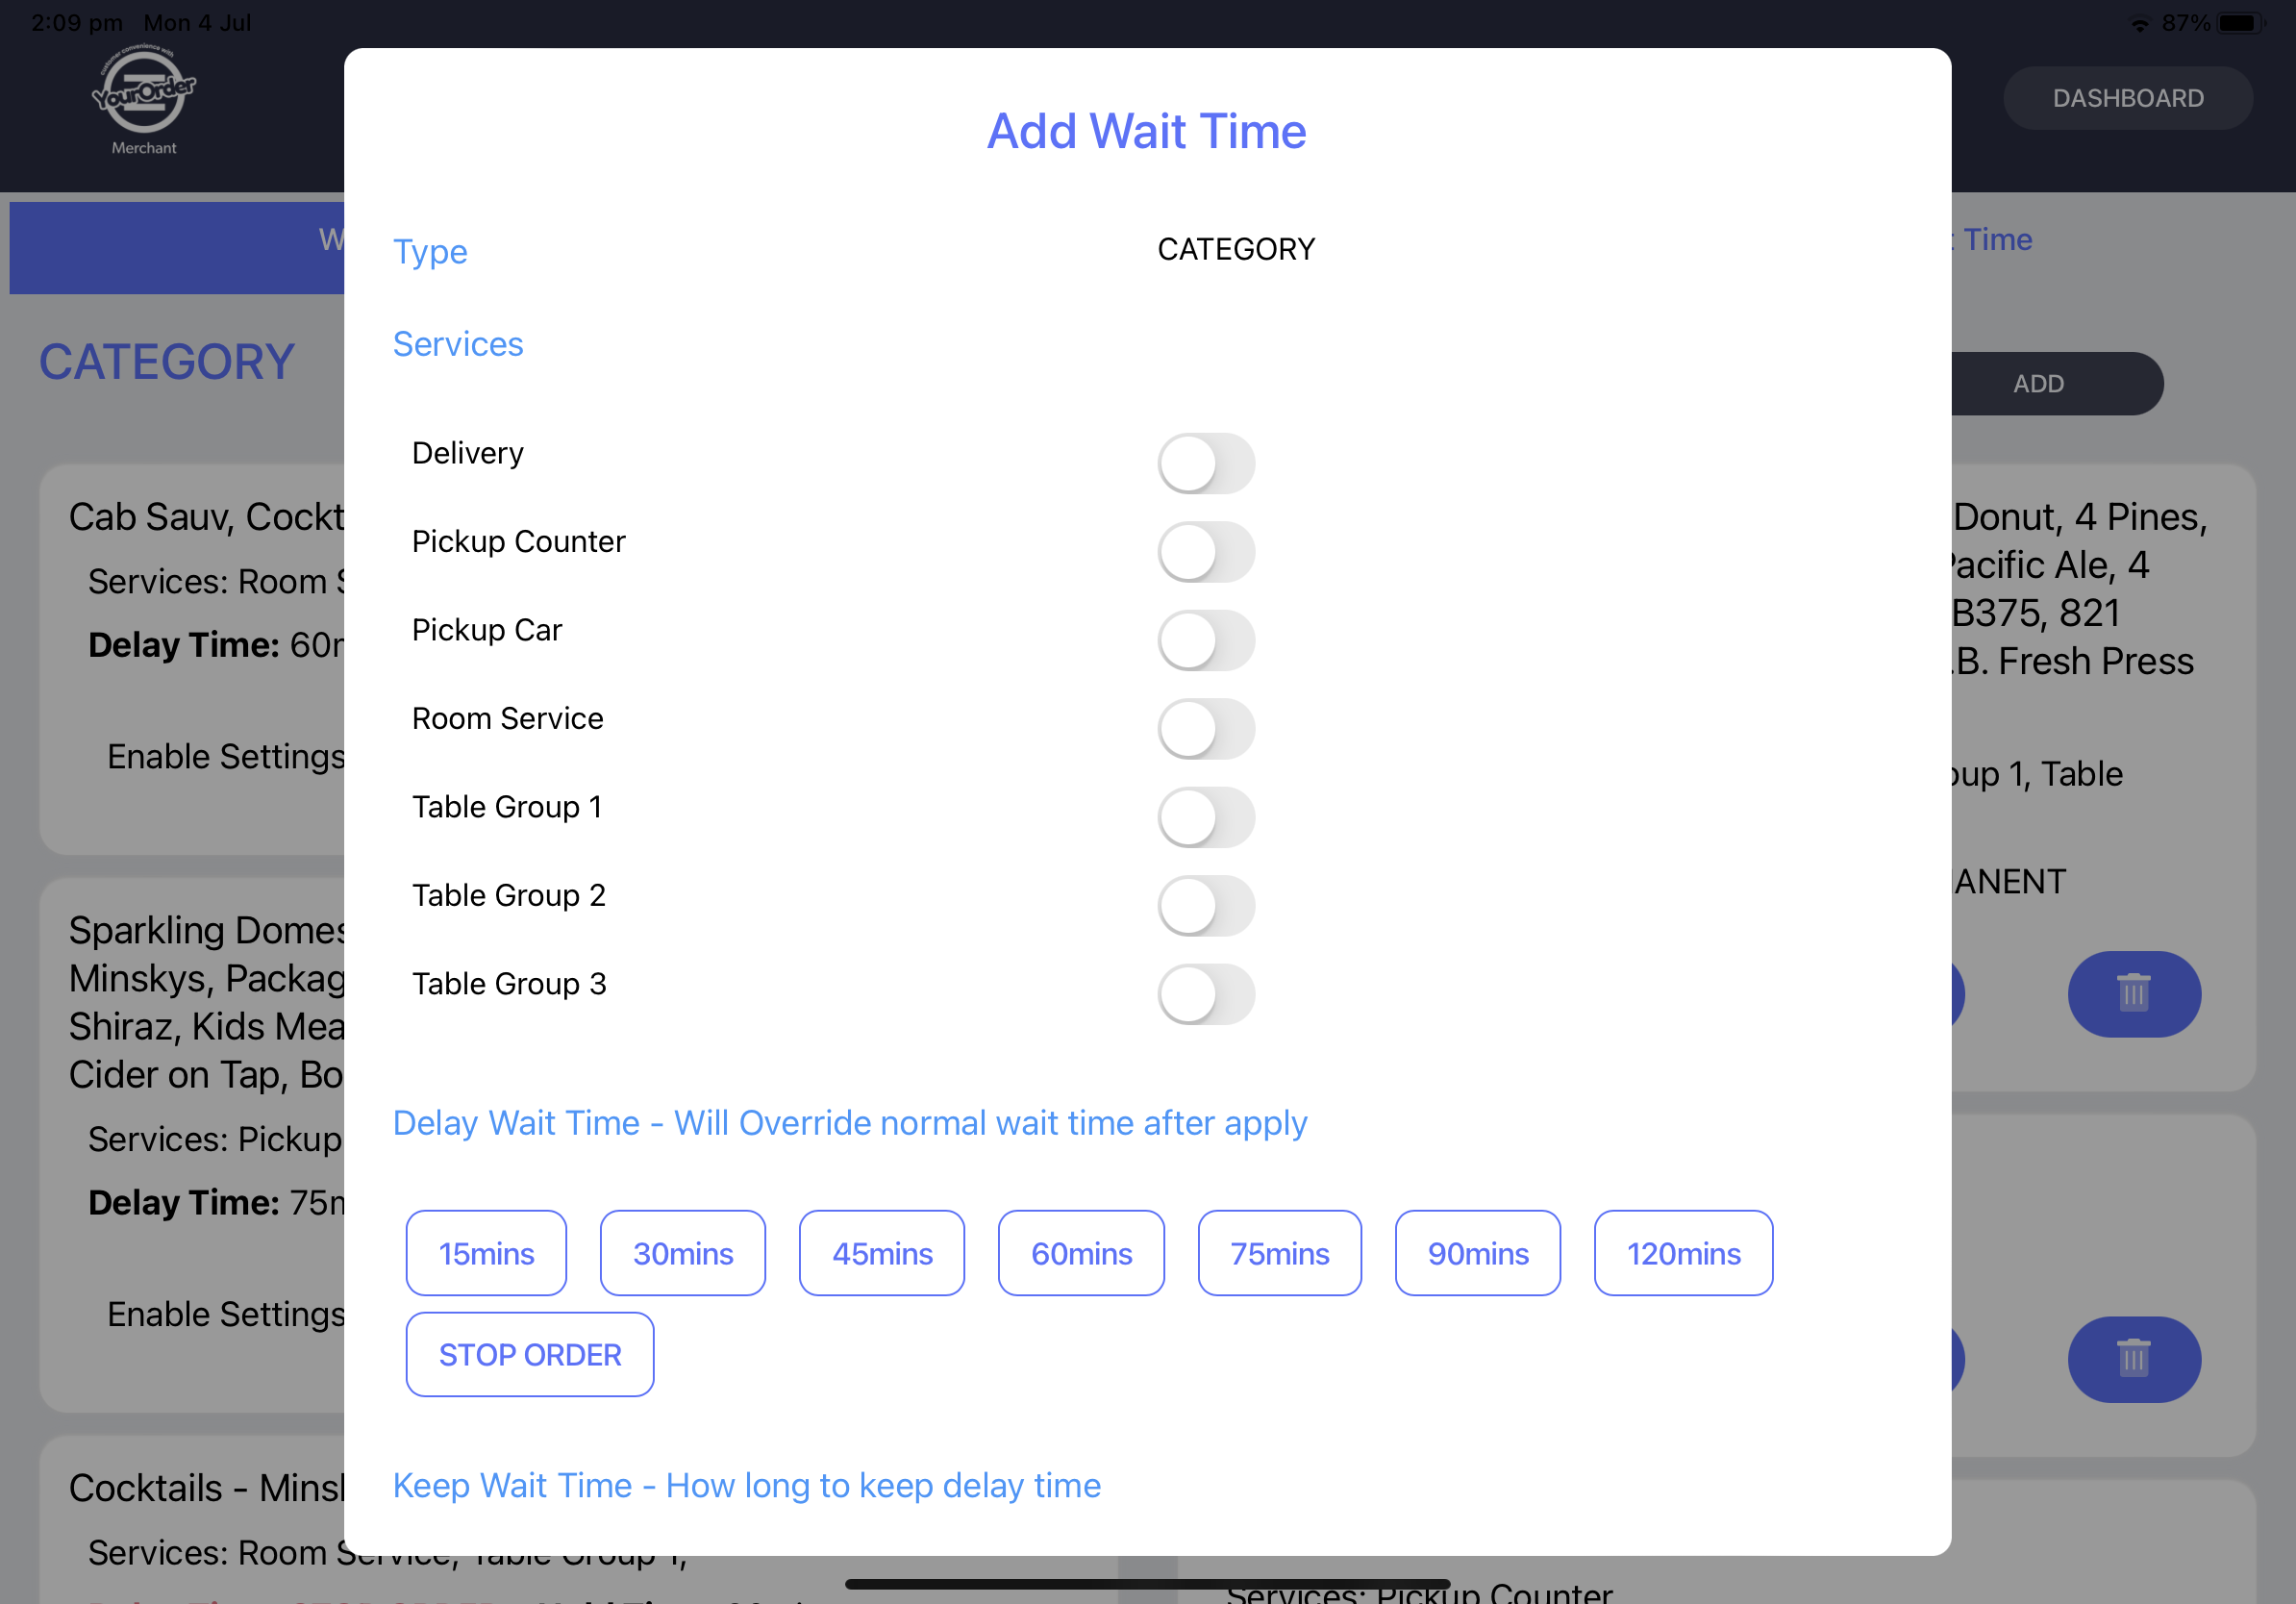
Add Wait Time panel - top
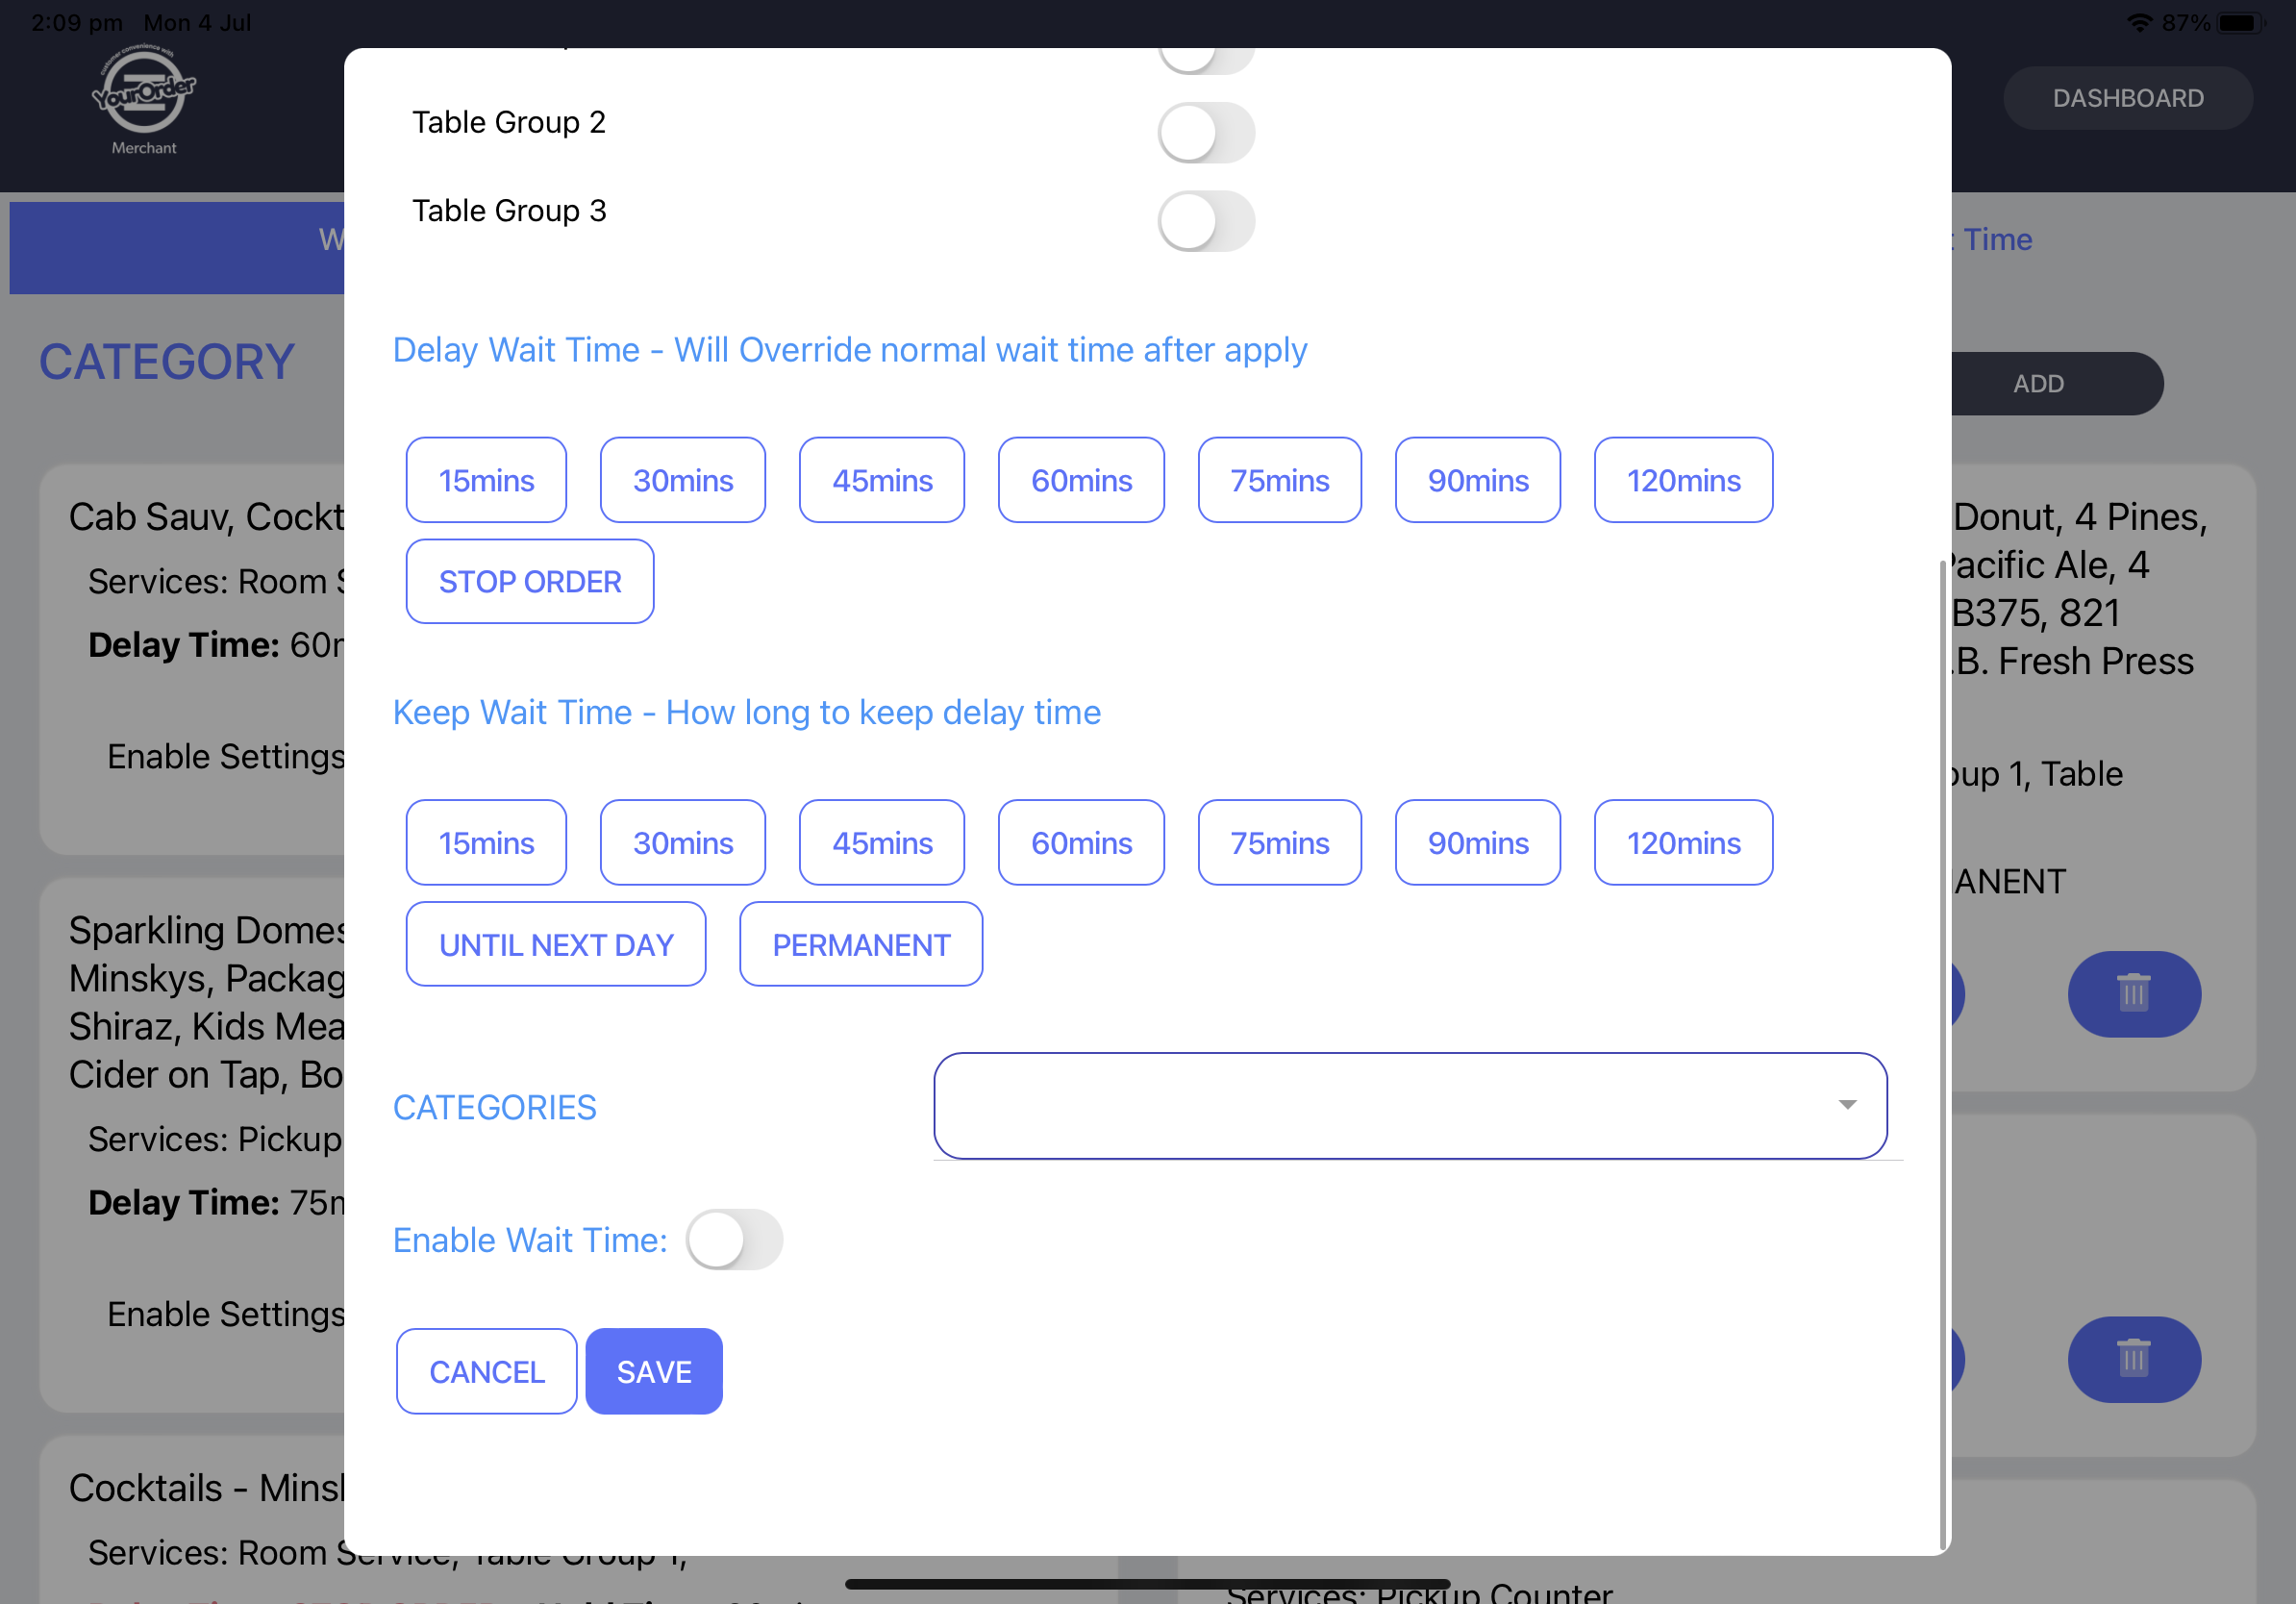
Add Wait Time Panel – bottom
In the “Add Wait Time” panel, there is a section either called products or categories, located near the bottom. When a user taps the field next to this label, a list will appear with selectable items. Use the search bar or swipe up and down to search for items. Tap a category/product and the radio button to the left will display a tick and change colour to blue. Multiple options can be added. Once selection is finalised press the OK button and tap Save.
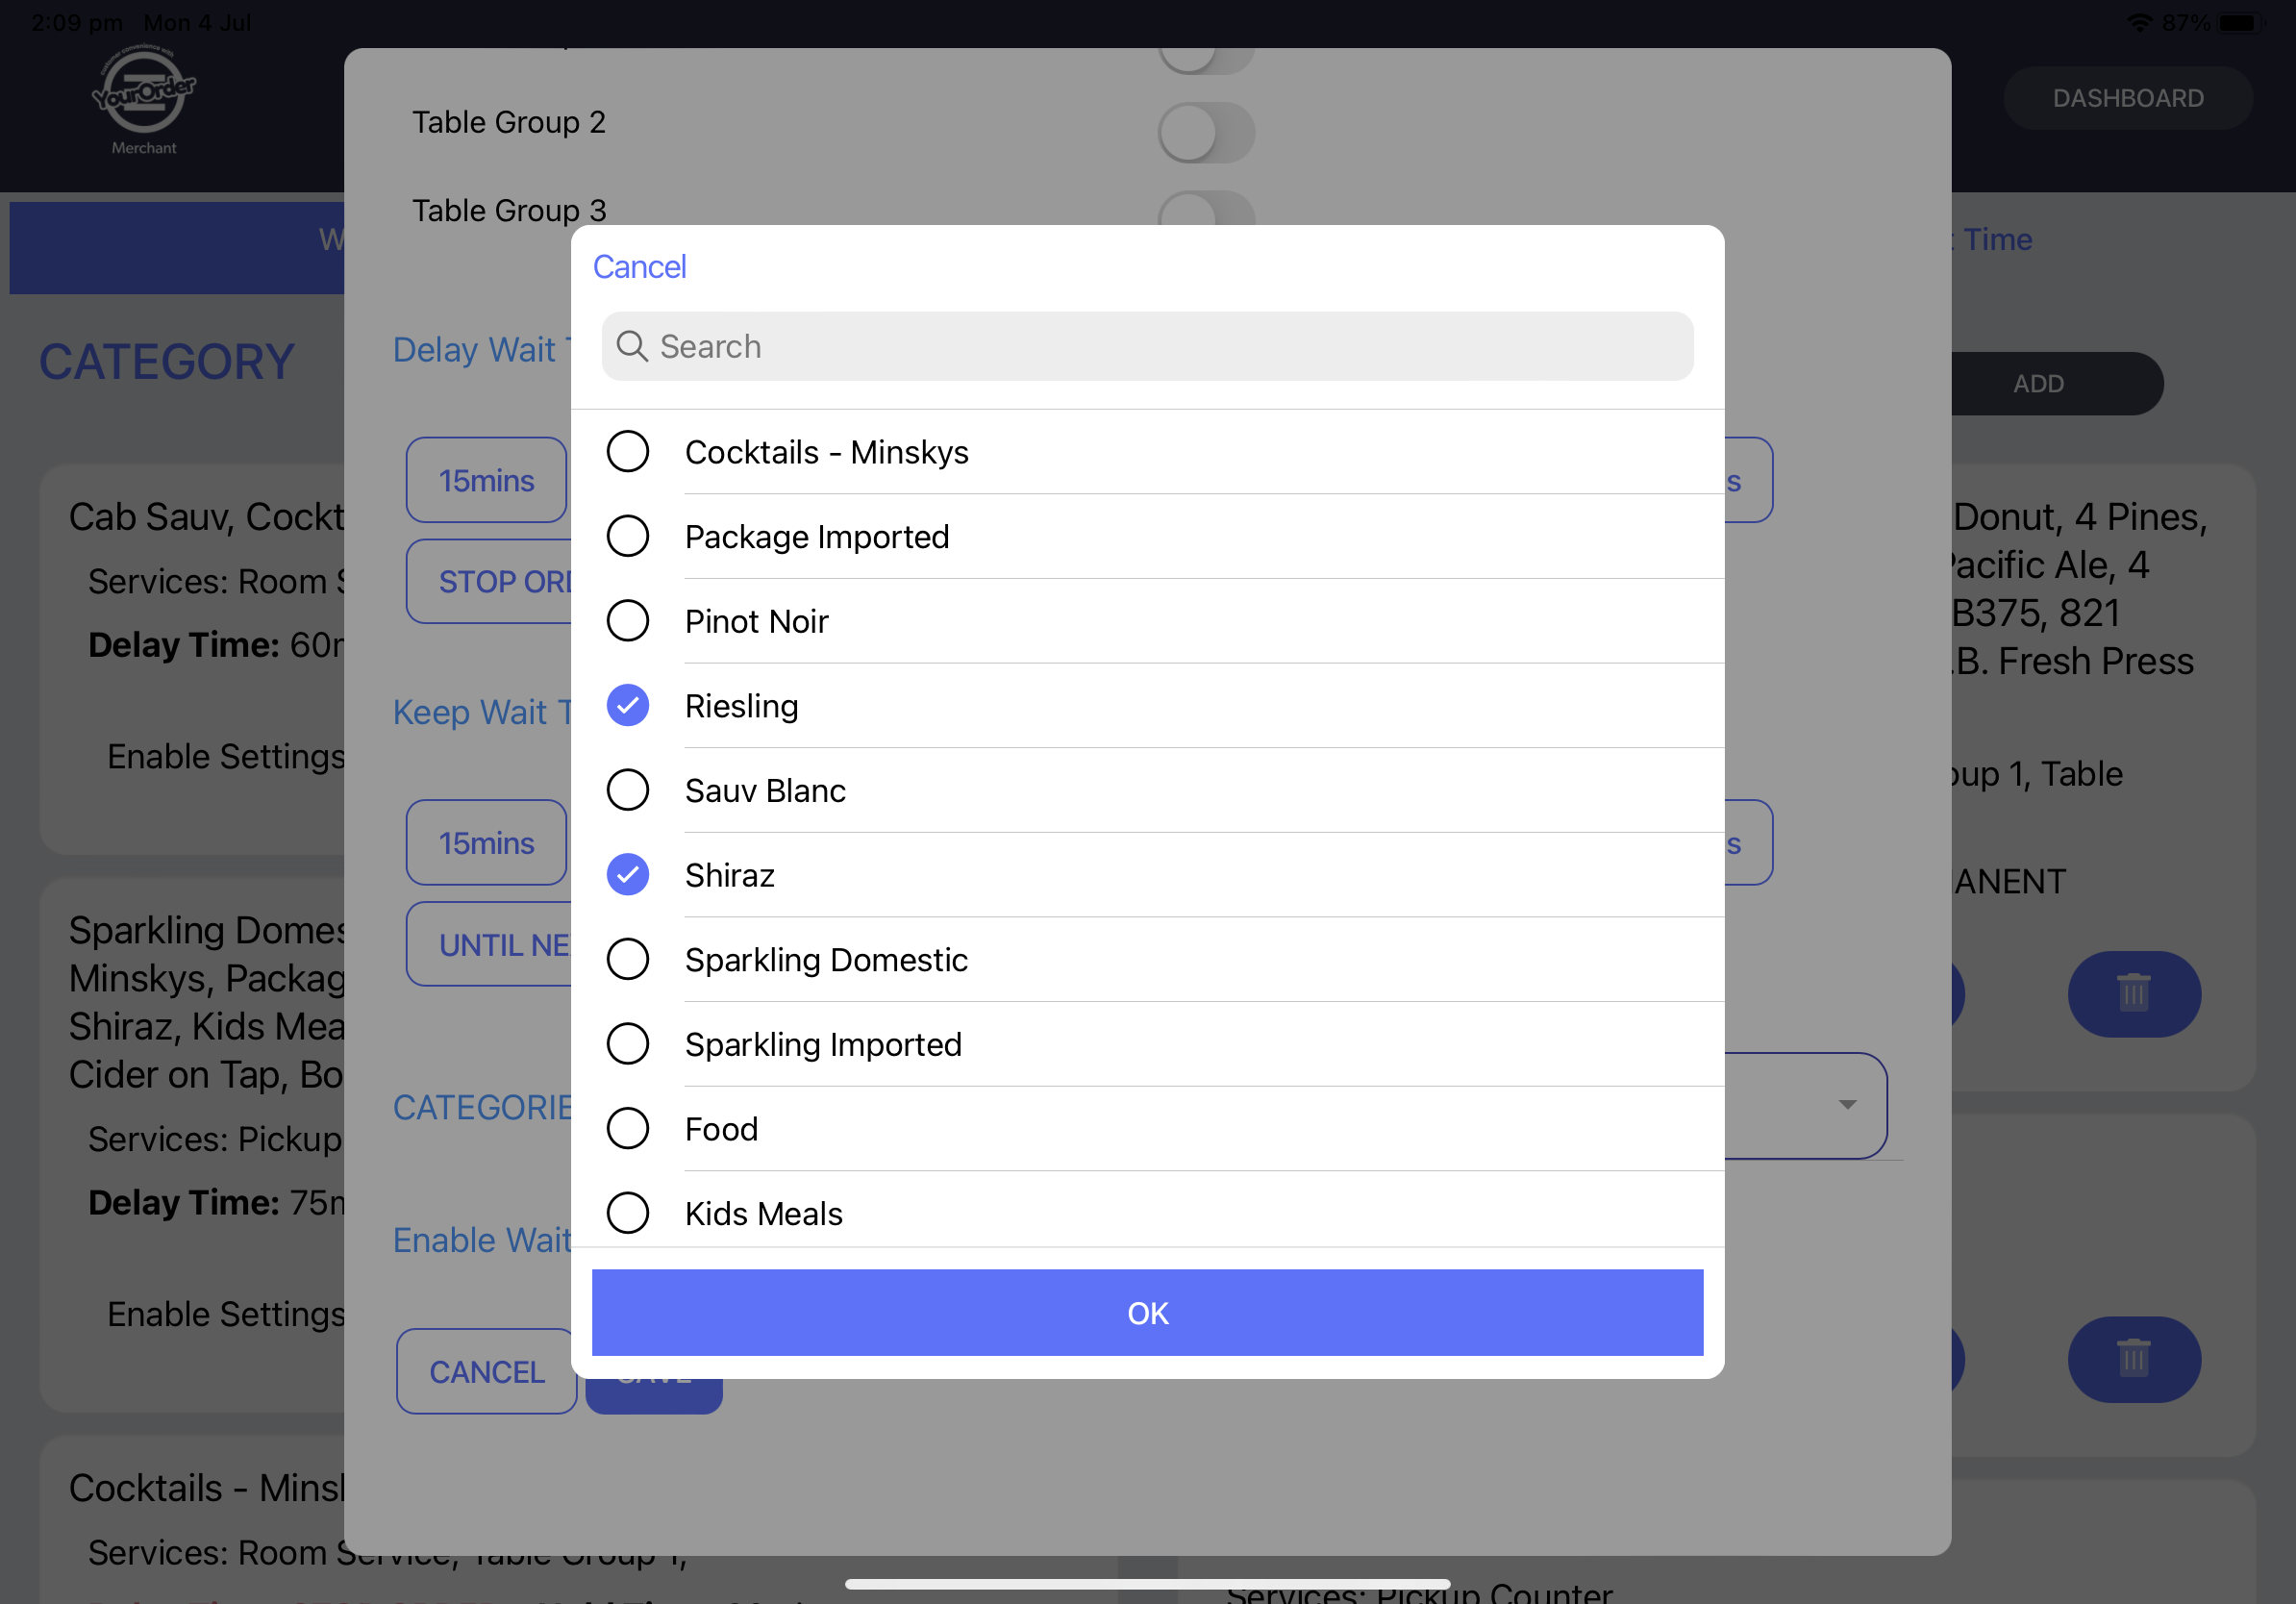
Product Selection List
In the enable estimate panel users can enable the estimated time feature for different services. Tap in the same row as an ordering type, if it turns blue then it is enabled and automatically saved.

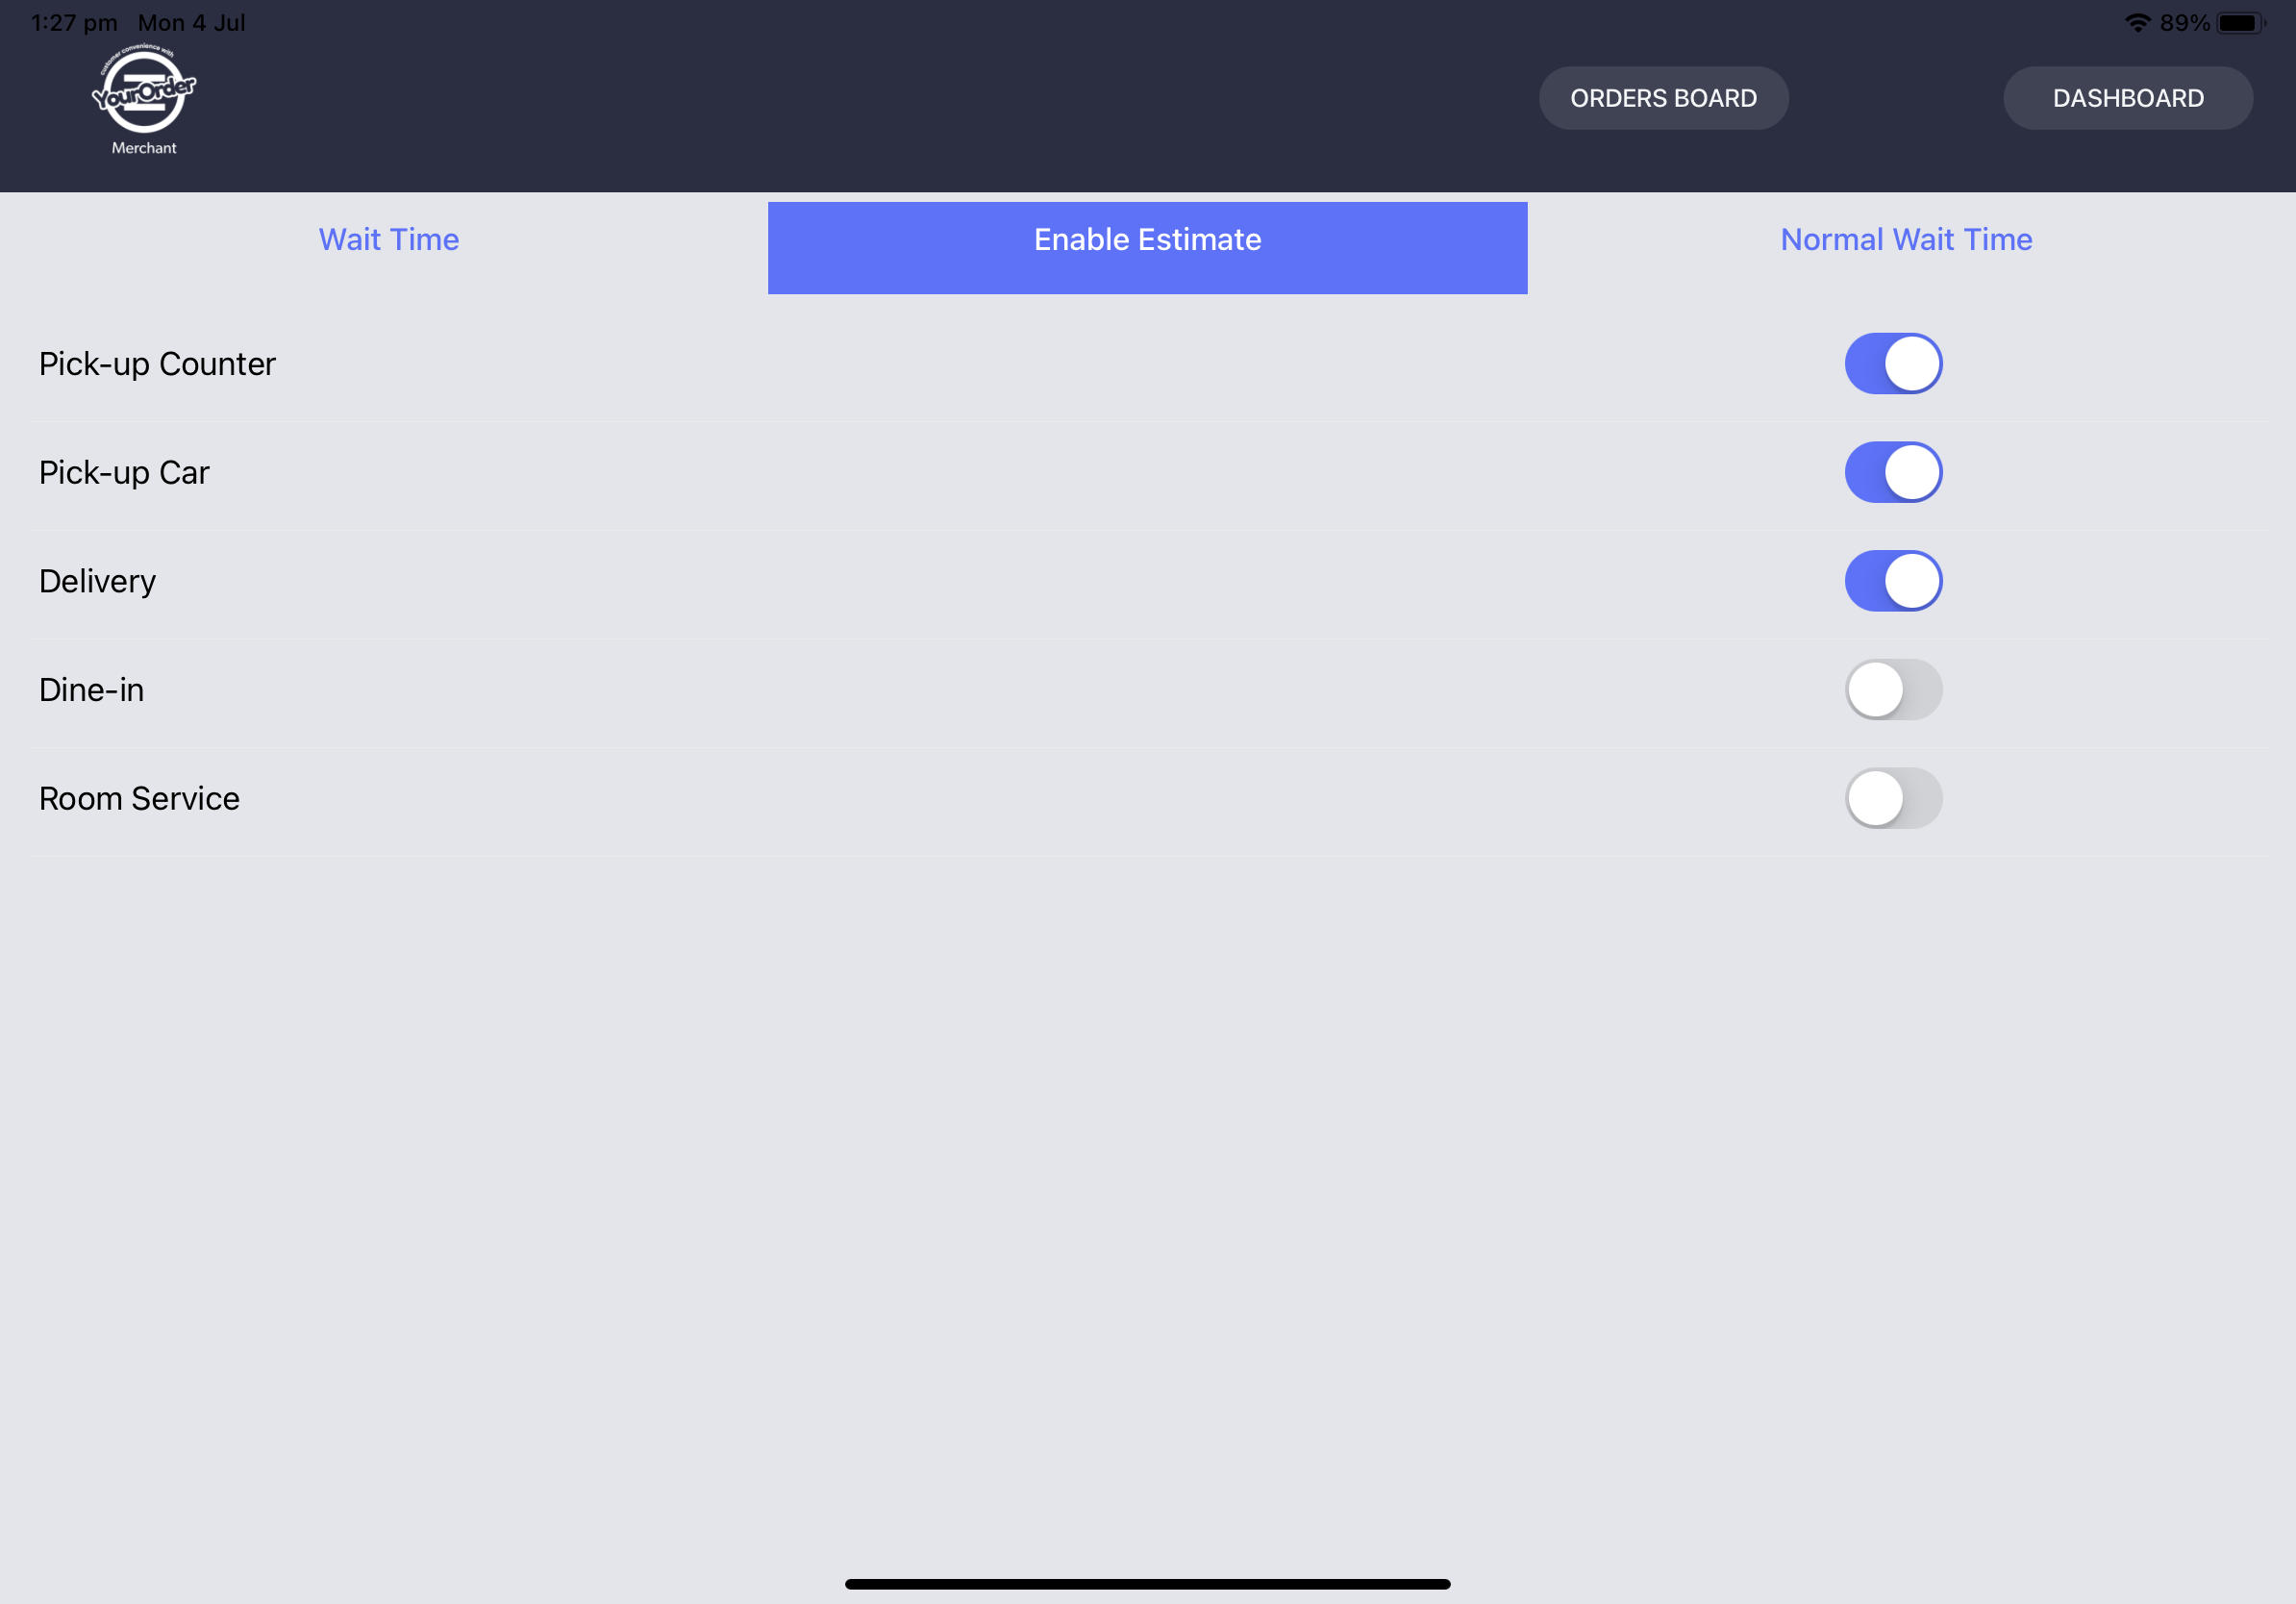
Enable Estimate Page
Clicking “Normal Wait Time” will move users to a new panel where the normal wait times for all services can be adjusted and display messages can be customised. Tap a field to the right of an ordering type and users can input a numerical value. If left empty then the field will use the default value of 1.
Tapping the field next to a Display message will let users input a new text. If any of these messages are left empty, they will use the default messages.
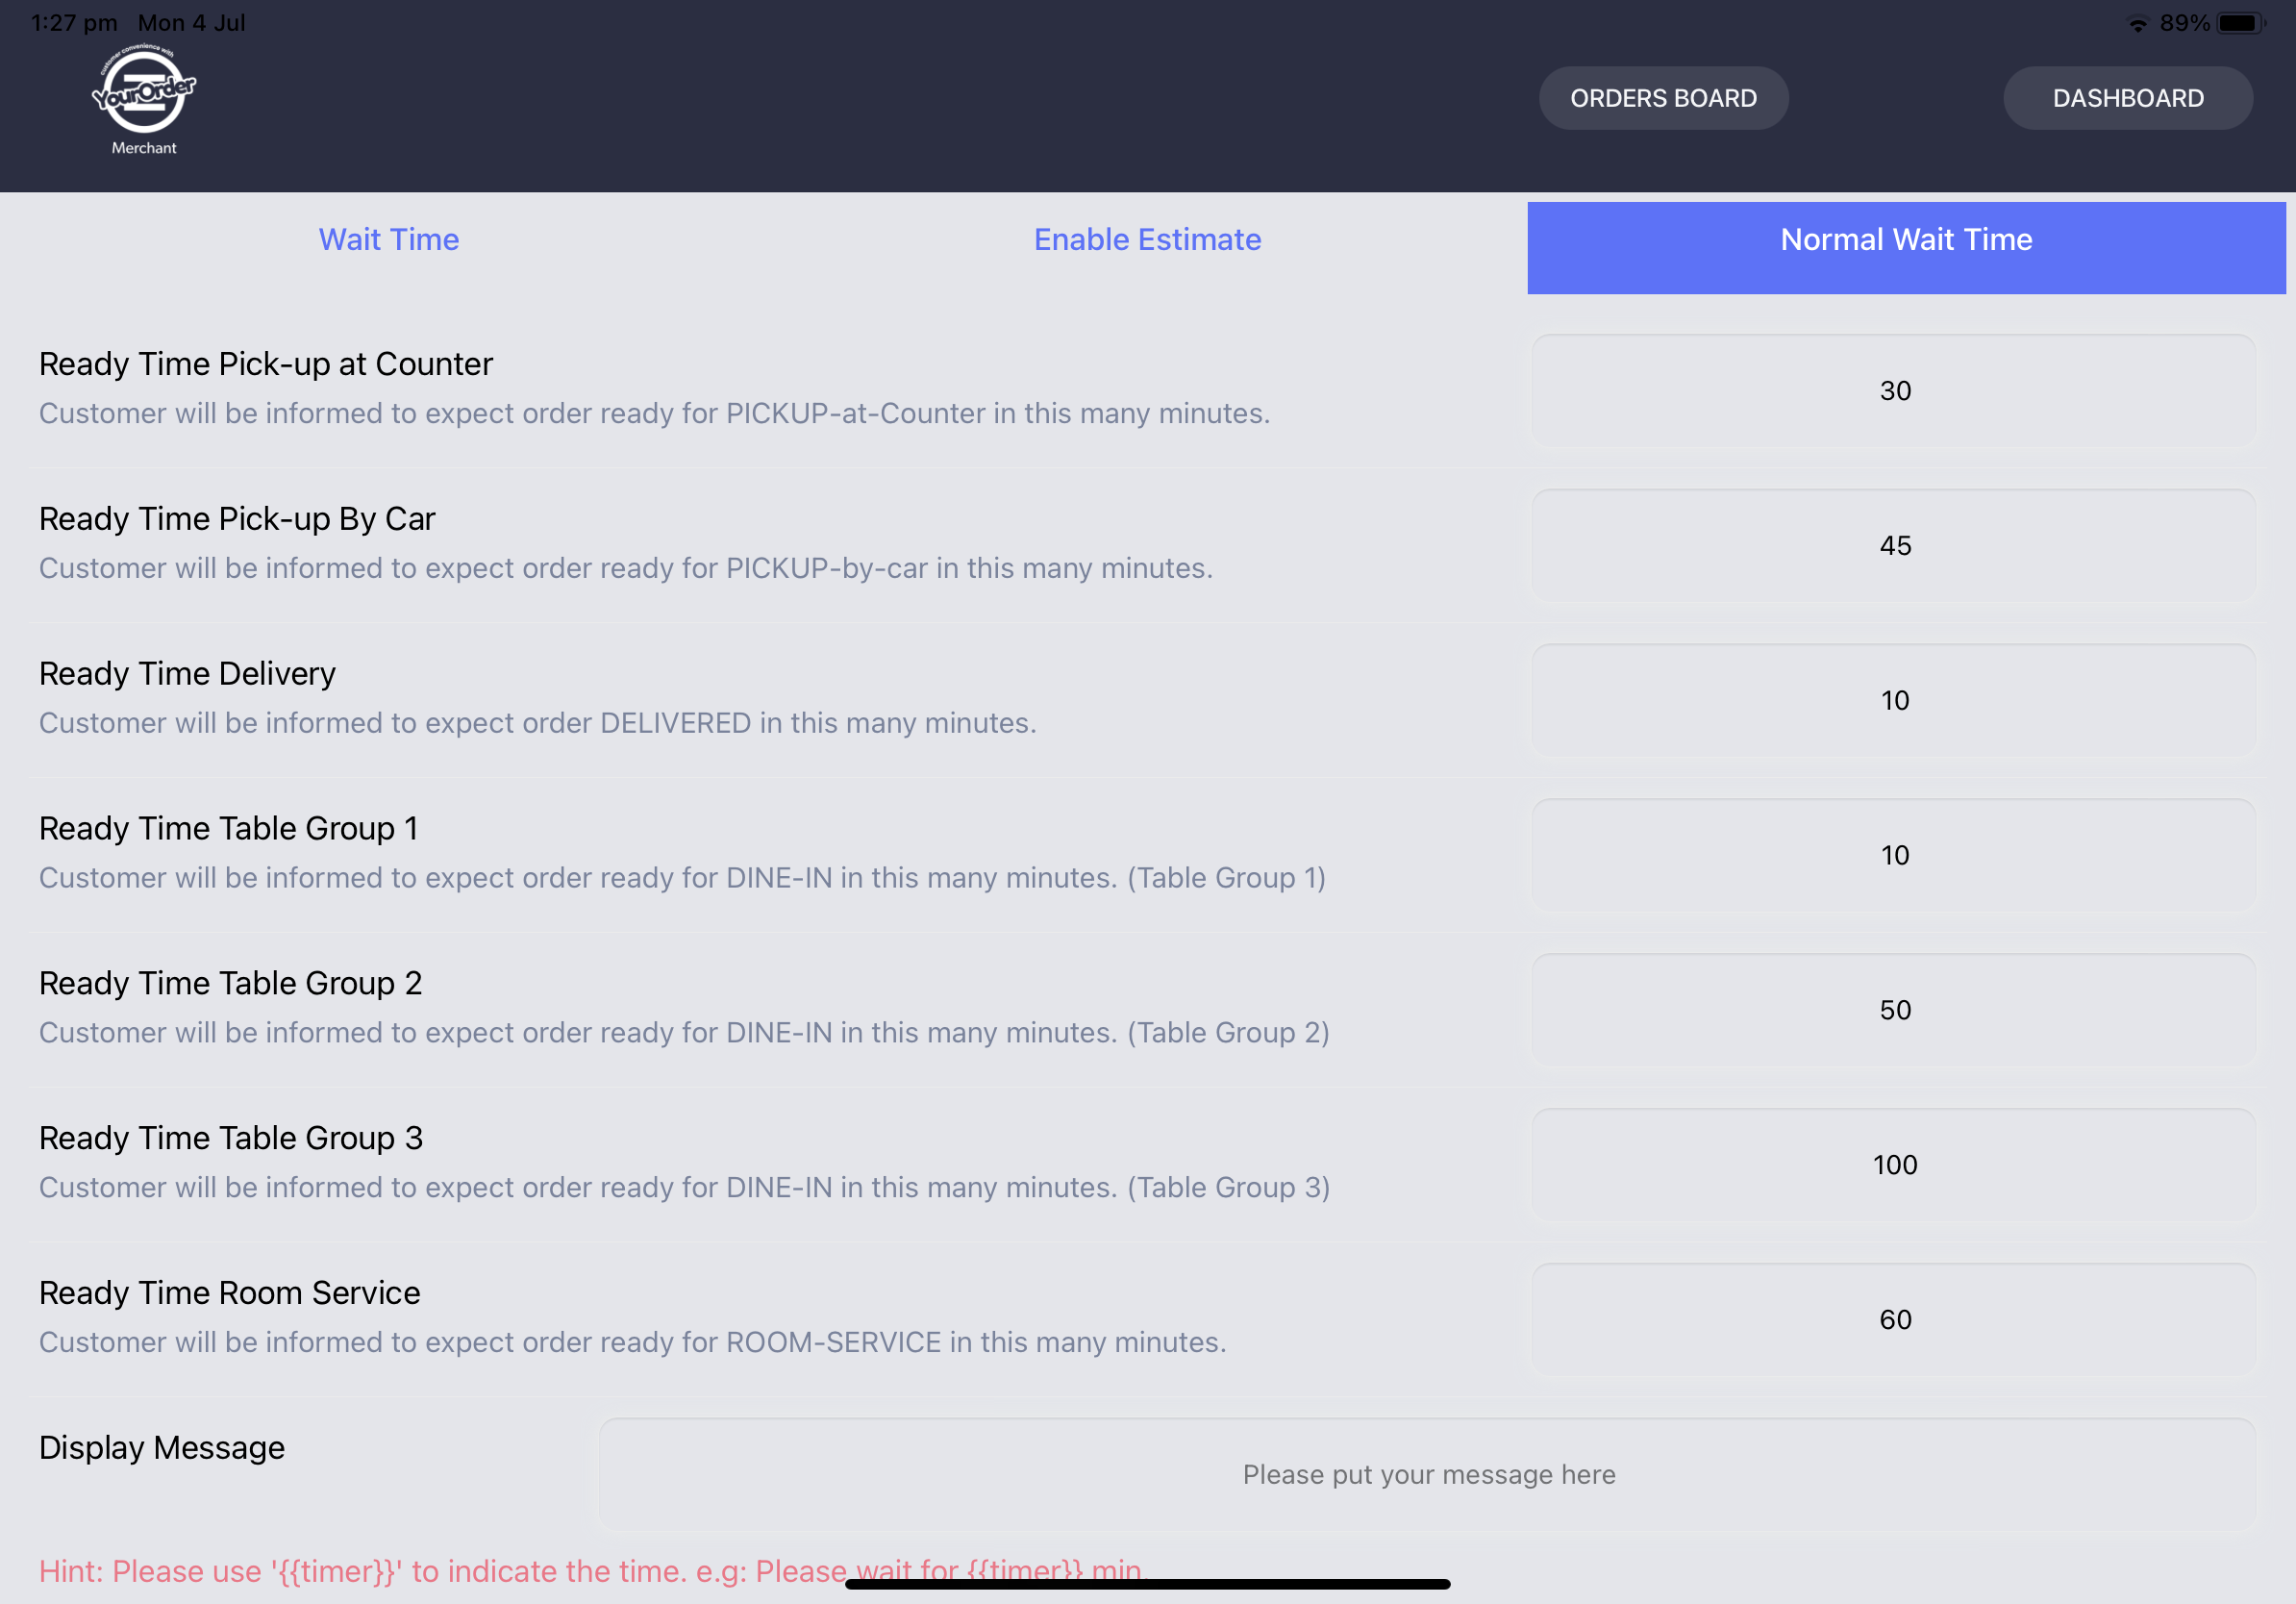
Normal Wait Time Screen - Top
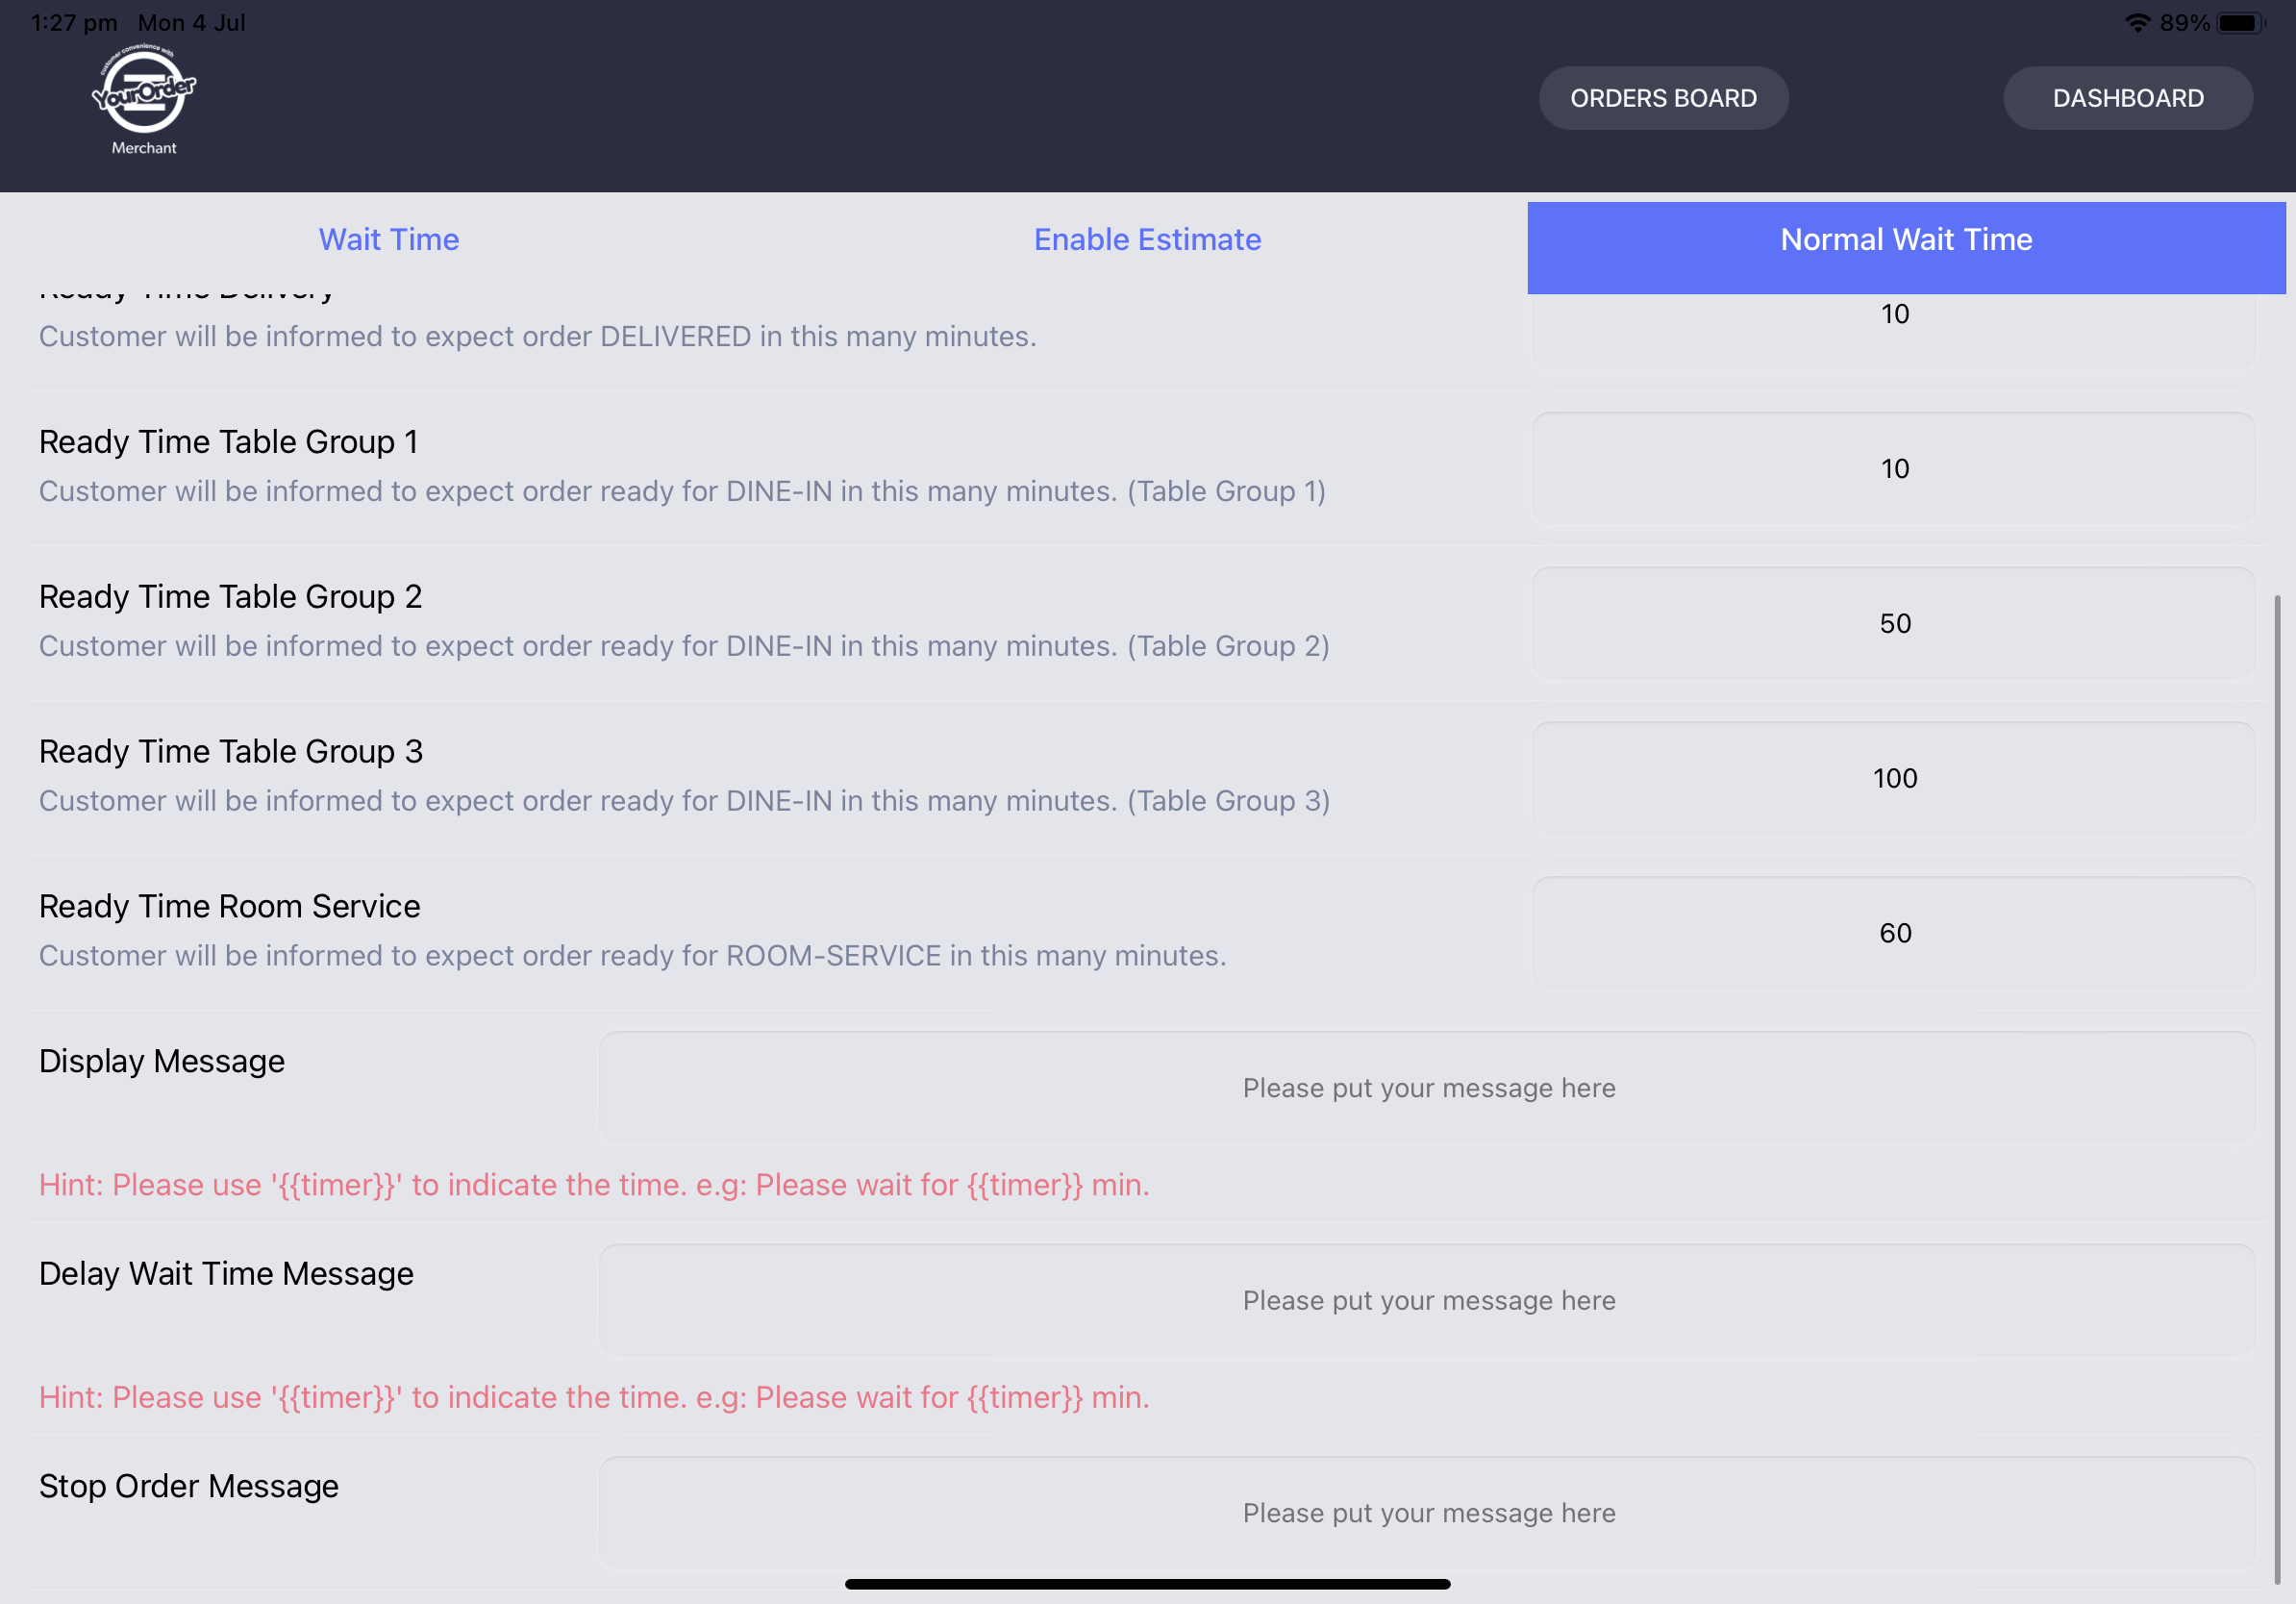
Normal Wait Time Screen - Bottom
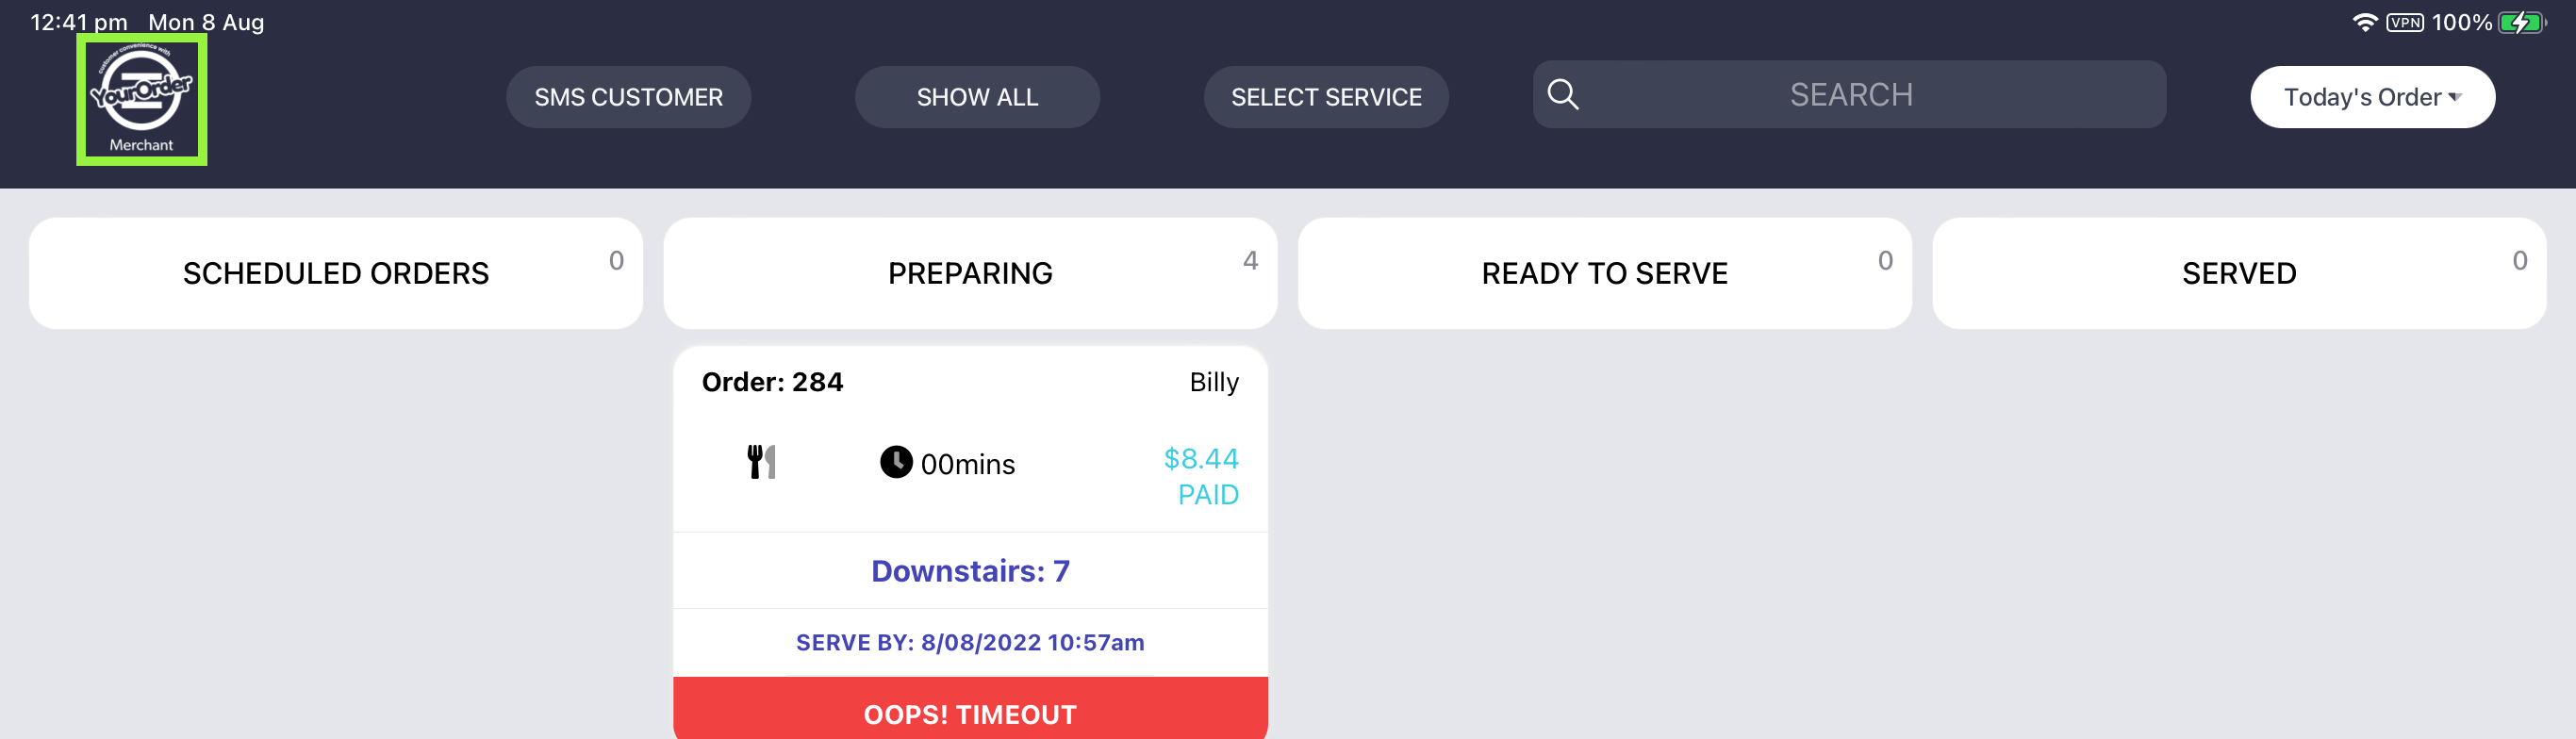
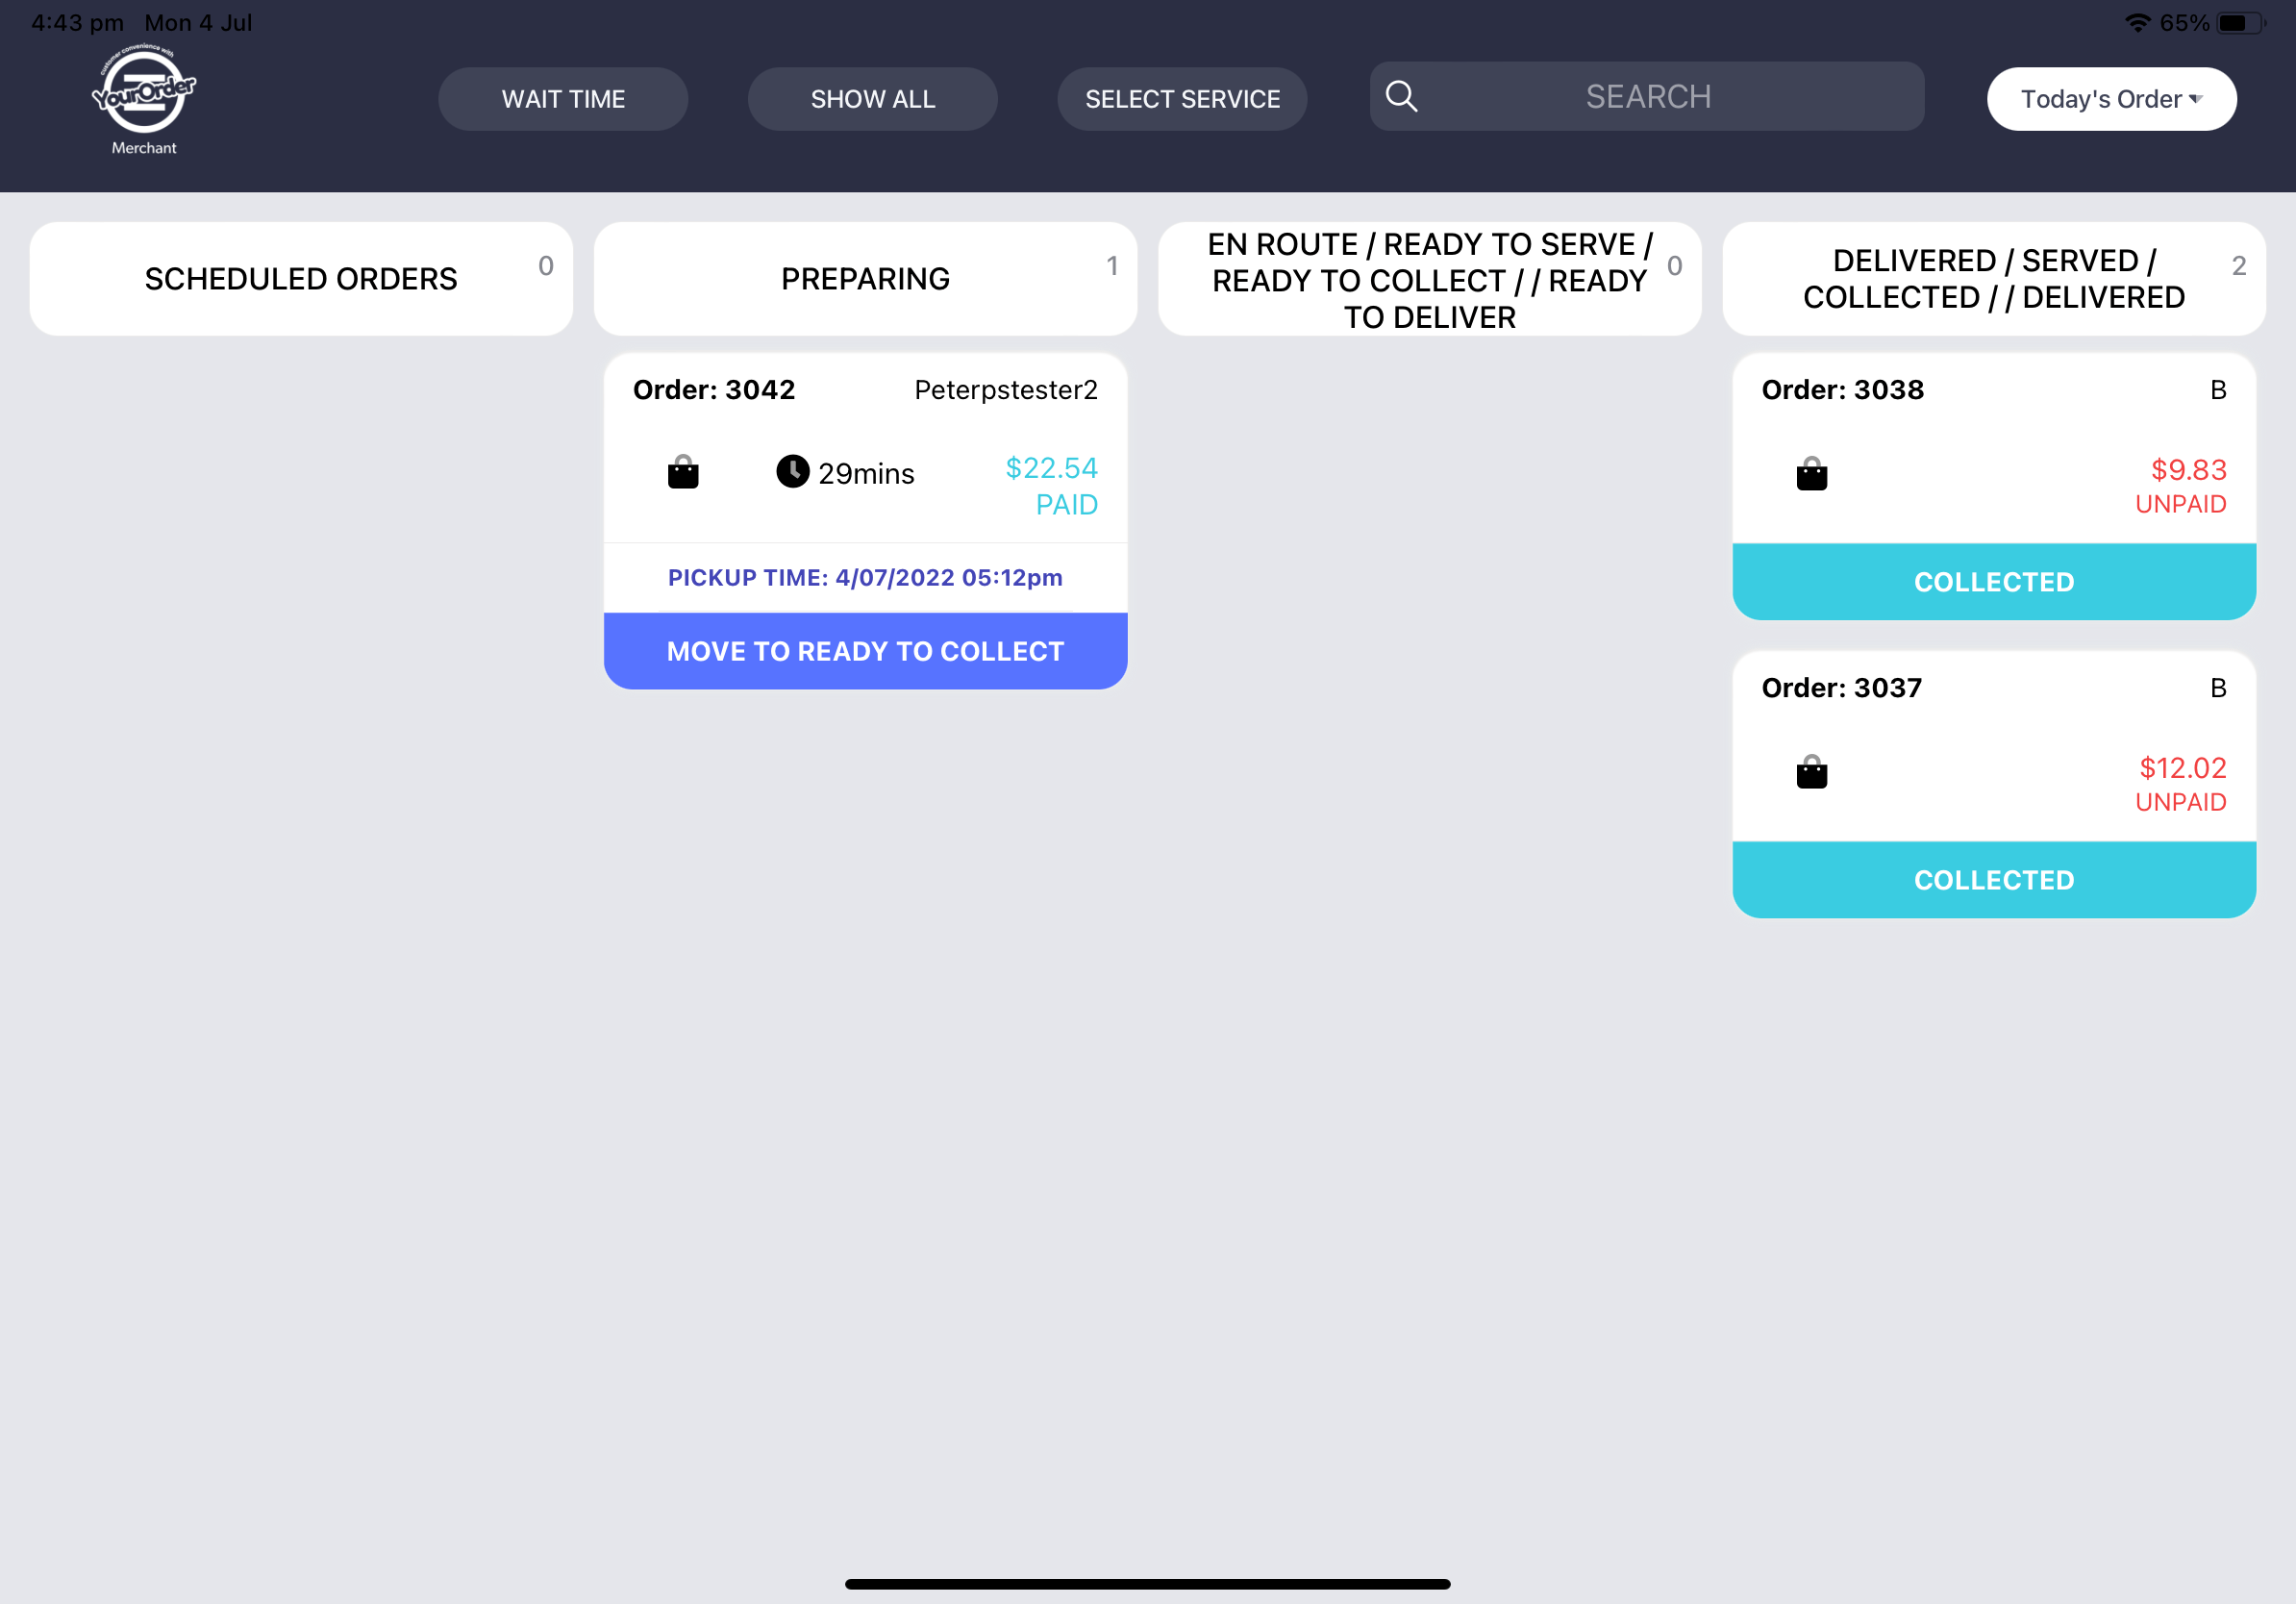
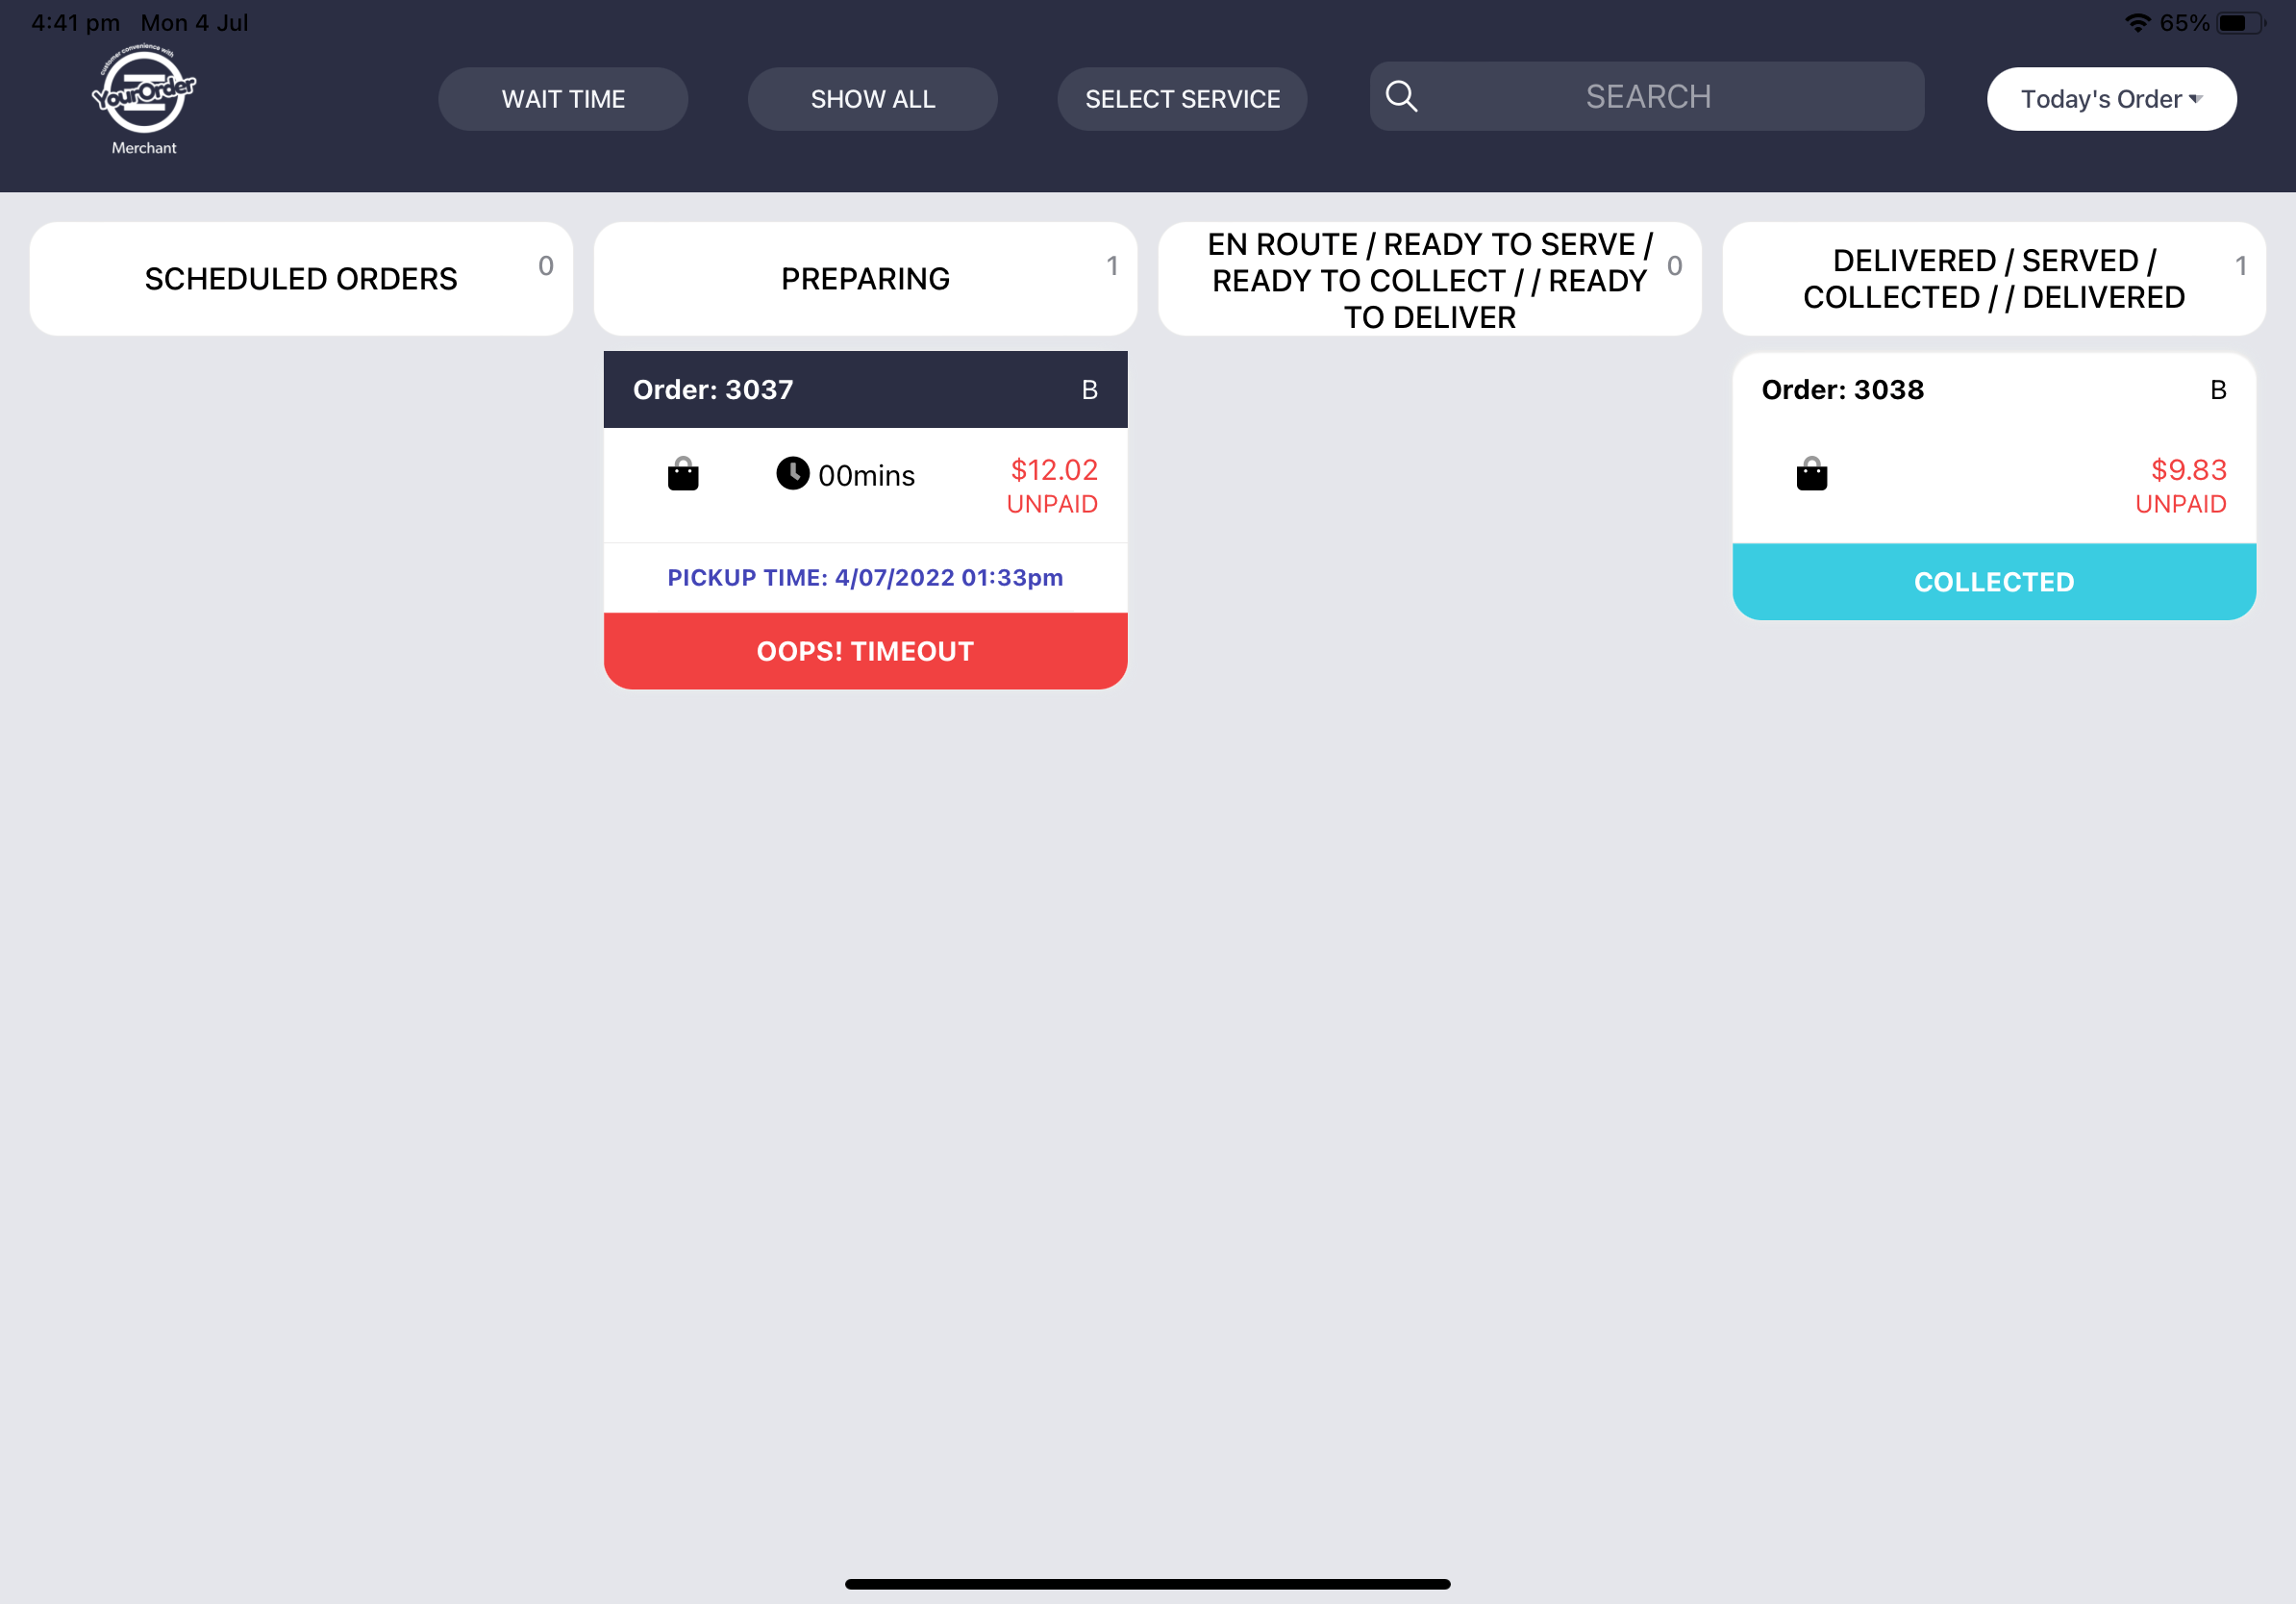
Tap “Orders Board” at the top and a new screen will appear. On this page, when a transaction is completed on the front end it will show up in the merchant app order board. The wait time will be displayed in the order panel next to the . If the timer runs out, it will display “OOPS! TIMEOUT” at the bottom of the order.

Order Board – Wait Time active
Order Board – Wait Time Finished
Note:
-
All changes to wait time will be reflected on the backpanel
Frontend
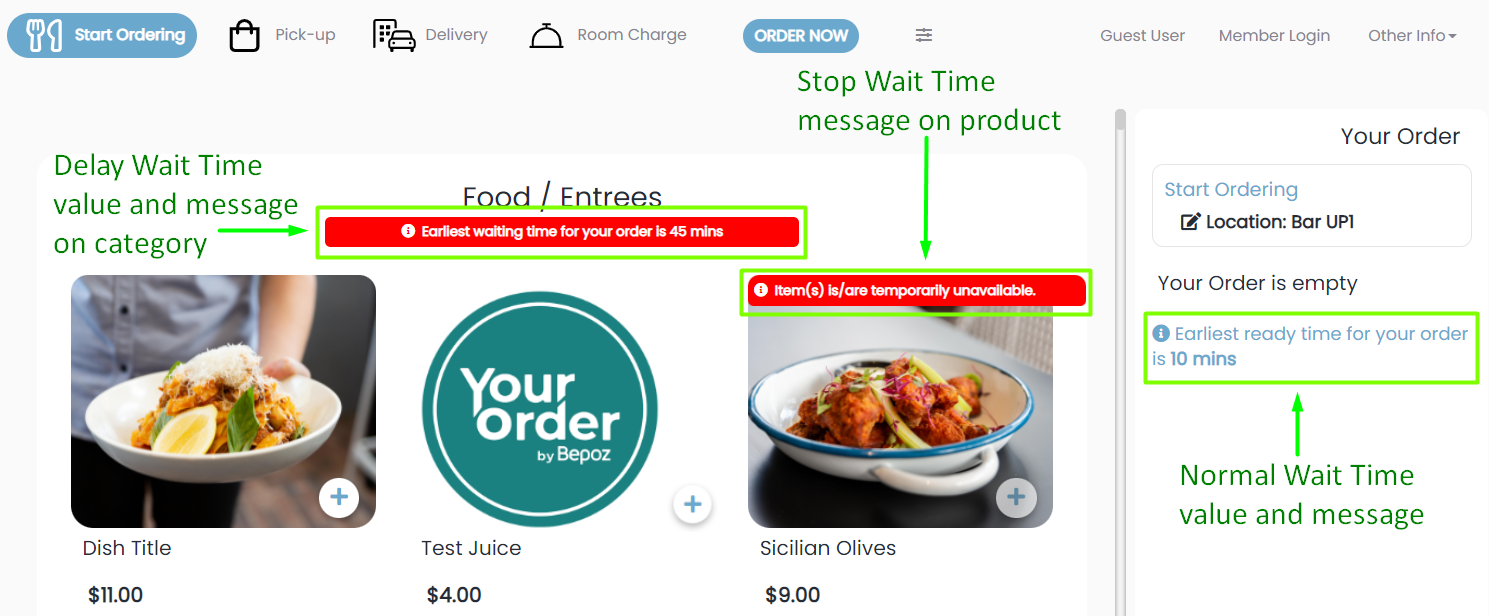
To view the wait times customers will need to access the menu screen by clicking an ordering type on the homepage. Customers may then see several types of wait times or none based on back panel setup.
Normal wait time and the specified value for the ordering type will appear in the cart area on the right side. Delay wait time message and values will be displayed underneath product/ category names based on configurations in the back panel. Stop wait time messages will appear in the same areas as Delay wait time but are only if STOP ORDER is a selected option.
Notes:
-
When a stop or delay wait time is set on a category and products in the category, then the category will display the wait time instead of the products.
-
Delay wait times will display the same on selected ordering types
-
When stop wait time is on a category and delay wait time is on a product in the category, the delay wait time message will not appear on the item
-
If delay wait time on a category is higher than a delay wait time on a product in the category then the message will not appear on the item
-
If both a category and a product in the category have a stop wait time, the message will only appear on the category