Overview
When a new YourOrder service has been sold and handed into the Onboarding Team from Sales, we need to undertake an initial survery with the customer to obtain all of the information required to Implement the service. Now is also a good opportunity to elicit interest in EzyGift integration, MyPlace loyalty app integration, and the Merchant app
Note that this is a technical survey, not a full Menu Briefing session, which will come later.
Outcomes
Initial contact with customer from the Onboarding Team made within 24 hours of handover from Sales
The following information has been obtained from the customer:
Venue, IT Contact and Web Developer Contact details
Public IP Address
Confirmation of Port Forwarding Setup by IT Contact, or router login details to enable Port Forwarding Setup
Preferred URL for YourOrder at the venue
Service Details and Table Grouping
Venue Branding
Stripe, Burst SMS account details
Policies
Onboarding Team must contact the clinet within 24 hours of deal handover from Sales
Venue must have a Static Public IP Address
Full Stripe details must be provided for payment
Reference Material
YourOrder Implementation Register

YourOrder - Customer Set Up Form_V3.8 - Master Template.pdf

Procedure
Step 1 - Handover Discussion
Call the Sales Rep to gain as much insight into the deal as possible. Update the YourOrder Implementation Register with any new information gathered.
NOTE: It is critical to double check that we have the correct contact details for the decision maker at the venue to fill out the Implementation Survey.
Step 2 - Welcome Phone Call
Call the decision maker to welcome them to Bepoz / YourOrder and introduce them to the onboarding process. Describe the kind of information required for Imnplementation and that they will shortly recieve an Implementation Survey. This is a good time to obtain the contact details of their venue contacts, or YourOrder Administrator, who we will work with later for Menu Briefing, Creation and Training.
Confirm here that the Implementation Survey will be e-mailed to them and their YourOrder Administrator, though we only need one filled copy returned. No further progress can be made until the survey is completed and returned.
For Multi-Instance customers, be sure to advise the customer that 1 Implementation Survey needs to be filled out per instance. While there is some common information regarding venue network details, information regarding each area of service will be unique
Step 3 - Implementation Survey
NOW:
Go to the YourOrder Onboarding Documents folder and get a copy of the Implementation Survey. Pre-fill the customer details and then e-mail it to the customer. Be sure to send it to the designated manager we should be working with, but copy the decision maker and the Sales Rep / Account Manager. This ensures all parties are aware of the information requirements and the project progress.
FUTURE:
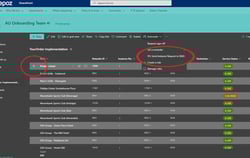
Select the correct row in the Implementaion Register, drop-down the "Automate" menu, and choose "Send Implementation Survey". This will send a survey that is pre-filled with venue information to the Venue Contact, with the decision maker copied.
You will also get a BCC e-mail this is important for the following step.
For Multi-Instance customers, 1 Implementation Survey needs to be sent per instance.
Step 4 - Complete Implementation Survey
If the customer does not complete the survey and return it within 3 days, it is important to follow up. It may be preferable to call the customer and interview them; then record the information yourself into a survery. This is where the BCC copy above becomes helpful. Simply download the attached Survey and fill it out.
When the customer returns a completed survey, or you have completed one for them, attach it to the Survey Ticket in the ConnectWise project. Add a note that the survery has been completed, and update ticket times, etc.
Also update the Contacts List in ConnectWise. By now, we should have Names, Titles, E-mails and Phone numbers for the following roles:
Decision Maker
YourOrder Admin (Venue Contact / POS Champion for training)
IT Admin or Supplier
Step 5 - Update the Implementation Register
Now transfer the information gathered from the customer into the YourOrder Implementation Register. Take care in filling out all of the required fields, as highlighted in Red (required for R&D to set up an instance) and in Purple (required for R&D to set up SSO / Merchant Apps)
Step 6 - Send to R&D and Request Instance Creation
When you have completed all required fields in the Implementation Register, select the instance you want to send to R&D and then choose "YO: Send Data to R&D" from the Automate drop-down menu.
NOTE: This only sends the data to R&D registers. It is NOT the trigger for them to create the instance
Next, assign the Instance Creation ticket in the Project in Connectwise to Saeed and notify YourOrder R&D Team via e-mail.